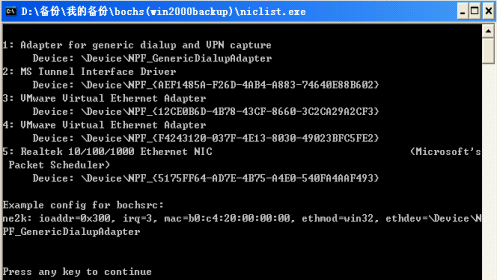
上面关于win2k.bxrc配置信息的内容中有一处需要设置网卡信息,这个就可以使用我上面提到的niclist.exe这个程序了,而使用这个程序需要安装WinPcap,本例使用WinPcap_4_0_2.exe;双击niclist.exe即可获得相关信息,本例使用本机的网卡信息,图上显示数条网卡信息因安装VMware缘故。如图:
4)创建运行bochs的批处理文件
创建运行bochs批处理文件"运行.bat",主要内容:
set BXSHARE=F:\bochs #此处为bochs调试器bochs.exe的路径
%BXSHARE%\bochsdbg.exe -q -f win2k.bxrc
rem %BXSHARE%\debug32.exe -q -f win2k.bxrc
#win2k.bxrc为上一步创建的win2k.bxrc配置信息文件
5)使用bochs开始调试:
到这一步就可以使用bochs进行调试了,双击"运行.bat"批处理文件即可打开bochs调试器,如果有a.img文件,bochs会以光盘启动方式启动操作系统;如果没有a.img文件,bochs会以硬盘形式启动操作系统,当然a.img的名称可以在win2k.bxrc配置信息文件中按照个人喜好随意修改。
二、使用bochs调试MBR
1)编写MBR程序:
本例中使用我之前写过的一个MBR小程序"基于MBR的系统登录密码验证程序"进行演示使用bochs调试MBR的方法,具体可参见http://bbs.pediy.com/showthread.php?t=121797,首先将汇编代码用NASM编译生成的bin文件拷贝到bochs文件夹下并更名为a.img,这样bochs就会以a.img作为光盘启动操作系统。
2)Bochs调试命令:
鉴于文章主题,这里只简单介绍一些最常用的bochs调试命令,作为入门这些就足够了,更多的可以参考bochs相关的说明文档。网上也有很多bochs调试命令的资料。下面只介绍本例中用到的若干命令;
命令 c 运行程序,相当于windbg的g以及OD的F9
命令 s 即step,单步执行程序
命令 p 单步执行,步过函数
命令 q 退出bochs并关闭虚拟机
命令 b 下断点命令,如本例中:b 0x7c00
命令blist 显示断点状态
命令 watch 显示当前所有读写断点
命令 r 显示寄存器的值
命令 u 反汇编代码,可设定起始和结束位置
命令 info 根据参数不同显示相关信息
3)开始调试MBR
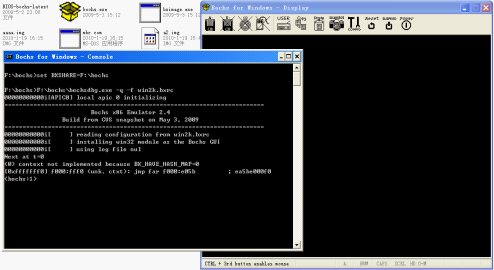
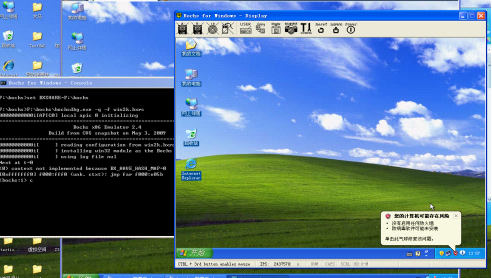
将第一步编写的MBR程序拷贝到bochs调试器文件夹下并更名为a.img,双击运行.bat开始调试,看到如下界面就说明一切工作正常,就可以开始调试了;
下面是具体的调试代码:
F:\bochs>set BXSHARE=F:\bochs
F:\bochs>F:\bochs\bochsdbg.exe -q -f win2k.bxrc
00000000000i[APIC0] local apic 0 initializing
==================================================================
Bochs x86 Emulator 2.4
Build from CVS snapshot on May 3, 2009
==================================================================
00000000000i[ ] reading configuration from win2k.bxrc
00000000000i[ ] installing win32 module as the Bochs GUI
00000000000i[ ] using log file nul
Next at t=0
(0) context not implemented because BX_HAVE_HASH_MAP=0
[0xfffffff0] f000:fff0 (unk. ctxt): jmp far f000:e05b ; ea5be000f0
<bochs:1> b 0x7c00 //此处MBR被加载到0x7c00处断点
<bochs:2> c //运行程序
(0) Breakpoint 1, 0x0000000000007c00 in ?? ()
Next at t=72597973
(0) [0x00007c00] 0000:7c00 (unk. ctxt): xor ebx, ebx ; 6631db
<bochs:3> s //单步执行
Next at t=72597974
(0) [0x00007c03] 0000:7c03 (unk. ctxt): mov ds, bx ; 8edb
<bochs:4> s
Next at t=72597975
(0) [0x00007c05] 0000:7c05 (unk. ctxt): mov ax, word ptr ds:0x413 ; a11304
<bochs:5> s
Next at t=72597976 //40:13,BIOS数据区保存常规的内存大小
(0) [0x00007c08] 0000:7c08 (unk. ctxt): and al, 0xfc ; 24fc
<bochs:6> s
Next at t=72597977
(0) [0x00007c0a] 0000:7c0a (unk. ctxt): sub ax, 0x0004 ; 2d0400
<bochs:7> s
Next at t=72597978 //开辟一段内存,实现程序的驻留
(0) [0x00007c0d] 0000:7c0d (unk. ctxt): mov word ptr ds:0x413, ax ; a31304
<bochs:8> s
Next at t=72597979
(0) [0x00007c10] 0000:7c10 (unk. ctxt): shl ax, 0x06 ; c1e006
<bochs:9> s
Next at t=72597980
(0) [0x00007c13] 0000:7c13 (unk. ctxt): mov es, ax ; 8ec0
<bochs:10> s
Next at t=72597981
(0) [0x00007c15] 0000:7c15 (unk. ctxt): mov si, 0x7c00 ; be007c
<bochs:11> s
Next at t=72597982
(0) [0x00007c18] 0000:7c18 (unk. ctxt): xor di, di ; 31ff
<bochs:12> s
Next at t=72597983 //拷贝512
(0) [0x00007c1a] 0000:7c1a (unk. ctxt): mov cx, 0x0100 ; b90001
<bochs:13> s
Next at t=72597984 //拷贝代码到驻留内存中执行
(0) [0x00007c1d] 0000:7c1d (unk. ctxt): rep movsw word ptr es:[di], word ptr ds:
[si] ; f3a5
<bochs:14> p //单步步过
Next at t=72598240
(0) [0x00007c1f] 0000:7c1f (unk. ctxt): mov ax, 0x0201 ; b80102
<bochs:15> s
Next at t=72598241
(0) [0x00007c22] 0000:7c22 (unk. ctxt): mov cl, 0x02 ; b102
<bochs:16> s
Next at t=72598242
(0) [0x00007c24] 0000:7c24 (unk. ctxt): cdq ; 6699
<bochs:17> s
Next at t=72598243
(0) [0x00007c26] 0000:7c26 (unk. ctxt): push es ; 06
<bochs:18> s
Next at t=72598244
(0) [0x00007c27] 0000:7c27 (unk. ctxt): push 0x002b ; 682b00
<bochs:19> s
Next at t=72598245
(0) [0x00007c2a] 0000:7c2a (unk. ctxt): retf ; cb
<bochs:20> p //单步步过
Next at t=72598246
(0) [0x0009e02b] 9e00:002b (unk. ctxt): mov si, 0x00db ; bedb00
<bochs:21> s
Next at t=72598247
(0) [0x0009e02e] 9e00:002e (unk. ctxt): call .+0x0070 (0x0009e0a1) ; e87000
<bochs:22> p //单步步过显示信息的函数
Next at t=72607917
(0) [0x0009e031] 9e00:0031 (unk. ctxt): mov si, 0x00ea ; beea00
<bochs:23> s
Next at t=72607918
(0) [0x0009e034] 9e00:0034 (unk. ctxt): call .+0x006a (0x0009e0a1) ; e86a00
<bochs:24> p //单步步过显示信息的函数
Next at t=72619688
(0) [0x0009e037] 9e00:0037 (unk. ctxt): call .+0x0077 (0x0009e0b1) ; e87700
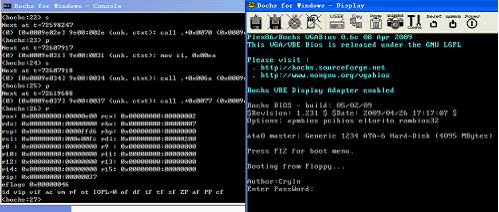
<bochs:25> //此时系统要求输入密码
程序执行到这里,系统要求用户输入密码,如图所示虚拟机界面:
在虚拟机里面输入自己在MBR程序里面设置的密码就可以接着在bochs里面一步一步继续往下面调试了!从MBR被载入并执行开始到NTLDR被载入并执行一直到操作系统开启的整个过程都可以一步步跟踪调试。系统启动后bochs就想别的虚拟机一样进入一个虚拟的操作系统中了,如图:
最后,如果自己动手开发操作系统,那么使用bochs调试是必不可缺少的。网上有很多几十行的一个hello world的最小的操作系统的代码,现在就可以来调试看看,也可以通过慢慢调试自己亲自动手写一个操作系统!
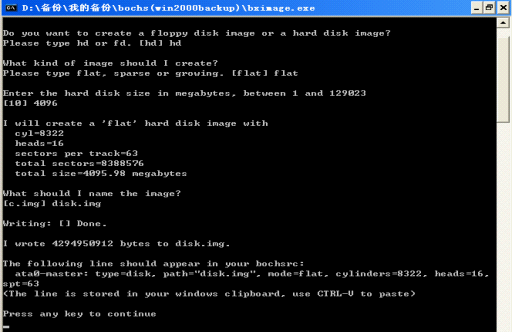
the next context is referenced from internet , I am sorry for failing to regain the original author 's name . following the paper I succeeded to installing my debug enviroment. to copy it here maybe useful or someone .
Do you want to create a floppy disk image or a hard disk image?
Please type hd or fd. [hd] hd
What kind of image should I create?
Please type flat, sparse or growing. [flat] flat
Enter the hard disk size in megabytes, between 1 and 129023
[10] 5000
I will create a 'flat' hard disk image with
cyl=10158
heads=16
sectors per track=63
total sectors=10239264
total size=4999.64 megabytes
What should I name the image?
[c.img] winxp.img
Writing: [] Done.
I wrote 5242503168 bytes to winxp.img.
The following line should appear in your bochsrc:
ata0-master: type=disk, path="winxp.img", mode=flat, cylinders=10158, heads=16
, spt=63
(The line is stored in your windows clipboard, use CTRL-V to paste)
# choose the boot disk.
boot: cdrom,disk
#此处像我这样修改
#后面不动
# default config interface is textconfig.
#config_interface: textconfig
#config_interface: wx
#display_library: x
# other choices: win32 sdl wx carbon amigaos beos macintosh nogui rfb term svga
# where do we send log messages?
log: bochsout.txt
# disable the mouse, since DLX is text only
mouse: enabled=0
# enable key mapping, using US layout as default.
#
# NOTE: In Bochs 1.4, keyboard mapping is only 100% implemented on X windows.
# However, the key mapping tables are used in the paste function, so
# in the DLX Linux example I'm enabling keyboard_mapping so that paste
# will work. Cut&Paste is currently implemented on win32 and X windows only.