-
-
[分享]安卓逆向课题之4, Activity,service,content provider,broadcast receiver和实例演示,完毕
-
发表于: 2023-11-4 17:46 4158
-
[分享]安卓逆向课题之4, Activity,service,content provider,broadcast receiver和实例演示,完毕

入门学习逆向的个人笔记,预览(欢迎探讨)
[原创] 肉丝的r0env2022(kali linux)配置xrdp远程桌面,以及Genymotion安卓11的ssh登陆问题和11系统amr64转译问题.
[分享] (Android) 逆向入门记录 一篇杂文, 记录.
[分享] Adndroid逆向的基础环境准备 的一些记录 , 抄袭royuse的课 第3课
[分享] 安卓逆向课题之4, Activity,service,content provider,broadcast receiver和实例演示,完毕
[分享] 安卓逆向课题之5, mobile spider get started. 两天高度集中学习, 承上启下的流程,a明白,b上手练.(5th完结)
[分享] 安卓逆向课题之6, mobile spider get started. Object的自动化动态分析和快速定位(笔记完毕)
[分享] 安卓逆向课题之7, mobile spider get started. 看电视直播App(未加固)去广告升级 (笔记待完善)
[分享] 安卓逆向课题之8, 真实App实操带壳App重打包去强制升级(部分抄袭别人笔记)(一次不完美的实践)
[讨论] Android Reverse Project No.9, "Types of App Security Protection, Identification and Handling Methods"
[原创] Android Reverse Project No.9, "Types of App Protection“ ---- Video Course
四大组件
as开发
第一个简单app
静态分析
动态分析
Basic Activity --》
最小兼容系统
apk mirror, Minimum version,
1 2 3 4 | ┌──(root㉿r0env)-[~]└─# ps aux | grep -i studioroot 574317 0.0 0.0 2580 1552 ? S Nov03 0:00 /bin/sh /root/Documents/android-studio/bin/studio.shroot 574371 6.8 43.7 8073752 3549156 ? Sl Nov03 79:19 /root/Documents/android-studio/jre/bin/java -classpath /root/Documents/android-studio/lib/bootstrap.jar:/root/Documents/android-studio/lib/util.jar:/root/Documents/android-studio/lib/jna.jar:/root/Documents/android-studio/jre/lib/tools.jar -XX:ReservedCodeCacheSize=512m -Xms256m -Xmx1280m -XX:+UseG1GC -XX:SoftRefLRUPolicyMSPerMB=50 -XX:CICompilerCount=2 -XX:+HeapDumpOnOutOfMemoryError -XX:-OmitStackTraceInFastThrow -ea -Dsun.io.useCanonCaches=false -Djdk.http.auth.tunneling.disabledSchemes="" -Djdk.attach.allowAttachSelf=true -Djdk.module.illegalAccess.silent=true -Dkotlinx.coroutines.debug=off -Djna.nosys=true -Djna.boot.library.path= -Didea.vendor.name=Google -Dsun.tools.attach.tmp.only=true -XX:ErrorFile=/root/java_error_in_studio_%p.log -XX:HeapDumpPath=/root/java_error_in_studio_.hprof -Didea.vendor.name=Google -Didea.paths.selector=AndroidStudio2021.2 -Djb.vmOptionsFile=/root/Documents/android-studio/bin/studio64.vmoptions -Djava.system.class.loader=com.intellij.util.lang.PathClassLoader -Didea.vendor.name=Google -Didea.paths.selector=AndroidStudio2021.2 -Didea.platform.prefix=AndroidStudio -Didea.jre.check=true -Dsplash=true com.intellij.idea.Main |
android studio 使用了自带的java
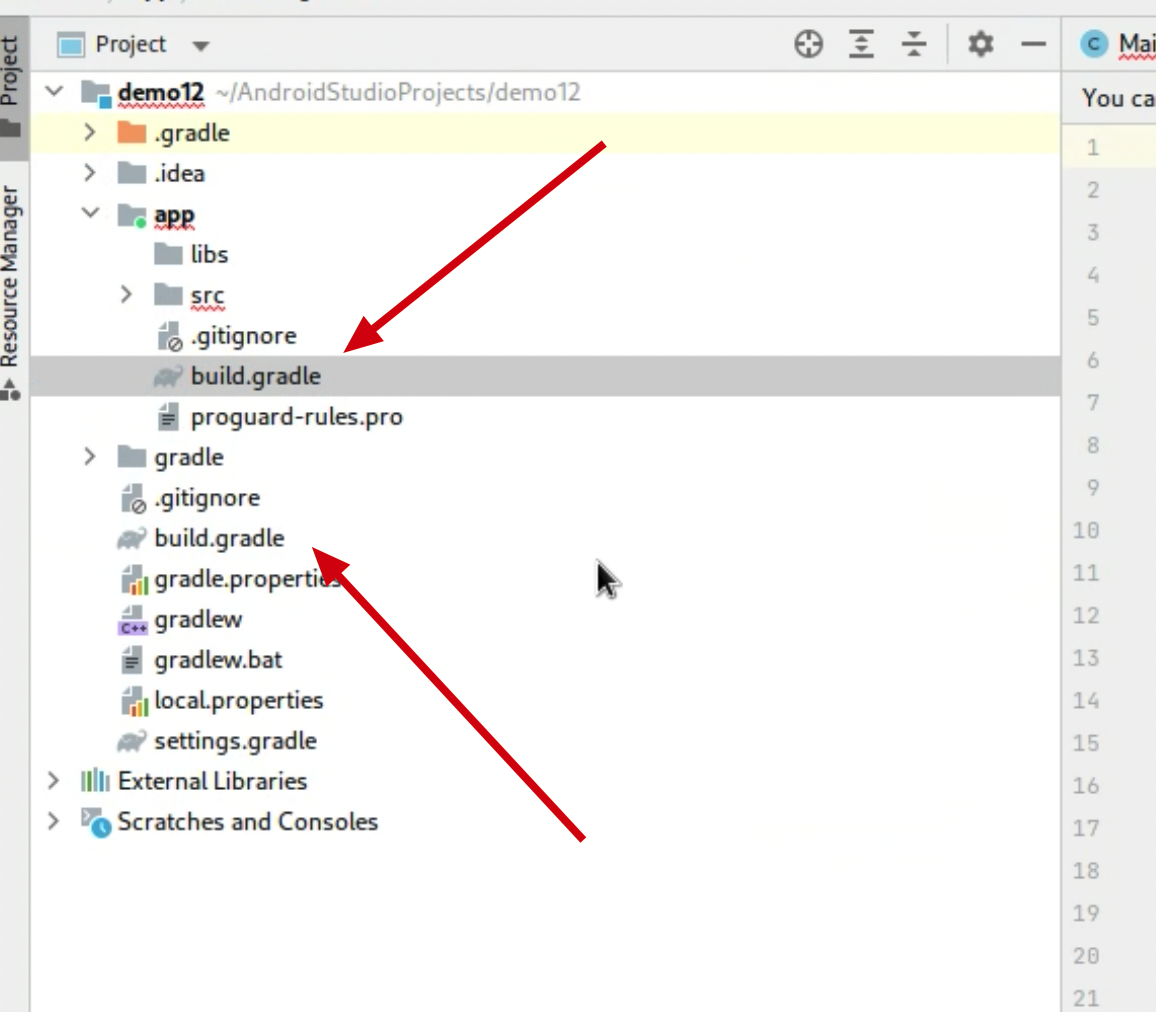
Android Studio中不同目录(文件)的位置和用途。主要这么三块
- 编译系统(Gradle)
- 配置文件
- 应用模块
Gradle是Google推荐使用的一套基于Groovy的编译系统脚本
Android中使用Gradle Wrapper对Gradle进行了一层包装
gradlew相关的文件就是和Gradle Wrapper有关
外部文件的介绍
| name | 用途 |
|---|---|
| .gradle | Gradle编译系统,版本由wrapper指定 |
| .idea Android Studio | IDE所需要的文件 |
| build | 代码编译后生成的文件存放的位置 |
| gradle | wrapper的jar和配置文件所在的位置 |
| .gitignore | git使用的ignore文件 |
| build.gradle | gradle编译的相关配置文件(相当于Makefile) |
| gradle.properties | gradle相关的全局属性设置 |
| gradlew | *nix下的gradle wrapper可执行文件 |
| graldew.bat | windows下的gradle wrapper可执行文件 |
| local.properties | 本地属性设置(key设置,android sdk位置等属性),这个文件是不推荐上传到VCS中去的 |
| settings.gradle | 和设置相关的gradle脚本 |
app模块里的文件
| name | 用途 |
|---|---|
| .gradle | Gradle编译系统,版本由wrapper指定 |
| build | 编译后的文件存在的位置(包括最终生成的apk也在这里面) |
| libs | 依赖的库所在的位置(jar和aar) |
| src | 源代码所在的目录 |
| src/main | 主要代码所在位置(src/androidTest)就是测试代码所在位置了 |
| src/main/assets | android中附带的一些文件 |
| src/main/java | 最最重要的,我们的java代码所在的位置 |
| src/main/jniLibs | jni的一些动态库所在的默认位置(.so文件) |
| src/main/res | android资源文件所在位置 |
| src/main/AndroidManifest.xml | AndroidManifest不用介绍了吧~ |
| build.gradle | 和这个项目有关的gradle配置,相当于这个项目的Makefile,一些项目的依赖就写在这里面 |
| proguard.pro | 代码混淆配置文件 |

build.gradl--- gradle编译的相关配置文件(相当于Makefile)
plugins {
    id 'com.android.application' // 使用 Android Gradle 插件,指明这是一个 Android 应用项目
}

android {
    compileSdk 32 // 指定编译使用的 Android SDK 版本

    defaultConfig {
        applicationId "com.example.demo12" // 应用程序包名
        minSdk 16 // 最低支持的 Android 版本
        targetSdk 32 // 应用程序编译和运行的目标 Android 版本
        versionCode 1 // 版本号代码
        versionName "1.0" // 版本名称

        testInstrumentationRunner "androidx.test.runner.AndroidJUnitRunner" // 用于运行 Android 单元测试的测试运行器
    }

    buildTypes {
        release { // 发布版本的构建配置
            minifyEnabled false // 禁用代码缩小
            proguardFiles getDefaultProguardFile('proguard-android-optimize.txt'), 'proguard-rules.pro' // 指定混淆规则文件
        }
    }

    compileOptions {
        sourceCompatibility JavaVersion.VERSION_1_8 // 指定源代码的兼容性为 Java 8
        targetCompatibility JavaVersion.VERSION_1_8 // 指定目标代码的兼容性为 Java 8
    }

    buildFeatures {
        viewBinding true // 启用视图绑定,用于在代码中访问 XML 布局文件中的视图元素
    }
}

dependencies {
    implementation 'androidx.appcompat:appcompat:1.6.1' // 添加 AndroidX AppCompat 库的依赖
    implementation 'com.google.android.material:material:1.10.0' // 添加 Material Design 组件库的依赖
    implementation 'androidx.constraintlayout:constraintlayout:2.1.4' // 添加 ConstraintLayout 库的依赖
    implementation 'androidx.navigation:navigation-fragment:2.7.5' // 添加导航组件库的依赖
    implementation 'androidx.navigation:navigation-ui:2.7.5' // 添加导航组件库的依赖
    testImplementation 'junit:junit:4.13.2' // 添加 JUnit 单元测试库的依赖
    androidTestImplementation 'androidx.test.ext:junit:1.1.5' // 添加 AndroidX 单元测试库的依赖
    androidTestImplementation 'androidx.test.espresso:espresso-core:3.5.1' // 添加 Espresso UI 测试库的依赖
}
AndroidManifest应用清单
1 2 3 4 5 6 7 8 9 10 11 12 13 14 15 16 17 18 19 20 21 22 23 24 25 26 27 28 29 30 31 32 33 34 35 36 37 | <?xml version="1.0" encoding="utf-8"?><!-- 声明 XML 文件的版本和字符编码 --><manifest xmlns:android="8a1K9s2c8@1M7q4)9K6b7g2)9J5c8W2)9J5c8Y4y4U0K9r3g2E0j5i4y4Q4x3X3g2S2L8X3c8J5L8$3W2V1i4K6u0W2j5$3!0E0i4K6u0r3j5i4m8C8i4K6u0r3M7X3g2K6i4K6u0r3j5h3&6V1M7X3!0A6k6l9`.`." xmlns:tools="789K9s2c8@1M7q4)9K6b7g2)9J5c8W2)9J5c8Y4y4U0K9r3g2E0j5i4y4Q4x3X3g2S2L8X3c8J5L8$3W2V1i4K6u0W2j5$3!0E0i4K6u0r3N6r3!0G2L8s2x3`." package="com.example.demo12"> <!-- 声明应用程序的包名 --> <application android:allowBackup="true" <!-- 启用应用数据备份 --> android:dataExtractionRules="@xml/data_extraction_rules" <!-- 数据提取规则的 XML 文件 --> android:fullBackupContent="@xml/backup_rules" <!-- 备份规则的 XML 文件 --> android:icon="@mipmap/ic_launcher" <!-- 应用程序图标 --> android:label="@string/app_name" <!-- 应用程序标签 --> android:roundIcon="@mipmap/ic_launcher_round" <!-- 圆形图标 --> android:supportsRtl="true" <!-- 支持从右到左的布局方向 --> android:theme="@style/Theme.Demo12" <!-- 应用程序的主题样式 --> tools:targetApi="31"> <!-- 工具属性,指定目标 API 版本 --> <activity android:name=".MainActivity" <!-- 指定活动的名称 --> android:exported="true" <!-- 允许其他应用启动该活动 --> android:label="@string/app_name" <!-- 活动的标签 --> android:theme="@style/Theme.Demo12.NoActionBar"> <!-- 活动的主题样式,没有操作栏 --> <intent-filter> <!-- 意图过滤器,指定应用程序的入口点 --> <action android:name="android.intent.action.MAIN" /> <!-- 主要操作,指定应用程序的主要入口点 --> <category android:name="android.intent.category.LAUNCHER" /> <!-- 活动的启动类别,表示它是应用程序的启动器 --> </intent-filter> </activity> </application></manifest> |
MainActivity.java
1 2 3 4 5 6 7 8 9 10 11 12 13 14 15 16 17 18 19 20 21 22 23 24 25 26 27 28 29 30 31 32 33 34 35 36 37 38 39 40 41 42 43 44 45 46 47 48 49 50 51 52 53 54 55 56 57 58 59 60 61 62 63 64 65 66 67 68 69 70 | package com.example.demo12; // 应用程序的包名import android.os.Bundle; // 导入 Android 框架的 Bundle 类import com.google.android.material.snackbar.Snackbar; // 导入 Material Design 库中的 Snackbar 类import androidx.appcompat.app.AppCompatActivity; // 导入 AppCompatActivity 类import android.view.View; // 导入 Android 框架的 View 类import androidx.navigation.NavController; // 导入导航组件库的 NavController 类import androidx.navigation.Navigation; // 导入导航组件库的 Navigation 类import androidx.navigation.ui.AppBarConfiguration; // 导入导航组件库的 AppBarConfiguration 类import androidx.navigation.ui.NavigationUI; // 导入导航组件库的 NavigationUI 类import com.example.demo12.databinding.ActivityMainBinding; // 导入数据绑定生成的 ActivityMainBinding 类import android.view.Menu; // 导入 Android 框架的 Menu 类import android.view.MenuItem; // 导入 Android 框架的 MenuItem 类public class MainActivity extends AppCompatActivity { private AppBarConfiguration appBarConfiguration; // AppBar 的配置对象 private ActivityMainBinding binding; // 数据绑定对象 @Override protected void onCreate(Bundle savedInstanceState) { super.onCreate(savedInstanceState); binding = ActivityMainBinding.inflate(getLayoutInflater()); // 使用数据绑定生成视图绑定对象 setContentView(binding.getRoot()); // 设置视图为生成的根视图 setSupportActionBar(binding.toolbar); // 设置应用栏支持 NavController navController = Navigation.findNavController(this, R.id.nav_host_fragment_content_main); // 导航控制器 appBarConfiguration = new AppBarConfiguration.Builder(navController.getGraph()).build(); // AppBar 配置 NavigationUI.setupActionBarWithNavController(this, navController, appBarConfiguration); // 使用导航控制器设置 ActionBar binding.fab.setOnClickListener(new View.OnClickListener() { // 处理 FloatingActionButton 的点击事件 @Override public void onClick(View view) { Snackbar.make(view, "Replace with your own action", Snackbar.LENGTH_LONG) // 创建 Snackbar 提示 .setAction("Action", null).show(); // 显示 Snackbar 提示 } }); } @Override public boolean onCreateOptionsMenu(Menu menu) { // Inflate the menu; this adds items to the action bar if it is present. getMenuInflater().inflate(R.menu.menu_main, menu); // 填充菜单项到操作栏 return true; // 返回 true 表示菜单已创建 } @Override public boolean onOptionsItemSelected(MenuItem item) { // Handle action bar item clicks here. The action bar will // automatically handle clicks on the Home/Up button, so long // as you specify a parent activity in AndroidManifest.xml. int id = item.getItemId(); // 获取菜单项的 ID //noinspection SimplifiableIfStatement if (id == R.id.action_settings) { // 如果点击了设置菜单项 return true; // 返回 true 表示已处理该菜单项 } return super.onOptionsItemSelected(item); // 返回默认的菜单项处理 } @Override public boolean onSupportNavigateUp() { NavController navController = Navigation.findNavController(this, R.id.nav_host_fragment_content_main); // 导航控制器 return NavigationUI.navigateUp(navController, appBarConfiguration) || super.onSupportNavigateUp(); // 处理向上导航操作 }} |
activity_main.xml 是 Android 应用程序的布局文件
之一,通常用于定义应用程序的主要界面布局。该布局文件描述了应用程序的用户界面中的组件、视图和它们的排列方式。具体来说,activity_main.xml 布局文件通常包括应用程序的主要界面元素,如应用栏、按钮、文本框、图像和其他 UI 元素。
在一个典型的 Android 应用中,activity_main.xml 布局文件通常与一个名为 MainActivity 的 Java 类相关联。在 MainActivity 类的 onCreate 方法中,通常使用 setContentView(R.layout.activity_main) 来加载与 activity_main.xml 关联的布局文件,从而在应用程序启动时显示该界面。
以下是一些常见的在 activity_main.xml 中定义的 UI 元素:
- AppBar(应用栏):通常包含应用程序的标题、操作按钮和其他与应用程序导航相关的元素。
- 按钮(Button):用于触发特定操作或事件的用户界面元素。
- 文本视图(TextView):用于显示文本内容,如标签、标题或说明。
- 图像视图(ImageView):用于显示图像或图标。
- 输入框(EditText):允许用户输入文本或数据。
- 列表视图(ListView 或 RecyclerView):用于显示数据列表,如联系人列表、新闻文章或其他可滚动的数据。
activity_main.xml 的内容会因应用程序的需求而异,它定义了应用程序的初始用户界面。在开发 Android 应用时,通常需要编辑和自定义此布局文件,以满足应用的设计和功能需求。
1 2 3 4 5 6 7 8 9 10 11 12 13 14 15 16 17 18 19 20 21 22 23 24 25 26 27 28 29 30 31 32 33 34 35 36 37 38 39 40 41 42 | <?xml version="1.0" encoding="utf-8"?><!-- XML 文件的版本和字符编码声明 --><androidx.coordinatorlayout.widget.CoordinatorLayout xmlns:android="089K9s2c8@1M7q4)9K6b7g2)9J5c8W2)9J5c8Y4y4U0K9r3g2E0j5i4y4Q4x3X3g2S2L8X3c8J5L8$3W2V1i4K6u0W2j5$3!0E0i4K6u0r3j5i4m8C8i4K6u0r3M7X3g2K6i4K6u0r3j5h3&6V1M7X3!0A6k6l9`.`." xmlns:app="961K9s2c8@1M7q4)9K6b7g2)9J5c8W2)9J5c8Y4y4U0K9r3g2E0j5i4y4Q4x3X3g2S2L8X3c8J5L8$3W2V1i4K6u0W2j5$3!0E0i4K6u0r3j5i4m8C8i4K6u0r3M7X3g2K6i4K6u0V1j5i4g2@1L8H3`.`." xmlns:tools="f5aK9s2c8@1M7q4)9K6b7g2)9J5c8W2)9J5c8Y4y4U0K9r3g2E0j5i4y4Q4x3X3g2S2L8X3c8J5L8$3W2V1i4K6u0W2j5$3!0E0i4K6u0r3N6r3!0G2L8s2x3`." android:layout_width="match_parent" android:layout_height="match_parent" tools:context=".MainActivity"> <!-- CoordinatorLayout 是一个顶级容器,用于协调子视图的交互和布局 --> <com.google.android.material.appbar.AppBarLayout android:layout_height="wrap_content" android:layout_width="match_parent" android:theme="@style/Theme.Demo12.AppBarOverlay"> <!-- AppBarLayout 包含应用栏的容器,可垂直滚动 --> <androidx.appcompat.widget.Toolbar android:id="@+id/toolbar" android:layout_width="match_parent" android:background="?attr/colorPrimary" app:popupTheme="@style/Theme.Demo12.PopupOverlay" android:layout_height="?attr/actionBarSize" /> <!-- Toolbar 是应用栏工具栏,用于显示标题和操作 --> </com.google.android.material.appbar.AppBarLayout> <include layout="@layout/content_main"/> <!-- 引用名为 "content_main" 的布局文件,包含主要内容 --> <com.google.android.material.floatingactionbutton.FloatingActionButton android:id="@+id/fab" android:layout_width="wrap_content" android:layout_height="wrap_content" android:layout_gravity="bottom|end" android:layout_marginEnd="@dimen/fab_margin" android:layout_marginBottom="16dp" app:srcCompat="@android:drawable/ic_dialog_email" /> <!-- FloatingActionButton 是浮动操作按钮,用于触发应用程序中的操作 --></androidx.coordinatorlayout.widget.CoordinatorLayout> |
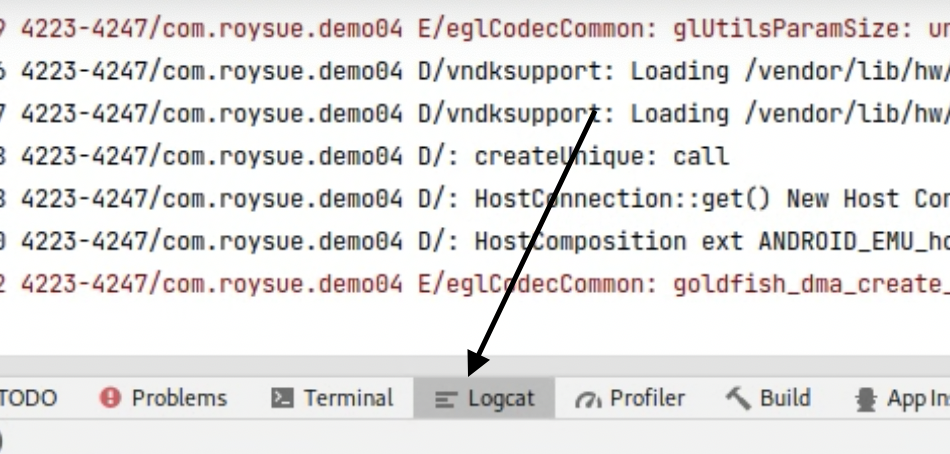
添加测试代码
1 | Log.i(“demo12 by calleng”,"Hello frome demo12"); |
点击 Logcat 位置可以看见调试信息
第一个项目测试.
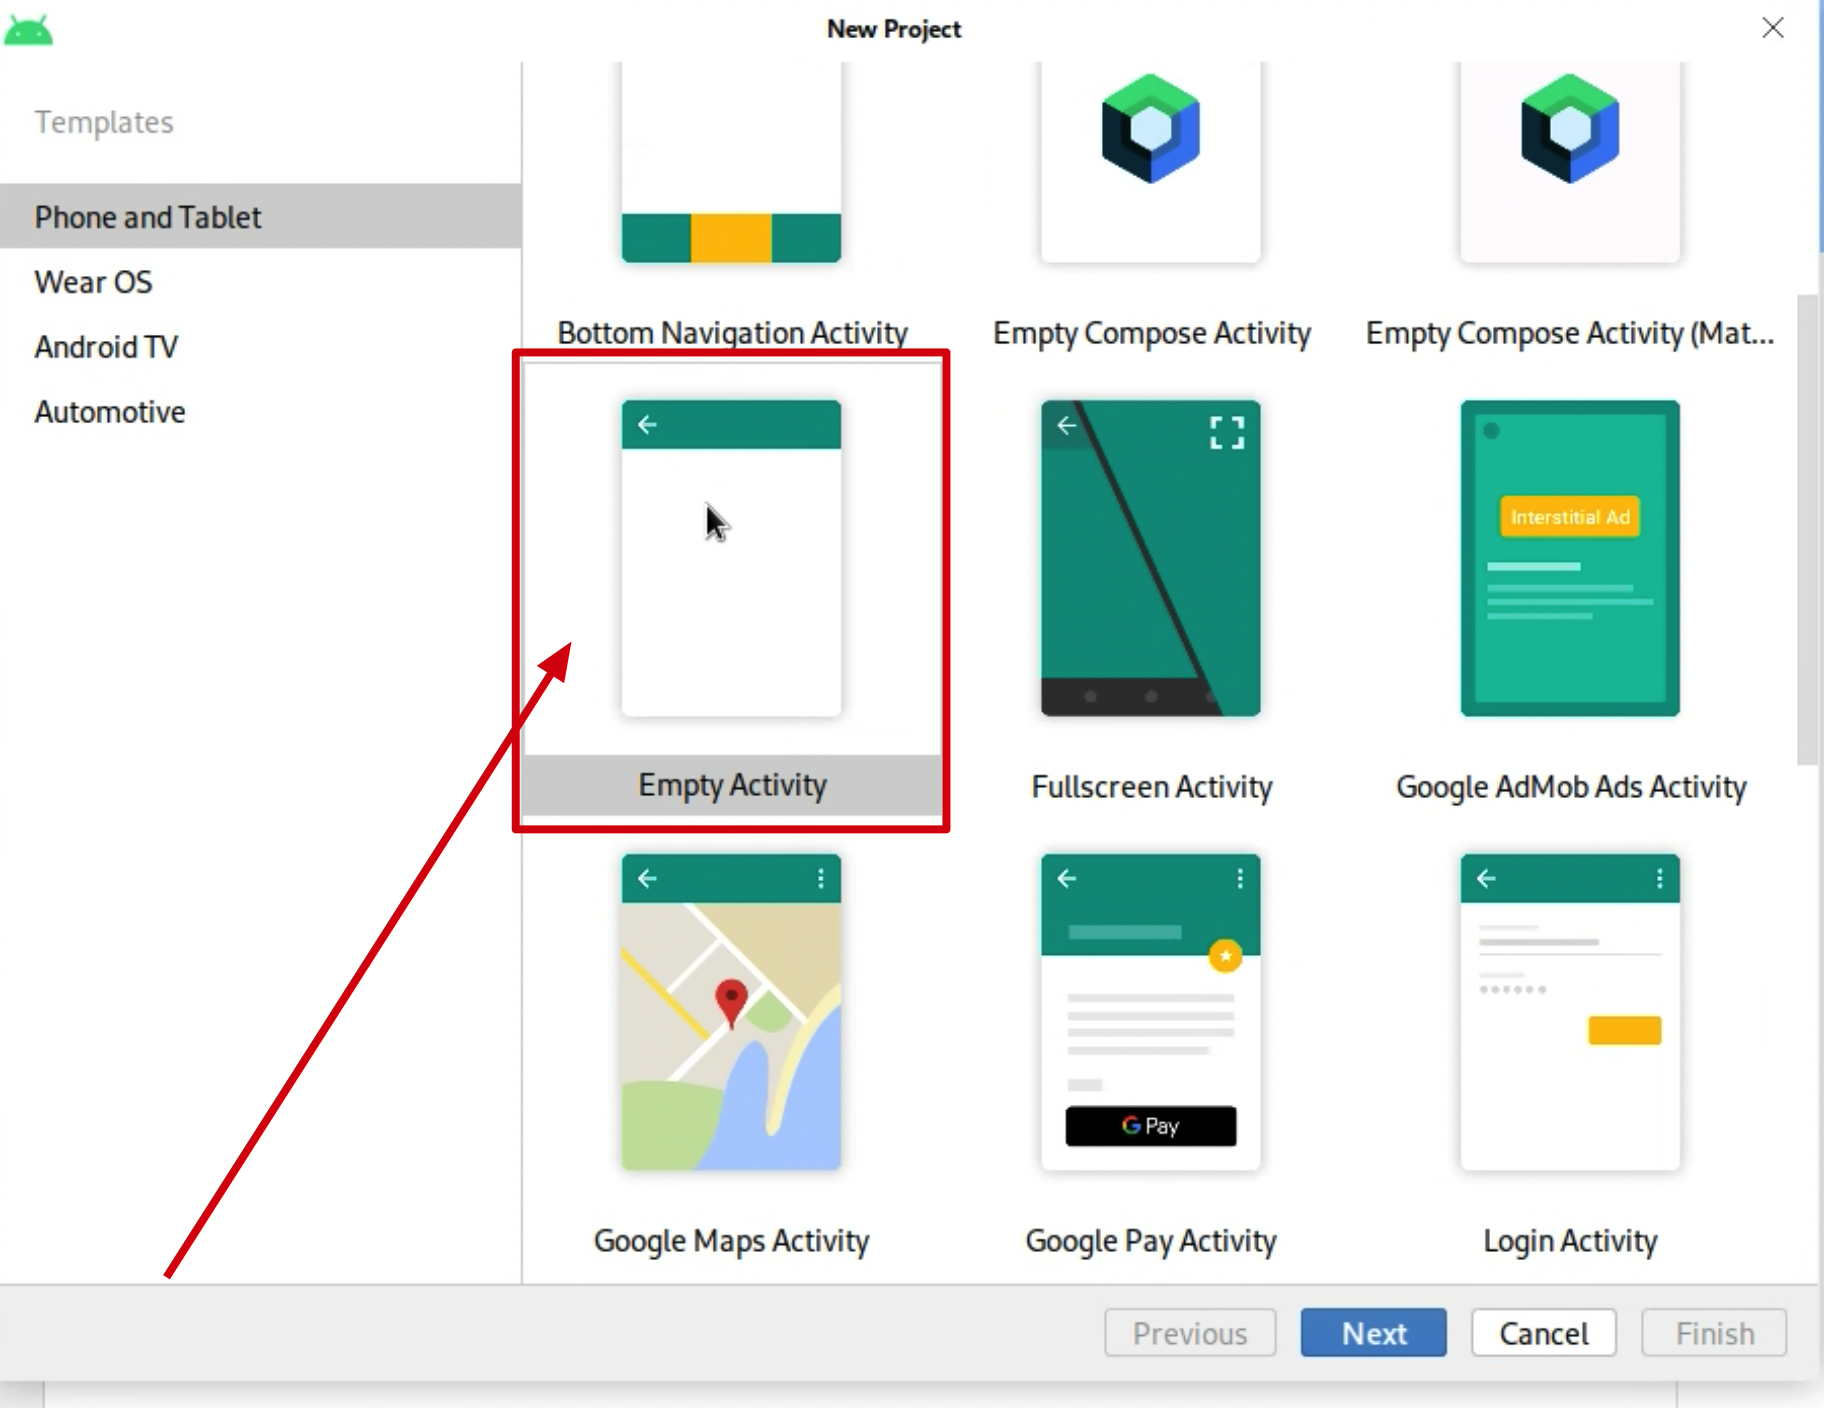
新建一个空的项目 然后贴入以下代码
MainActivity.java
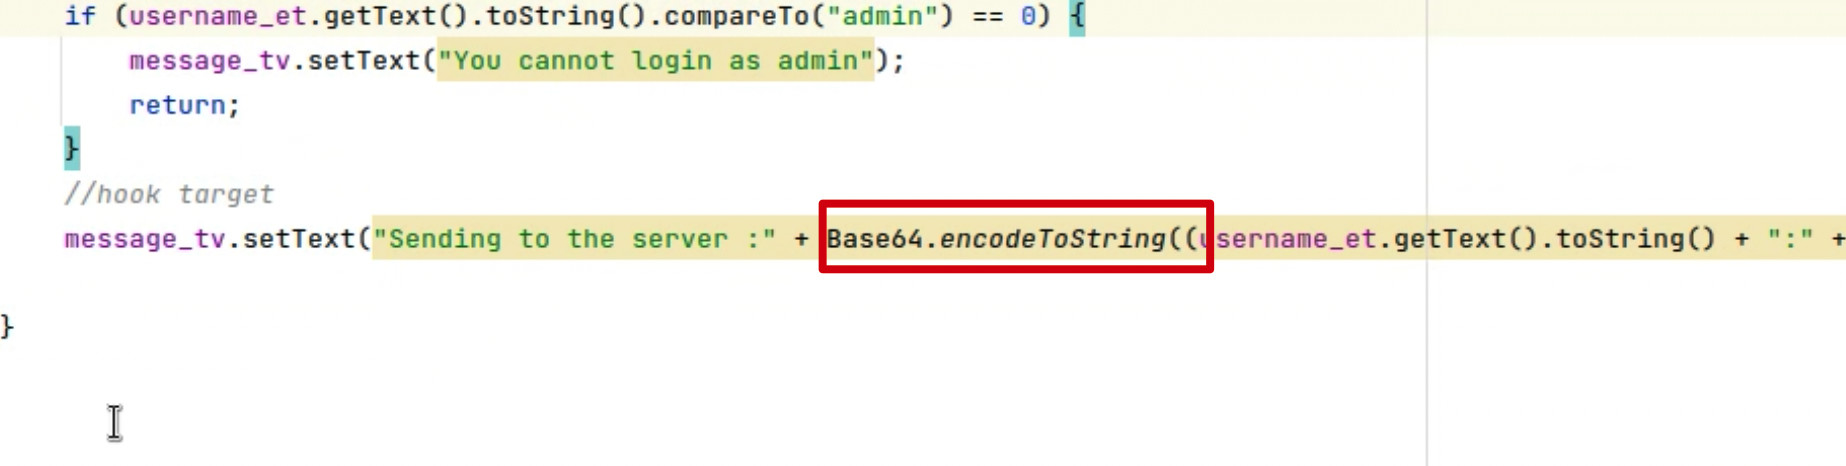
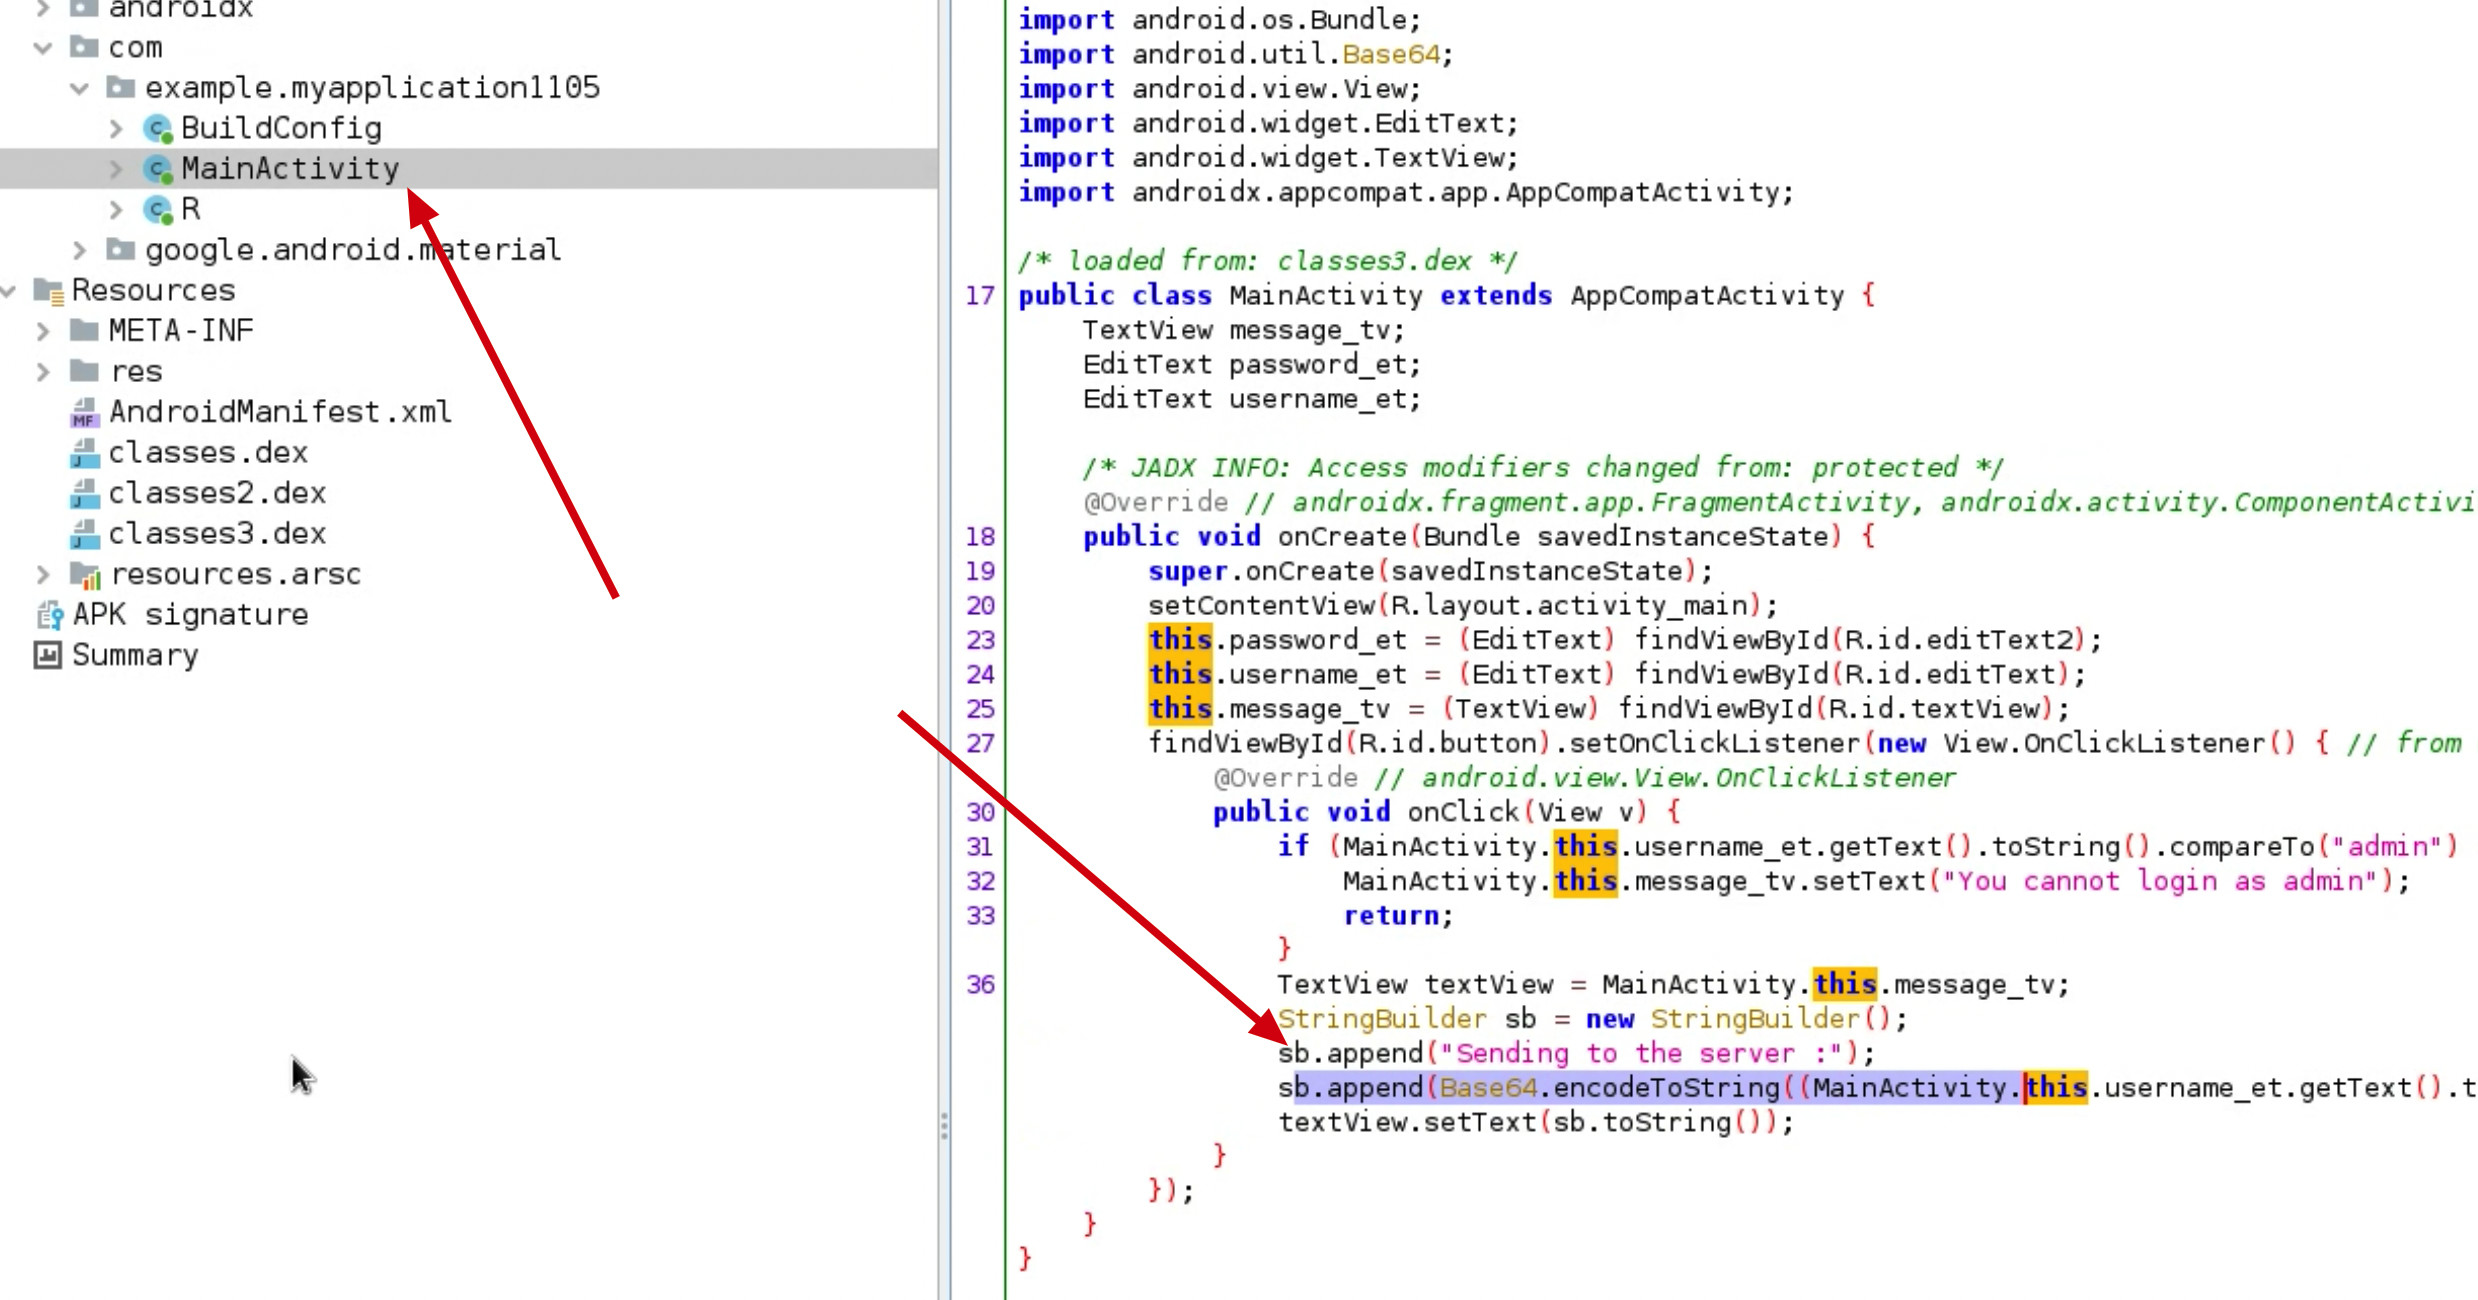
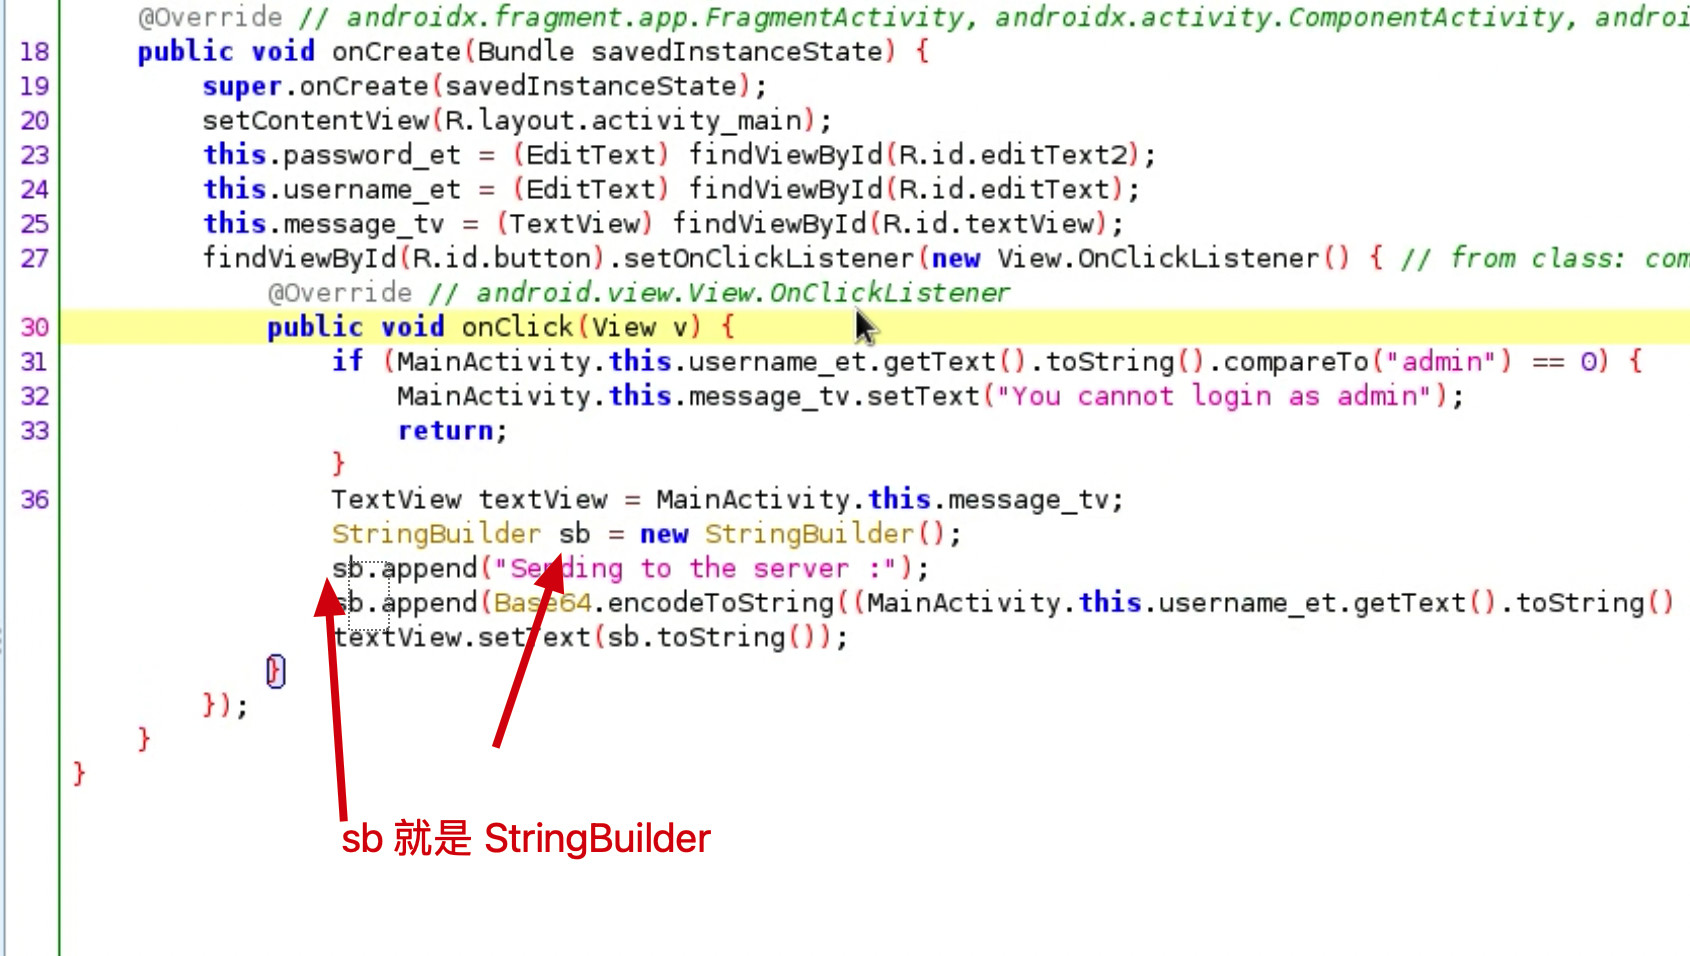
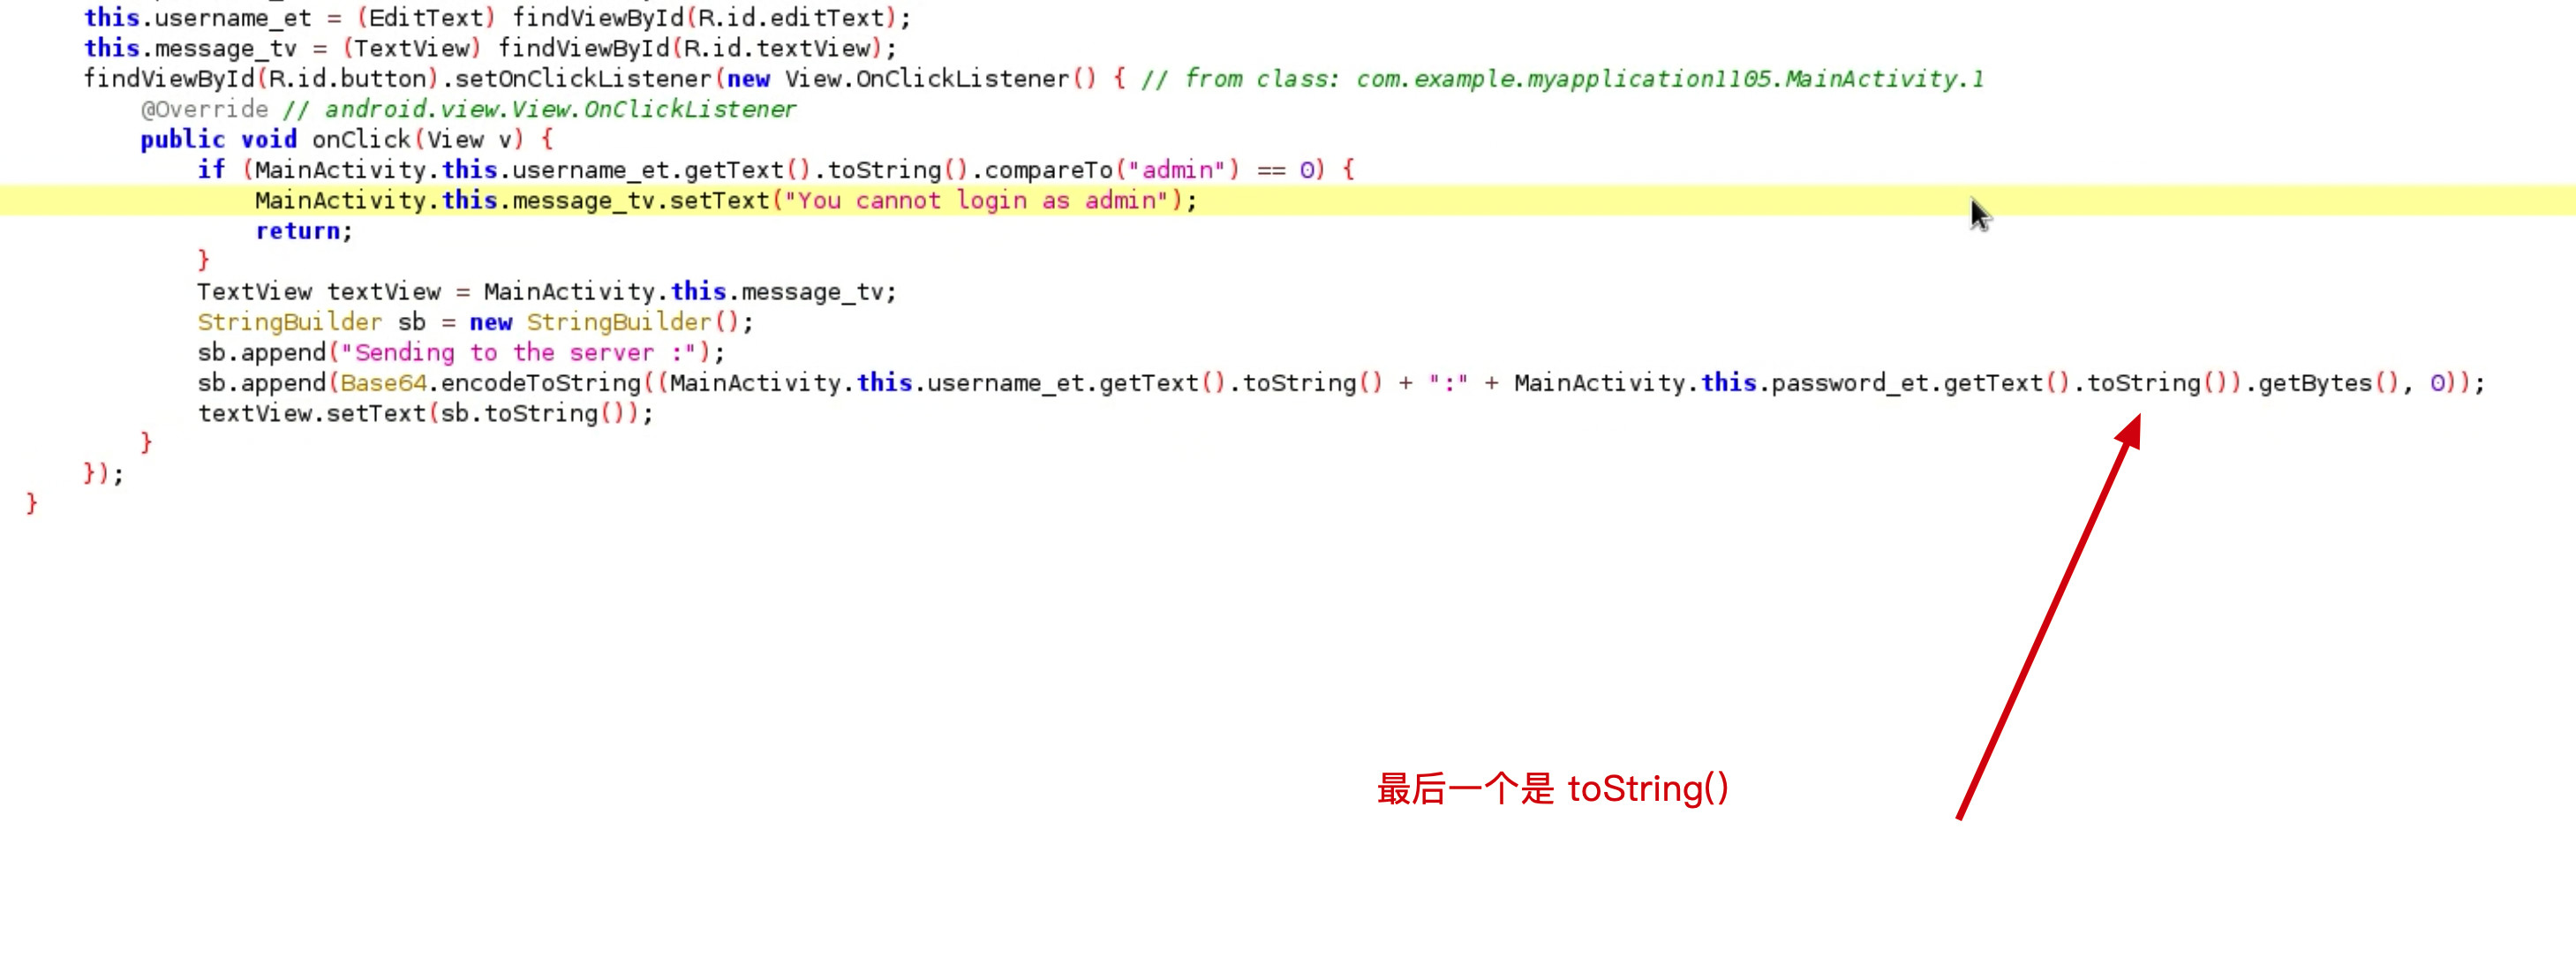
1 2 3 4 5 6 7 8 9 10 11 12 13 14 15 16 17 18 19 20 21 22 23 24 25 26 27 28 29 30 31 32 33 34 35 36 37 38 39 40 41 | package com.example.myapplication1105;import androidx.appcompat.app.AppCompatActivity;import android.os.Bundle;import android.util.Base64;import android.view.View;import android.widget.EditText;import android.widget.TextView;public class MainActivity extends AppCompatActivity { EditText username_et; EditText password_et; TextView message_tv; @Override protected void onCreate(Bundle savedInstanceState) { super.onCreate(savedInstanceState); setContentView(R.layout.activity_main); password_et = (EditText) this.findViewById(R.id.editText2); username_et = (EditText) this.findViewById(R.id.editText); message_tv = ((TextView) findViewById(R.id.textView)); this.findViewById(R.id.button).setOnClickListener(new View.OnClickListener() { @Override public void onClick(View v) { if (username_et.getText().toString().compareTo("admin") == 0) { message_tv.setText("You cannot login as admin"); return; } //hook target message_tv.setText("Sending to the server :" + Base64.encodeToString((username_et.getText().toString() + ":" + password_et.getText().toString()).getBytes(), Base64.DEFAULT)); } }); }} |
activity_main.xml
1 2 3 4 5 6 7 8 9 10 11 12 13 14 15 16 17 18 19 20 21 22 23 24 25 26 27 28 29 30 31 32 33 34 35 36 37 38 39 40 41 42 43 44 45 46 47 48 49 50 51 52 53 54 55 | <?xml version="1.0" encoding="utf-8"?><androidx.constraintlayout.widget.ConstraintLayout xmlns:android="673K9s2c8@1M7q4)9K6b7g2)9J5c8W2)9J5c8Y4y4U0K9r3g2E0j5i4y4Q4x3X3g2S2L8X3c8J5L8$3W2V1i4K6u0W2j5$3!0E0i4K6u0r3j5i4m8C8i4K6u0r3M7X3g2K6i4K6u0r3j5h3&6V1M7X3!0A6k6l9`.`." xmlns:app="946K9s2c8@1M7q4)9K6b7g2)9J5c8W2)9J5c8Y4y4U0K9r3g2E0j5i4y4Q4x3X3g2S2L8X3c8J5L8$3W2V1i4K6u0W2j5$3!0E0i4K6u0r3j5i4m8C8i4K6u0r3M7X3g2K6i4K6u0V1j5i4g2@1L8H3`.`." xmlns:tools="dacK9s2c8@1M7q4)9K6b7g2)9J5c8W2)9J5c8Y4y4U0K9r3g2E0j5i4y4Q4x3X3g2S2L8X3c8J5L8$3W2V1i4K6u0W2j5$3!0E0i4K6u0r3N6r3!0G2L8s2x3`." android:layout_width="match_parent" android:layout_height="match_parent" tools:context=".MainActivity"> <TextView android:id="@+id/textView" android:layout_width="wrap_content" android:layout_height="wrap_content" android:text="please input username and password" app:layout_constraintBottom_toBottomOf="parent" app:layout_constraintLeft_toLeftOf="parent" app:layout_constraintRight_toRightOf="parent" app:layout_constraintTop_toTopOf="parent" /> <EditText android:id="@+id/editText" android:hint="username" android:layout_width="fill_parent" android:layout_height="40dp" android:maxLength="20" app:layout_constraintBottom_toBottomOf="parent" app:layout_constraintEnd_toEndOf="parent" app:layout_constraintHorizontal_bias="1.0" app:layout_constraintStart_toStartOf="parent" app:layout_constraintTop_toTopOf="parent" app:layout_constraintVertical_bias="0.095" /> <EditText android:id="@+id/editText2" android:hint="password" android:layout_width="fill_parent" android:layout_height="40dp" android:maxLength="20" app:layout_constraintBottom_toBottomOf="parent" app:layout_constraintTop_toTopOf="parent" app:layout_constraintVertical_bias="0.239" /> <Button android:id="@+id/button" android:layout_width="100dp" android:layout_height="35dp" android:layout_gravity="right|center_horizontal" android:text="提交" android:visibility="visible" app:layout_constraintBottom_toBottomOf="parent" app:layout_constraintEnd_toEndOf="parent" app:layout_constraintStart_toStartOf="parent" app:layout_constraintTop_toTopOf="parent" app:layout_constraintVertical_bias="0.745" /></androidx.constraintlayout.widget.ConstraintLayout> |
跑起来后如图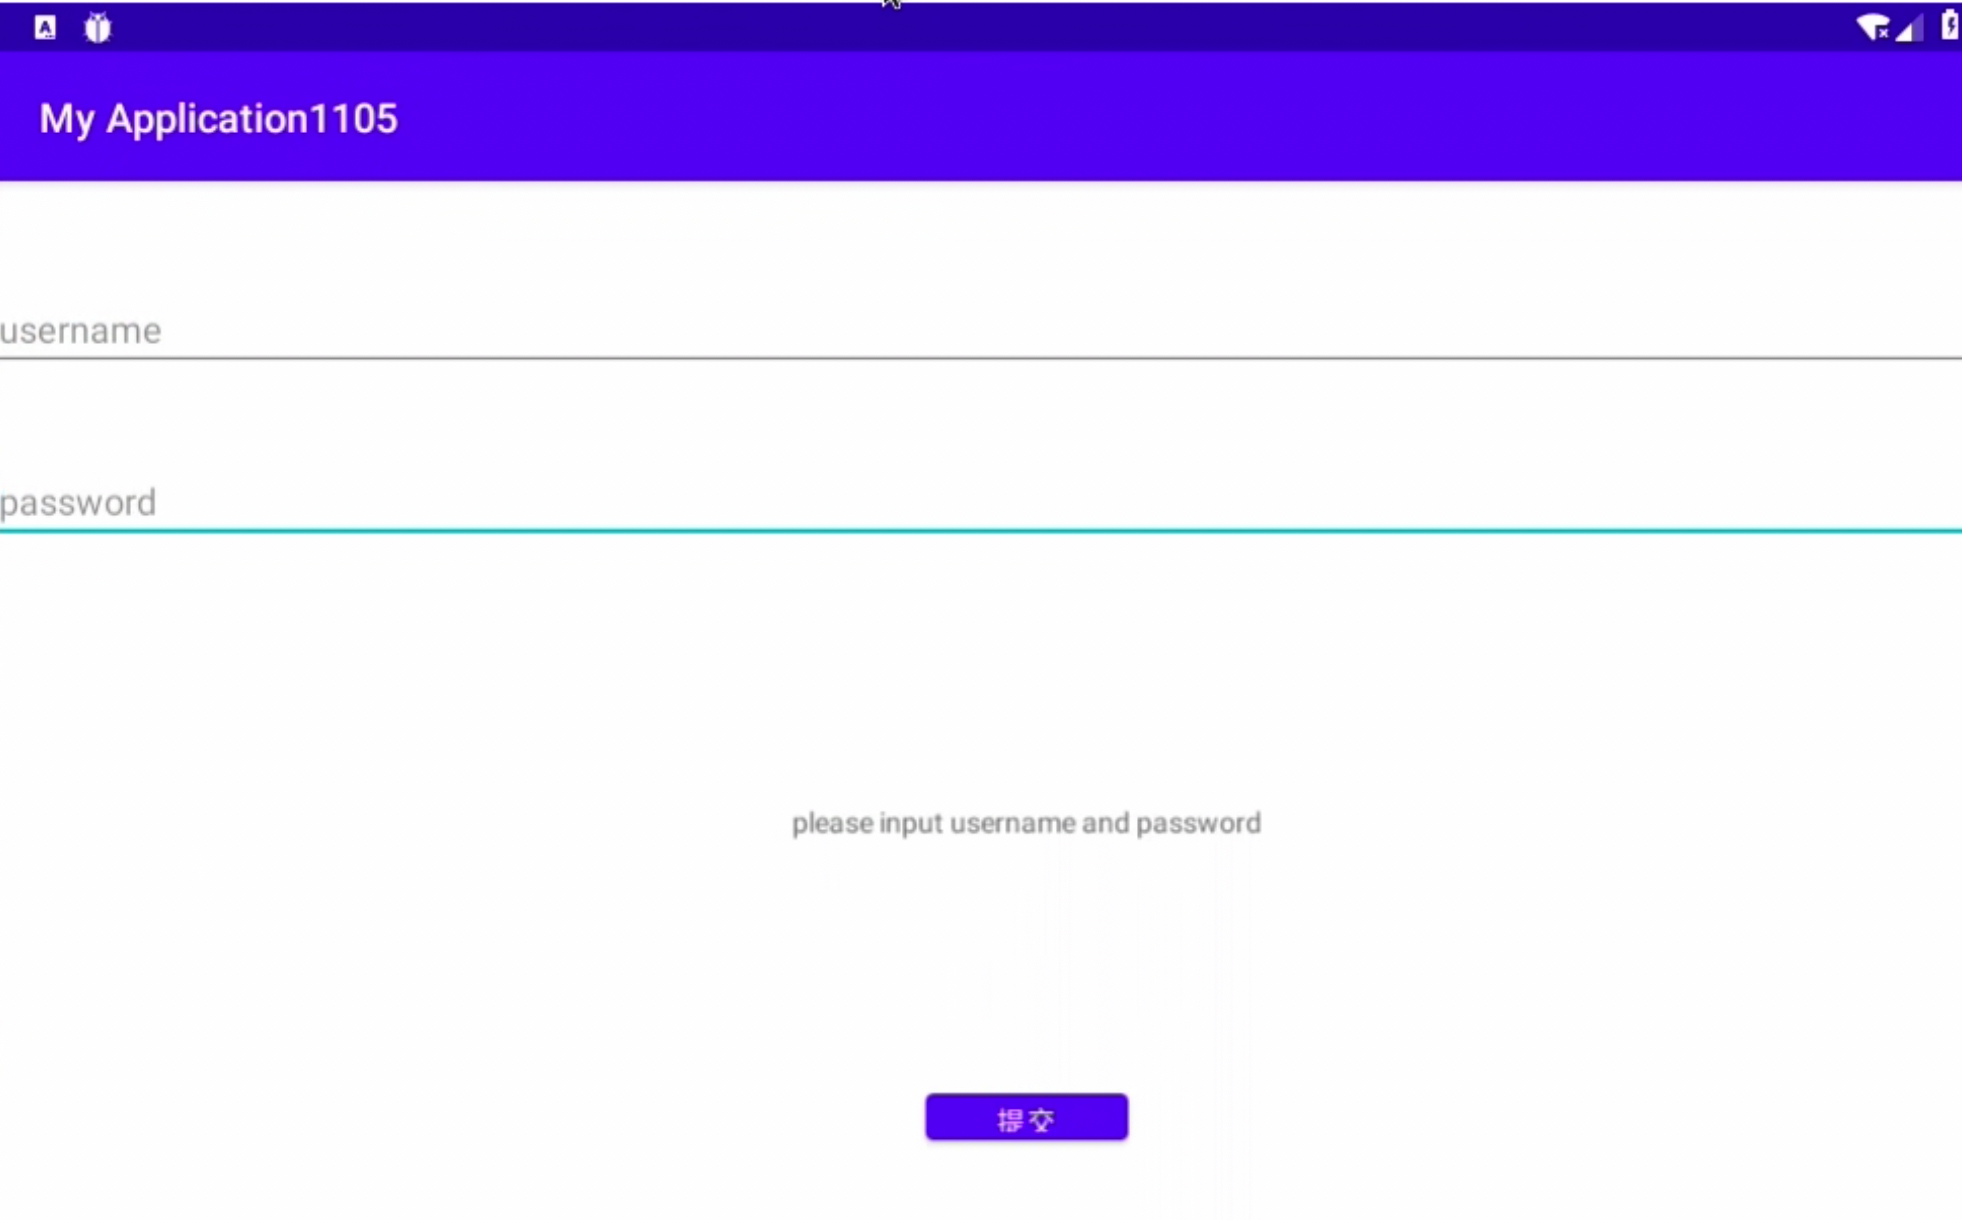
阅读一些安卓入门的基础的书, 练习, 重复几次,代码练习, 熟练.
一个, Activity,service,content provider,broadcast receiver, 运用到极致案例
53cK9s2c8@1M7s2y4Q4x3@1q4Q4x3V1k6Q4x3V1k6%4N6%4N6Q4x3X3g2U0L8X3u0D9L8$3N6K6i4K6u0W2j5$3!0E0i4K6u0r3c8s2u0W2j5h3#2d9k6h3y4G2M7X3c8W2M7W2)9J5c8Y4m8Q4x3V1j5^5z5e0b7&6x3K6R3@1i4K6u0W2K9s2c8E0L8l9`.`.
Android——四大组件、六大布局、五大存储
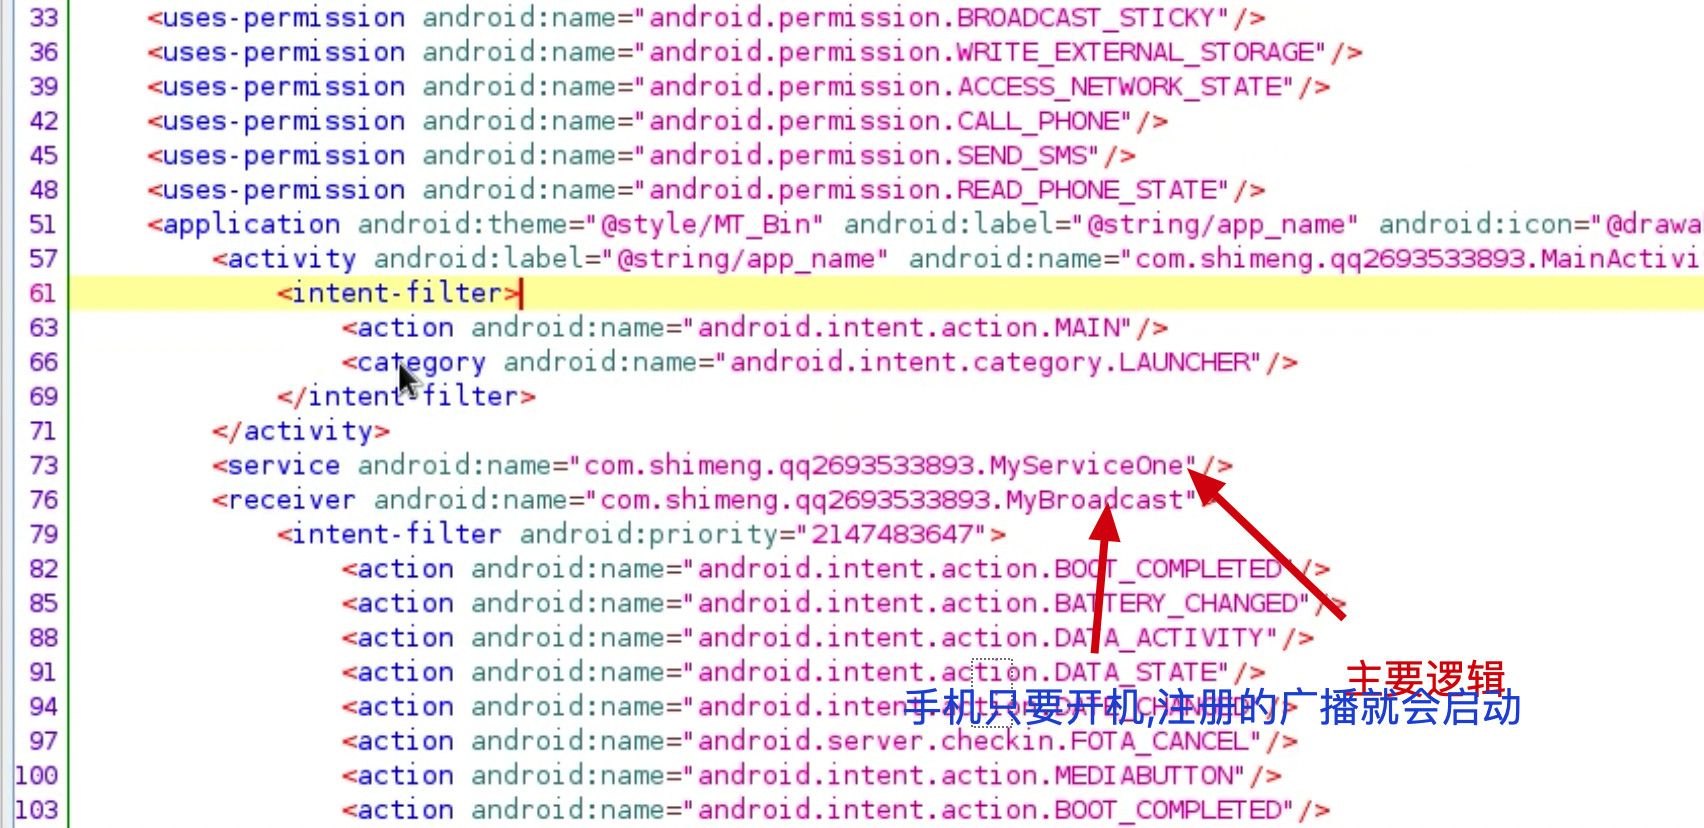
####Jadx-gui 静态分析--- 三层锁机勒索病毒
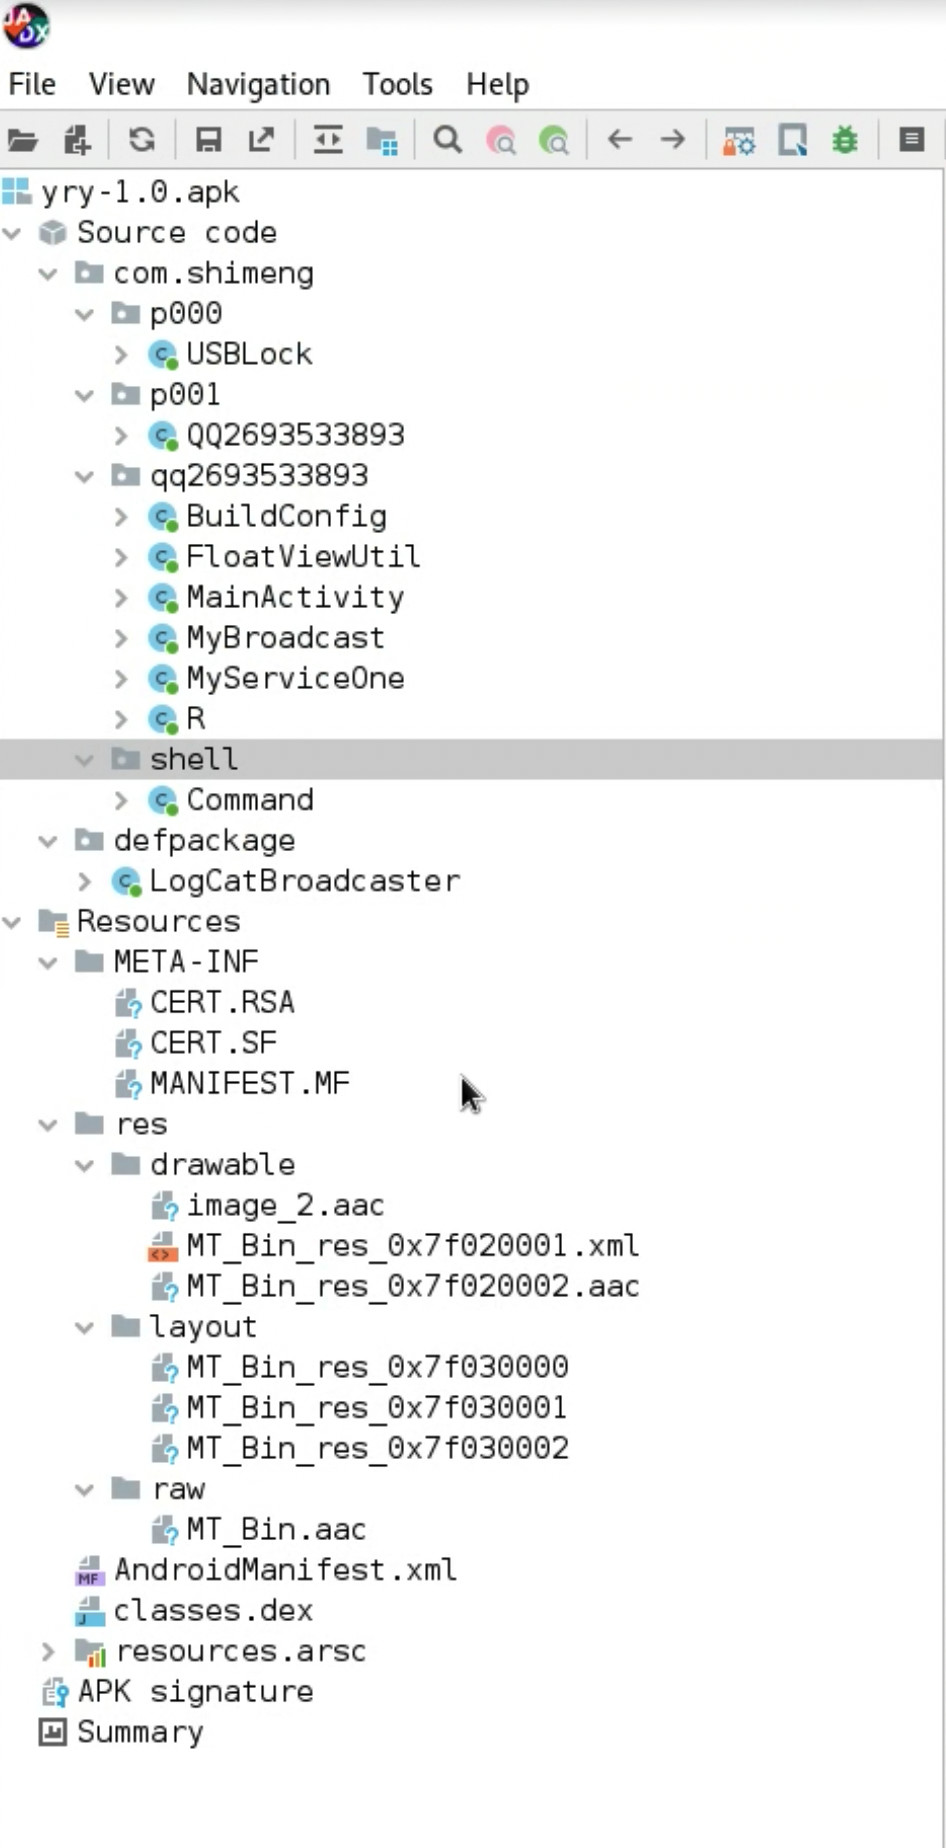
动态申请了很多权限
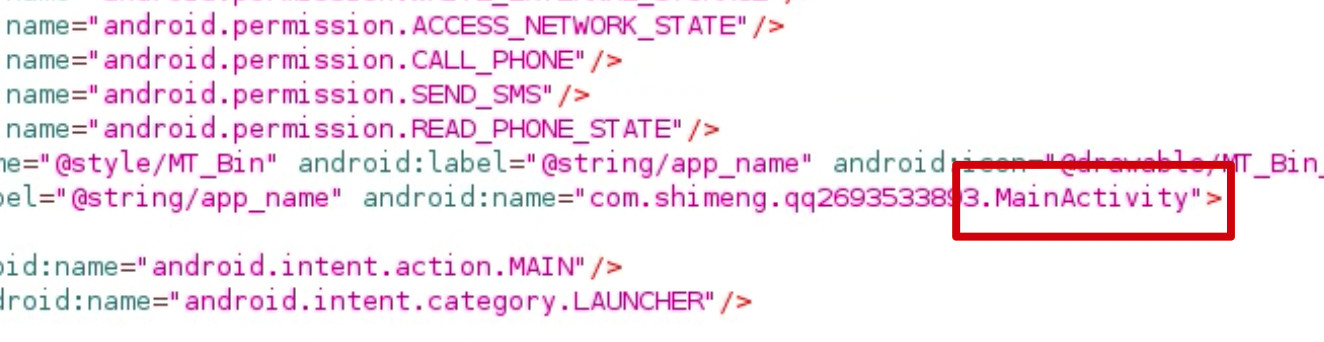
AndroidManifest.xml
1 2 3 4 5 6 7 8 9 10 11 12 13 14 15 16 17 18 19 20 21 22 23 24 25 26 27 28 29 30 31 32 33 34 35 36 37 38 39 40 41 42 43 44 45 46 47 48 49 50 51 52 53 54 55 56 57 58 59 60 | <?xml version="1.0" encoding="utf-8"?><manifest xmlns:android="d98K9s2c8@1M7q4)9K6b7g2)9J5c8W2)9J5c8Y4y4U0K9r3g2E0j5i4y4Q4x3X3g2S2L8X3c8J5L8$3W2V1i4K6u0W2j5$3!0E0i4K6u0r3j5i4m8C8i4K6u0r3M7X3g2K6i4K6u0r3j5h3&6V1M7X3!0A6k6l9`.`." android:versionCode="1" android:versionName="1.0" package="com.shimeng.qq2693533893" platformBuildVersionCode="21" platformBuildVersionName="5.0-1521886"> <uses-sdk android:minSdkVersion="14" android:targetSdkVersion="21"/> <uses-permission android:name="android.permission.RECEIVE_BOOT_COMPLETED"/> <uses-permission android:name="android.permission.RECEIVE_USER_PRESENT"/> <uses-permission android:name="android.permission.RECEIVE_SMS"/> <uses-permission android:name="android.permission.SYSTEM_ALERT_WINDOW"/> <uses-permission android:name="android.permission.GET_TASKS"/> <uses-permission android:name="android.permission.INTERNET"/> <uses-permission android:name="android.permission.VIBRATE"/> <uses-permission android:name="android.permission.BROADCAST_STICKY"/> <uses-permission android:name="android.permission.WRITE_EXTERNAL_STORAGE"/> <uses-permission android:name="android.permission.ACCESS_NETWORK_STATE"/> <uses-permission android:name="android.permission.CALL_PHONE"/> <uses-permission android:name="android.permission.SEND_SMS"/> <uses-permission android:name="android.permission.READ_PHONE_STATE"/> <application android:theme="@style/MT_Bin" android:label="@string/app_name" android:icon="@drawable/MT_Bin_res_0x7f020002" android:debuggable="true" android:allowBackup="true"> <activity android:label="@string/app_name" android:name="com.shimeng.qq2693533893.MainActivity"> <intent-filter> <action android:name="android.intent.action.MAIN"/> <category android:name="android.intent.category.LAUNCHER"/> </intent-filter> </activity> <service android:name="com.shimeng.qq2693533893.MyServiceOne"/> <receiver android:name="com.shimeng.qq2693533893.MyBroadcast"> <intent-filter android:priority="2147483647"> <action android:name="android.intent.action.BOOT_COMPLETED"/> <action android:name="android.intent.action.BATTERY_CHANGED"/> <action android:name="android.intent.action.DATA_ACTIVITY"/> <action android:name="android.intent.action.DATA_STATE"/> <action android:name="android.intent.action.DATE_CHANGED"/> <action android:name="android.server.checkin.FOTA_CANCEL"/> <action android:name="android.intent.action.MEDIABUTTON"/> <action android:name="android.intent.action.BOOT_COMPLETED"/> <action android:name="android.intent.action.REBOOT"/> <action android:name="android.intent.action.USER_PRESENT"/> <action android:name="android.intent.action.MEDIA_MOUNTED"/> <action android:name="android.intent.action.MEDIA_SCANNER_STARTED"/> <action android:name="android.intent.action.MEDIA_SCANNER_FINISHED"/> <action android:name="android.intent.action.TIME_SET"/> <action android:name="android.intent.action.TIME_TICK"/> <action android:name="android.intent.action.UMS_CONNECTED"/> <action android:name="android.intent.action.WALLPAPER_CHANGED"/> <action android:name="android.intent.action.PACKAGE_ADDED"/> <action android:name="android.intent.action.PACKAGE_REMOVED"/> <action android:name="android.intent.action.PHONE_STATE"/> <action android:name="android.intent.action.SCREEN_OFF"/> <action android:name="android.intent.action.SCREEN_ON"/> <action android:name="android.intent.action.SERVICE_STATE"/> <action android:name="android.intent.action.SIG_STR"/> <action android:name="android.intent.category.ALTERNATIVE"/> <action android:name="android.intent.action.SETTINGS"/> <action android:name="android.net.conn.CONNECTIVITY_CHANGE"/> <action android:name="android.net.wifi.WIFI_STATE_CHANGED"/> <action android:name="android.net.wifi.STATE_CHANGE"/> <category android:name="android.intent.category.HOME"/> </intent-filter> </receiver> </application></manifest> |
软件注册 services的
1 | <service android:name="com.shimeng.qq2693533893.MyServiceOne"/> |
find MyServiceOne.
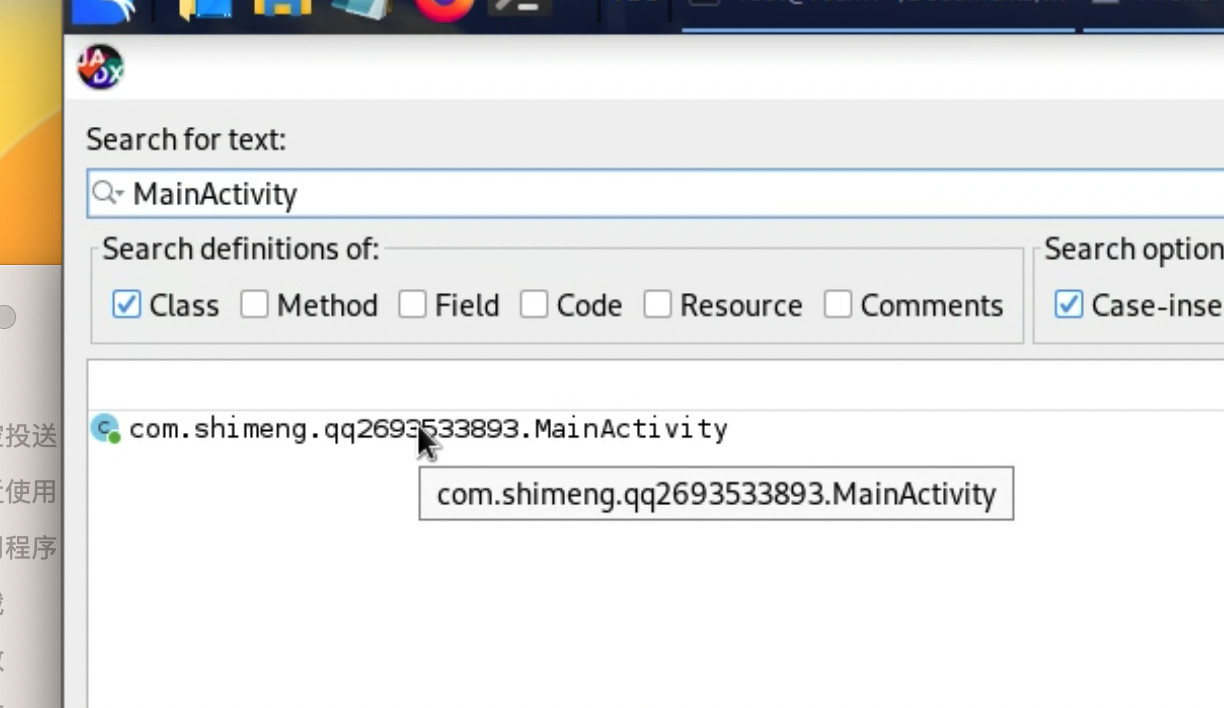
静态分析,先看 activity.
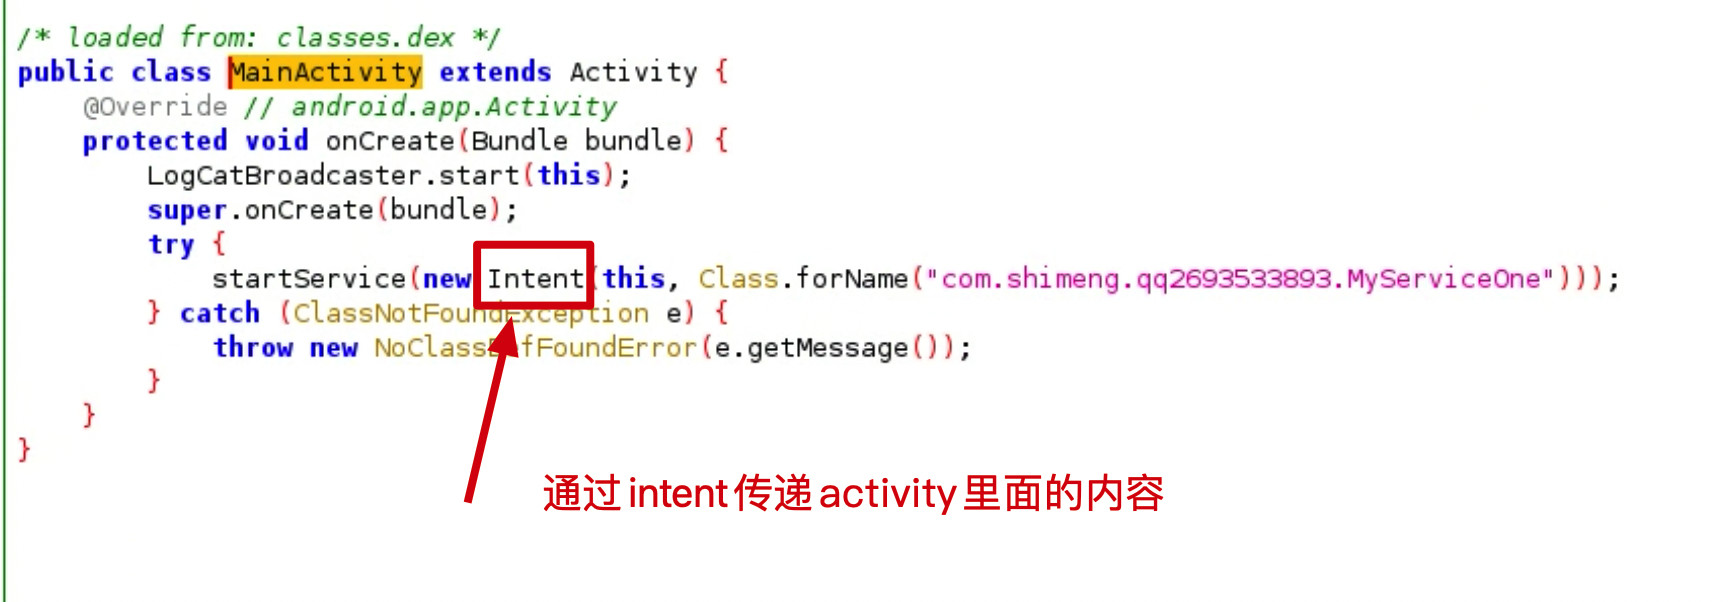
通过 intent 来传递 activity之间的内容.

try --- catch , 结构, 防止程序出现异常崩溃, 存在一个缓冲机制,条件机制.
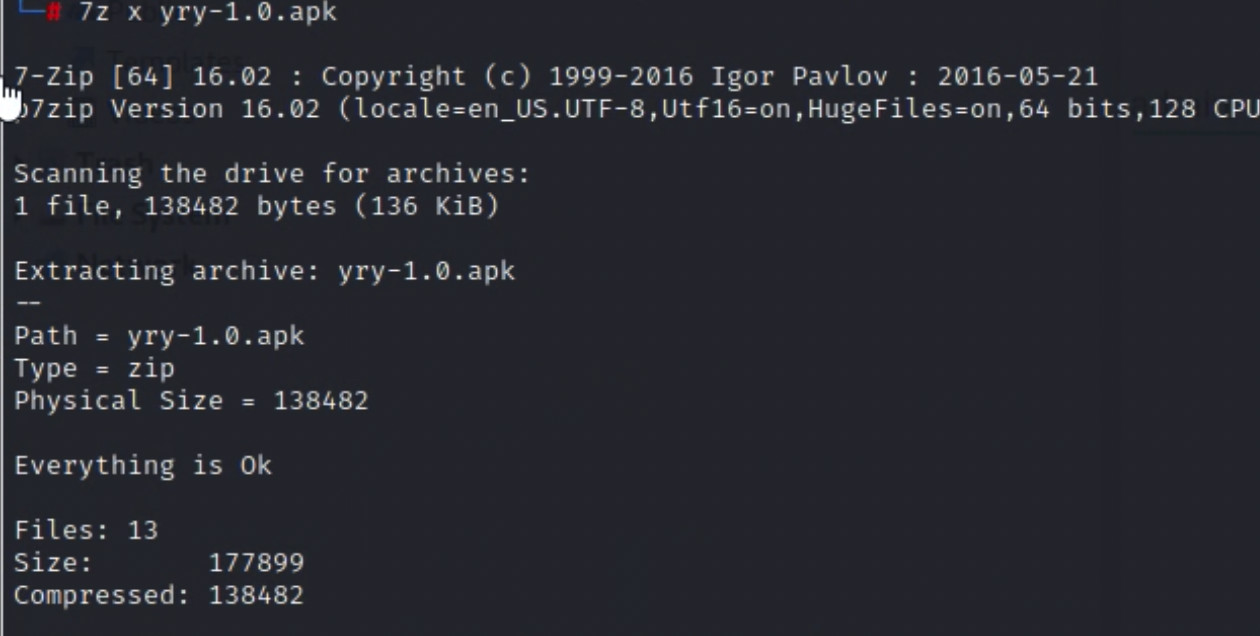
尝试解压
文件类型识别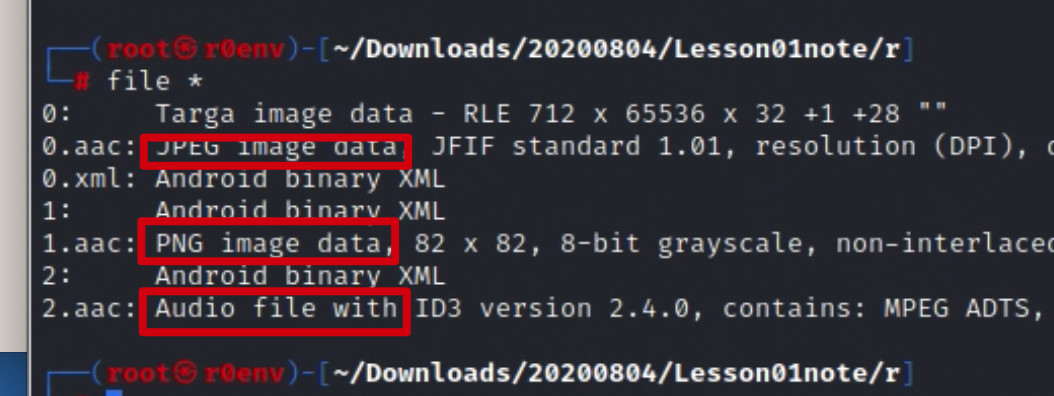
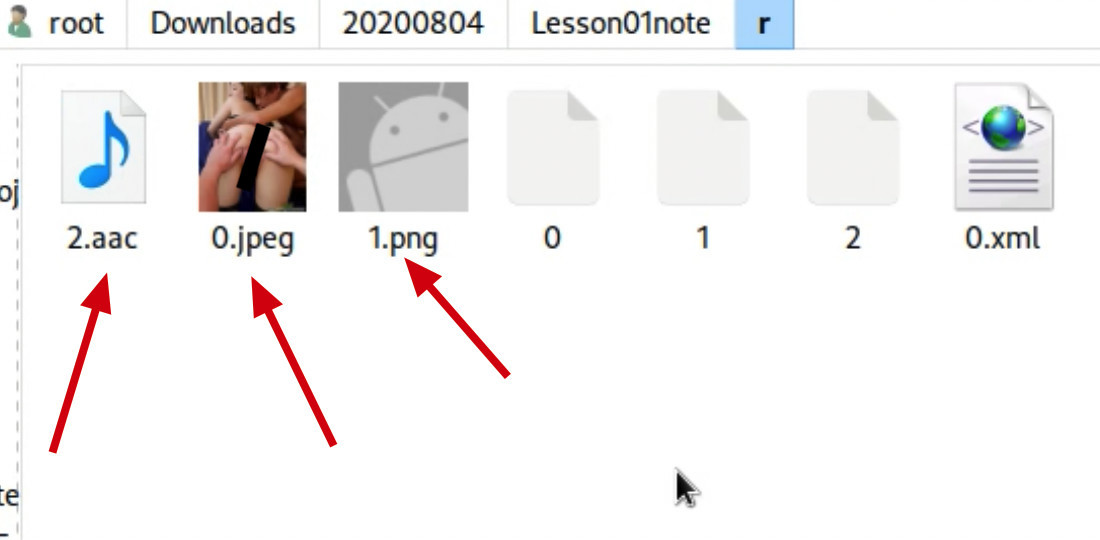
通过改名后, 预览画面, 展现出勒索病毒的原貌
如果 AndroidManifest 没有混淆, 打开即明文.
若有人 xml 也混淆,那么需要hook 系统 api , dump出,使用.
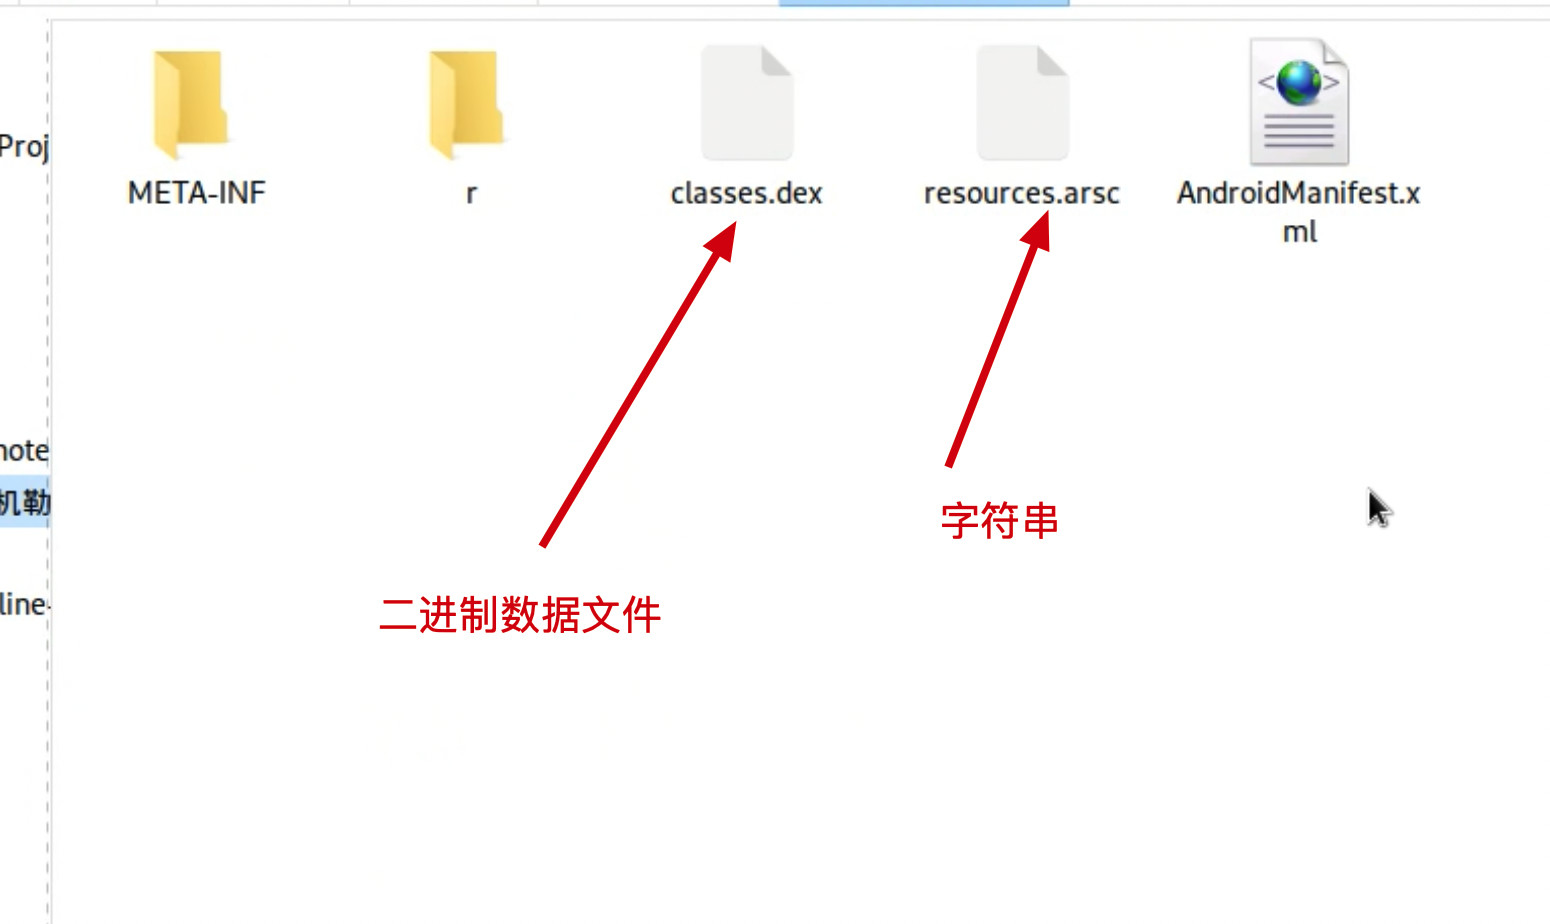
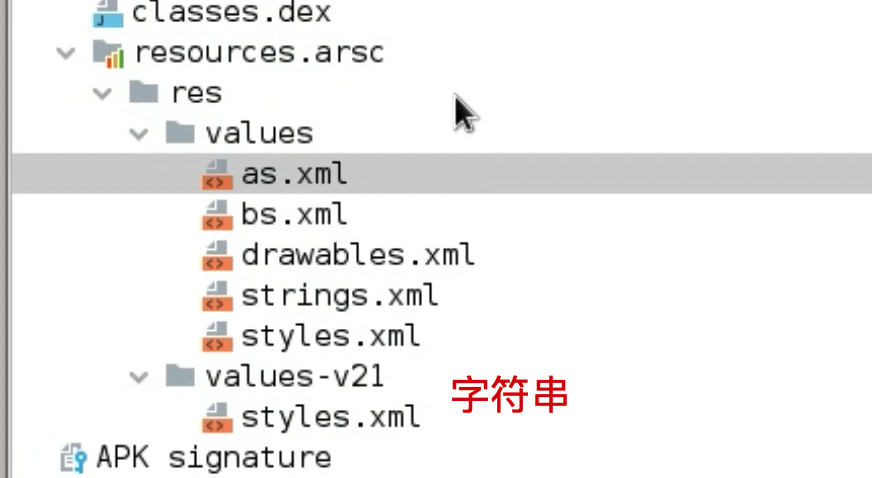
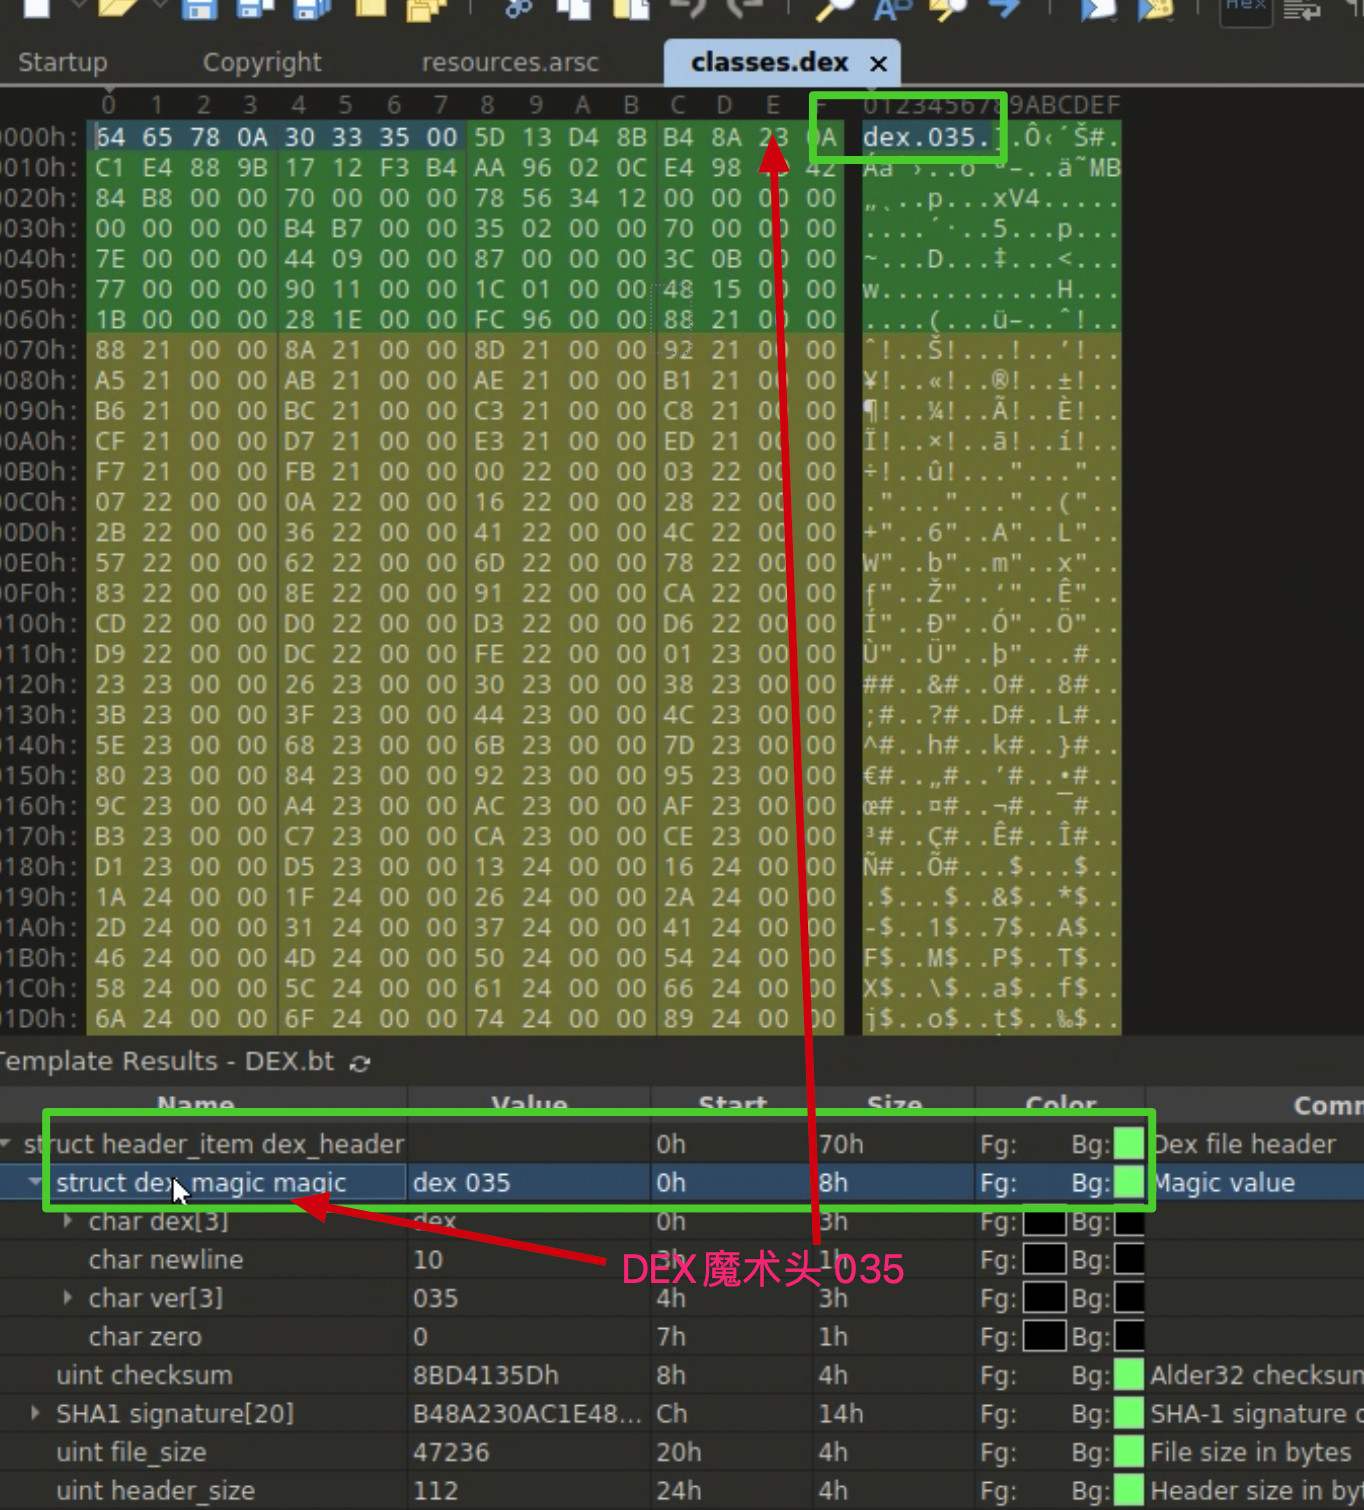
010- editor 打开,自动解析为安卓的资源文件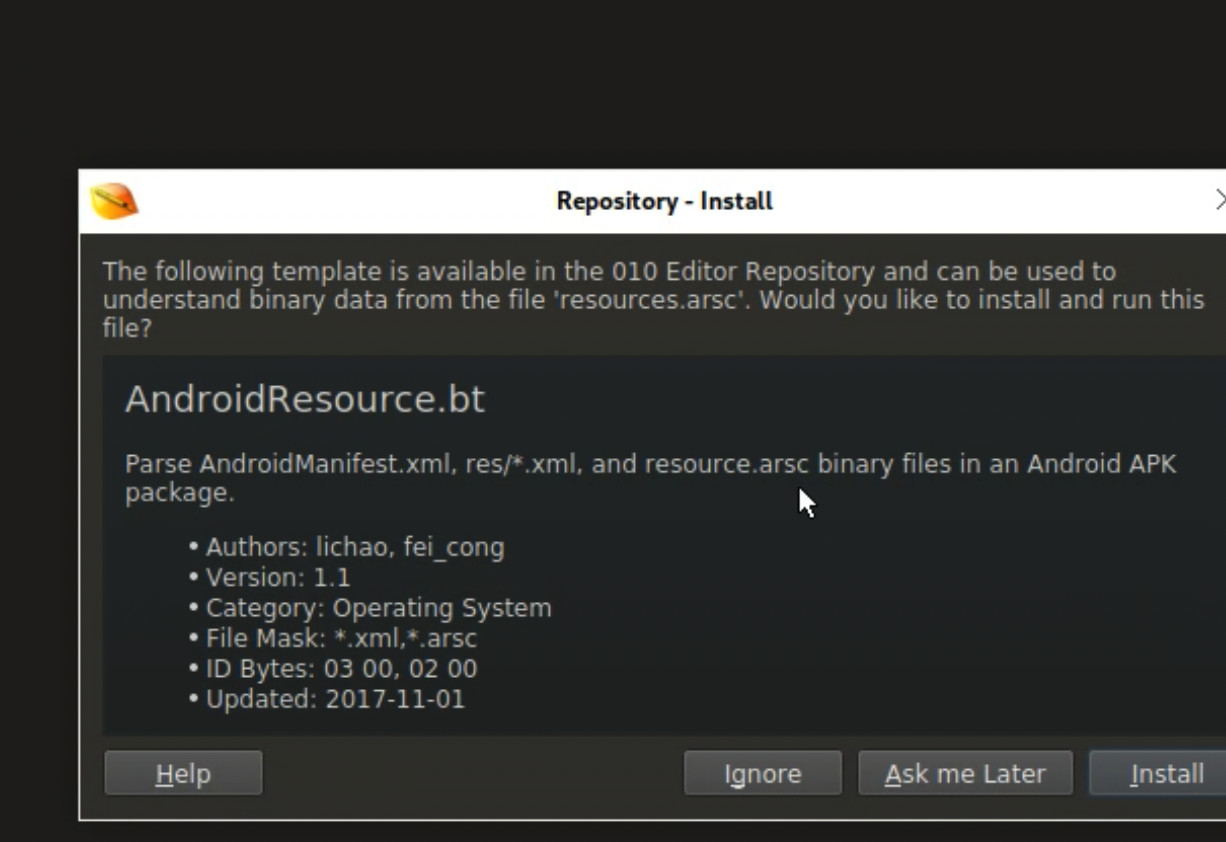
脱壳是一定会用到的工具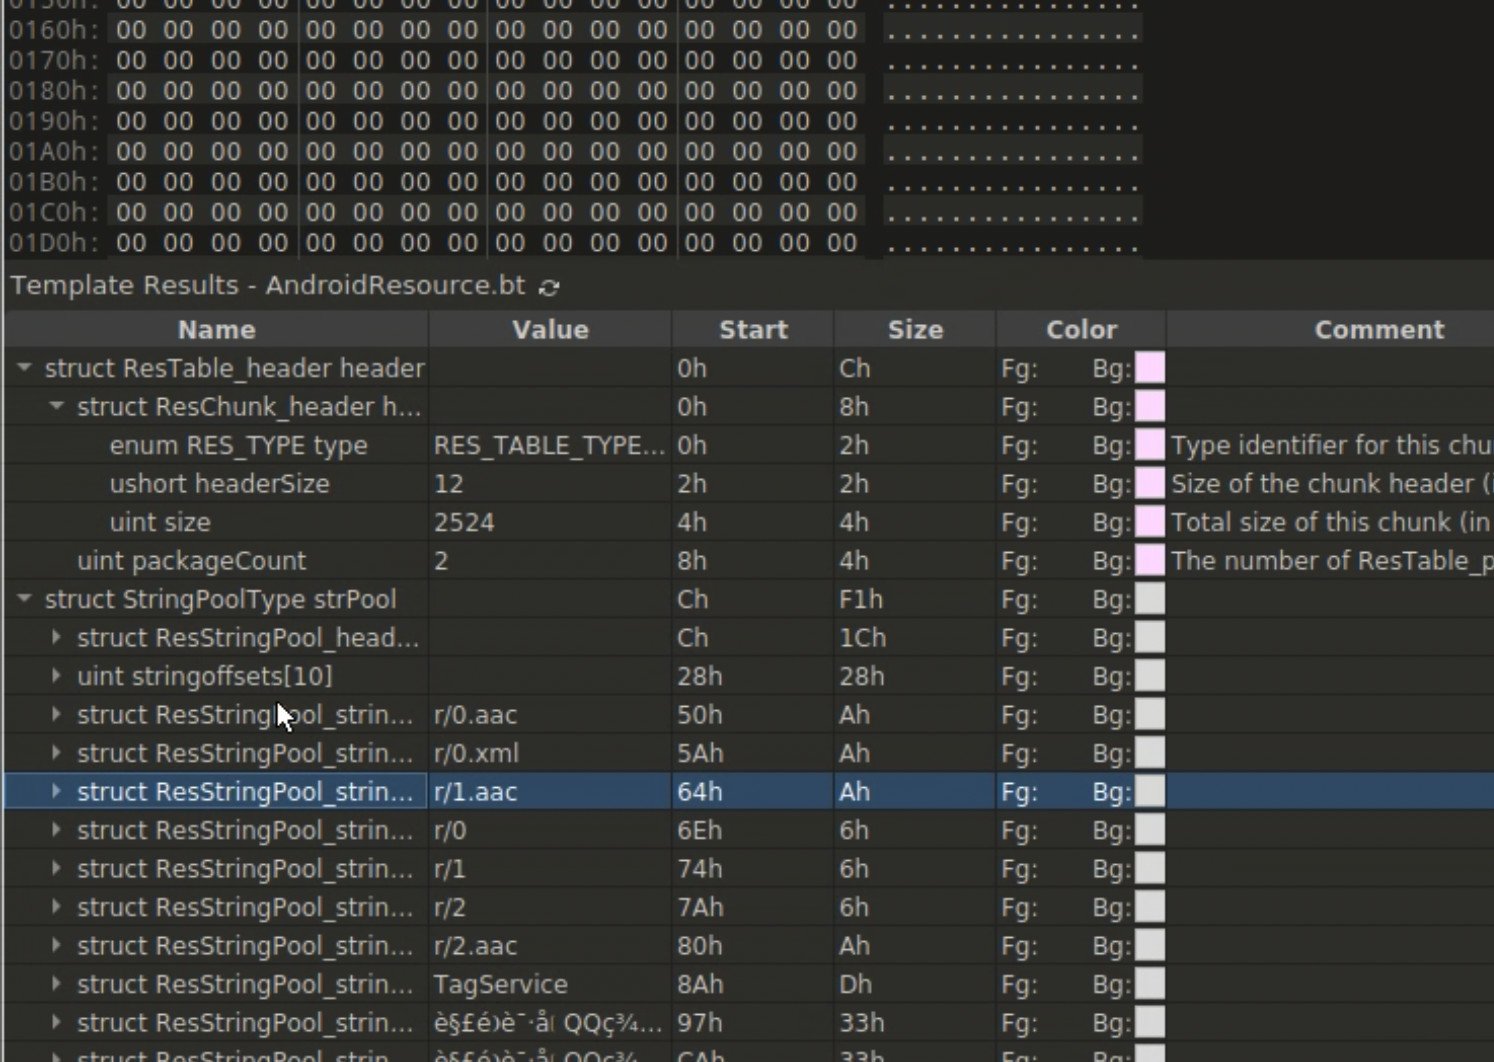
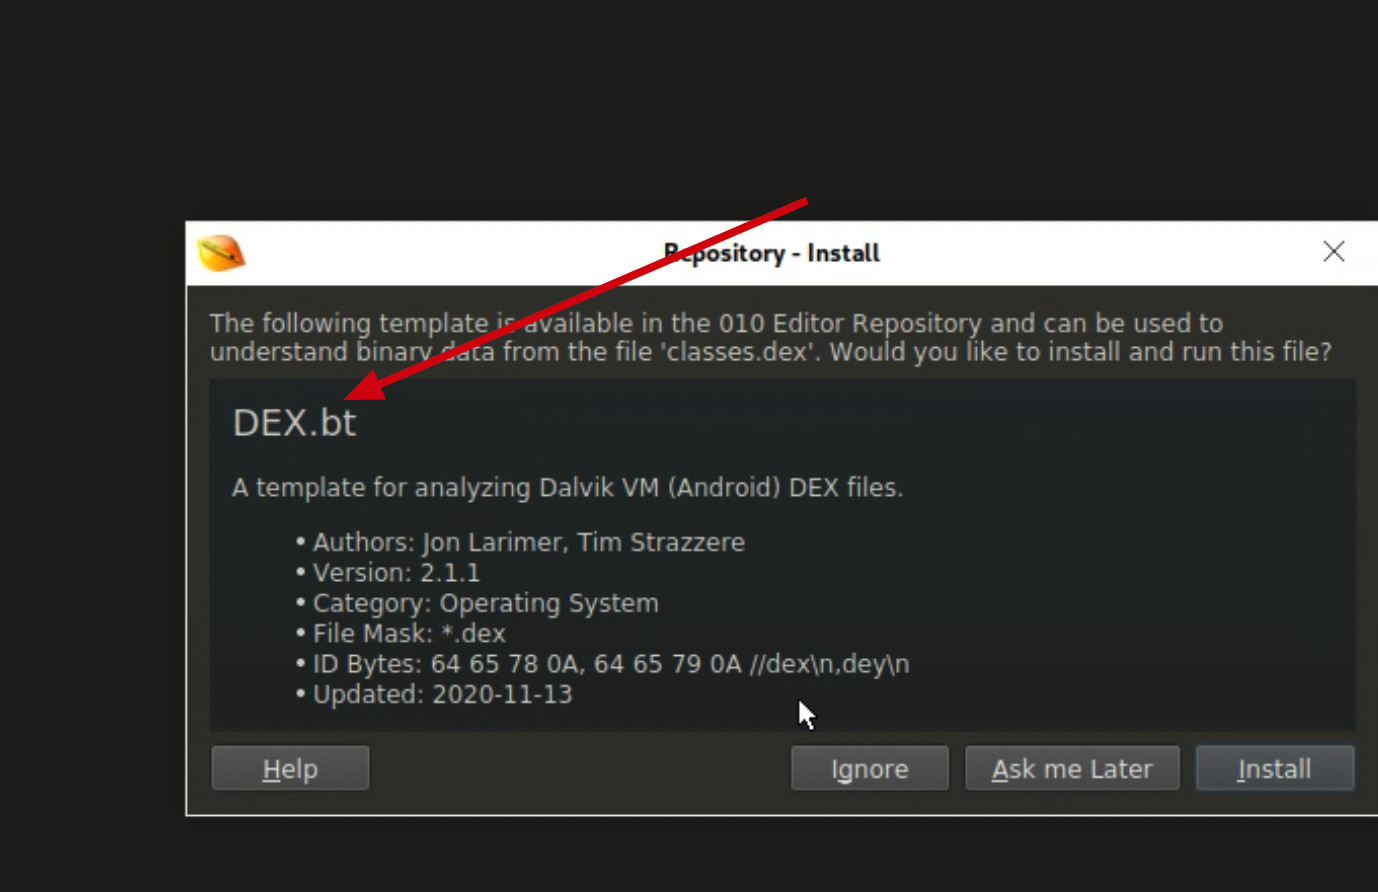
安装Dex文件解析器
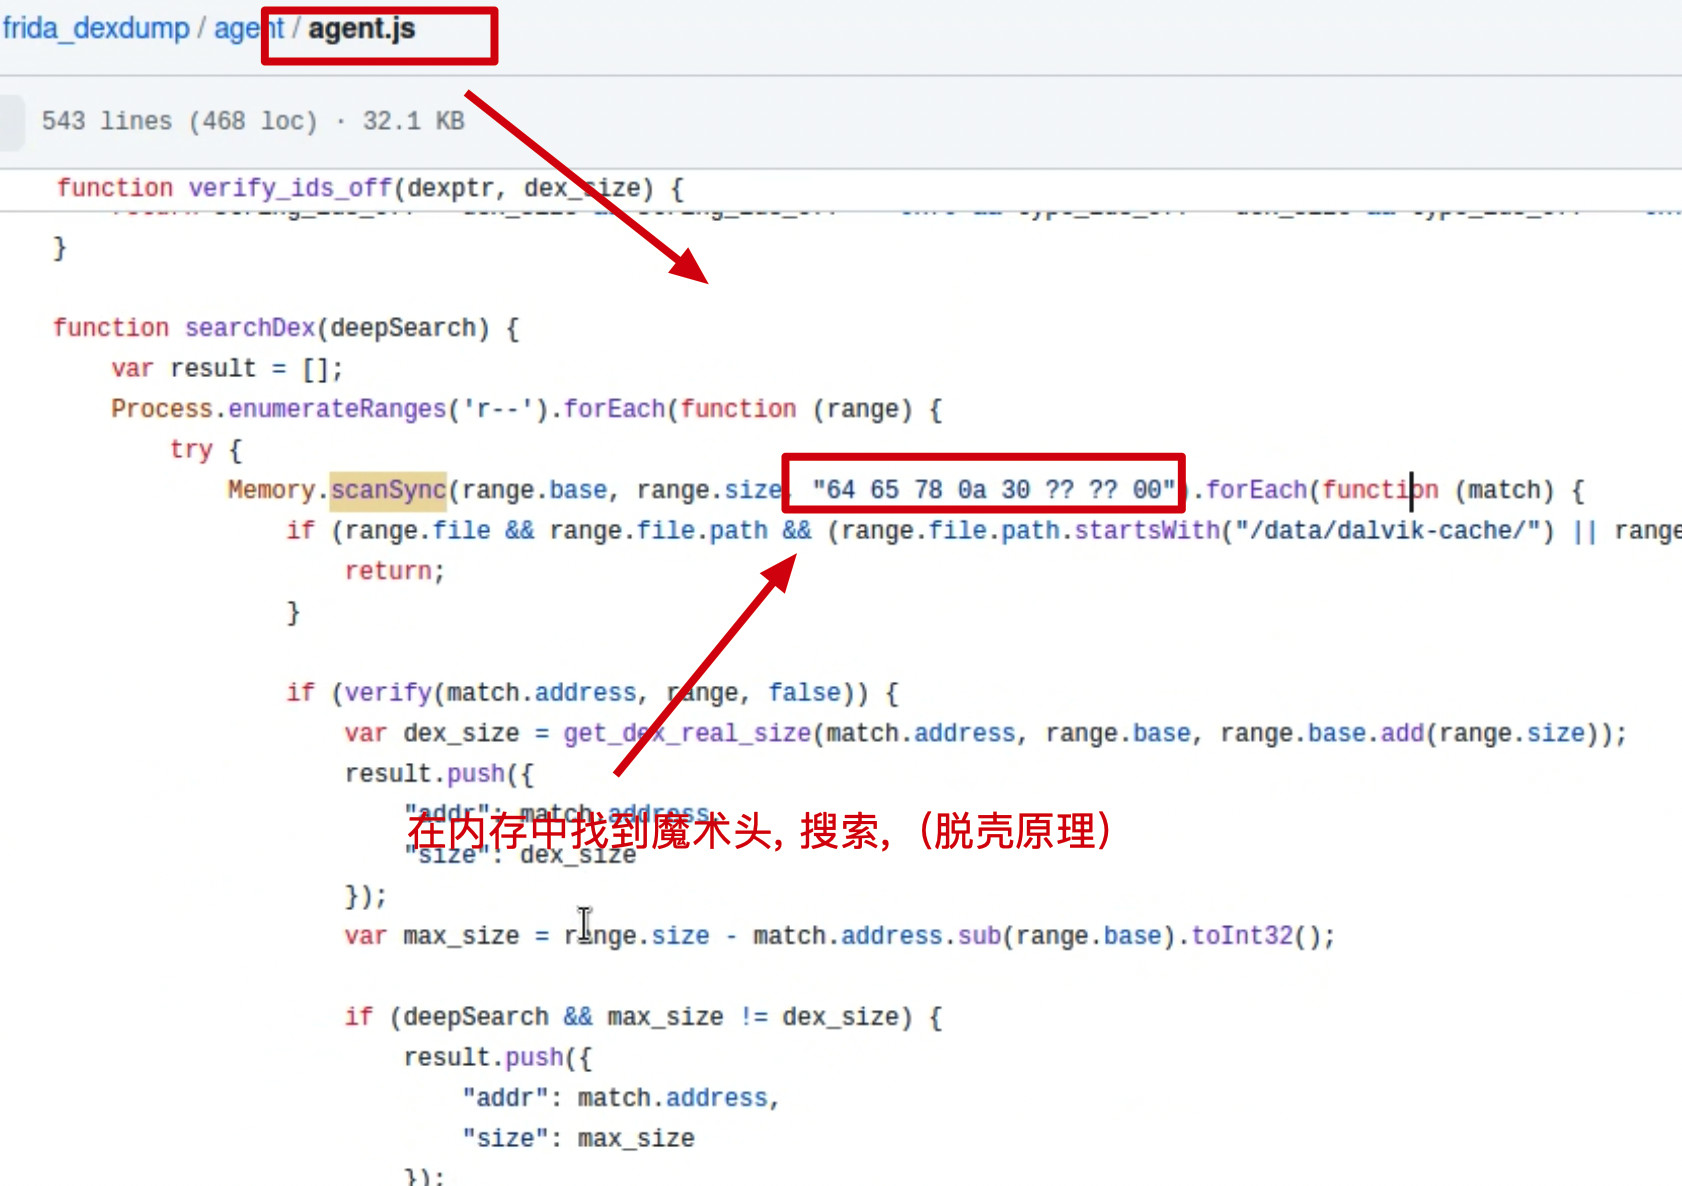
葫芦娃的脱壳脚本原理
DEX文件大小也是通过 文件格式定义声明的.
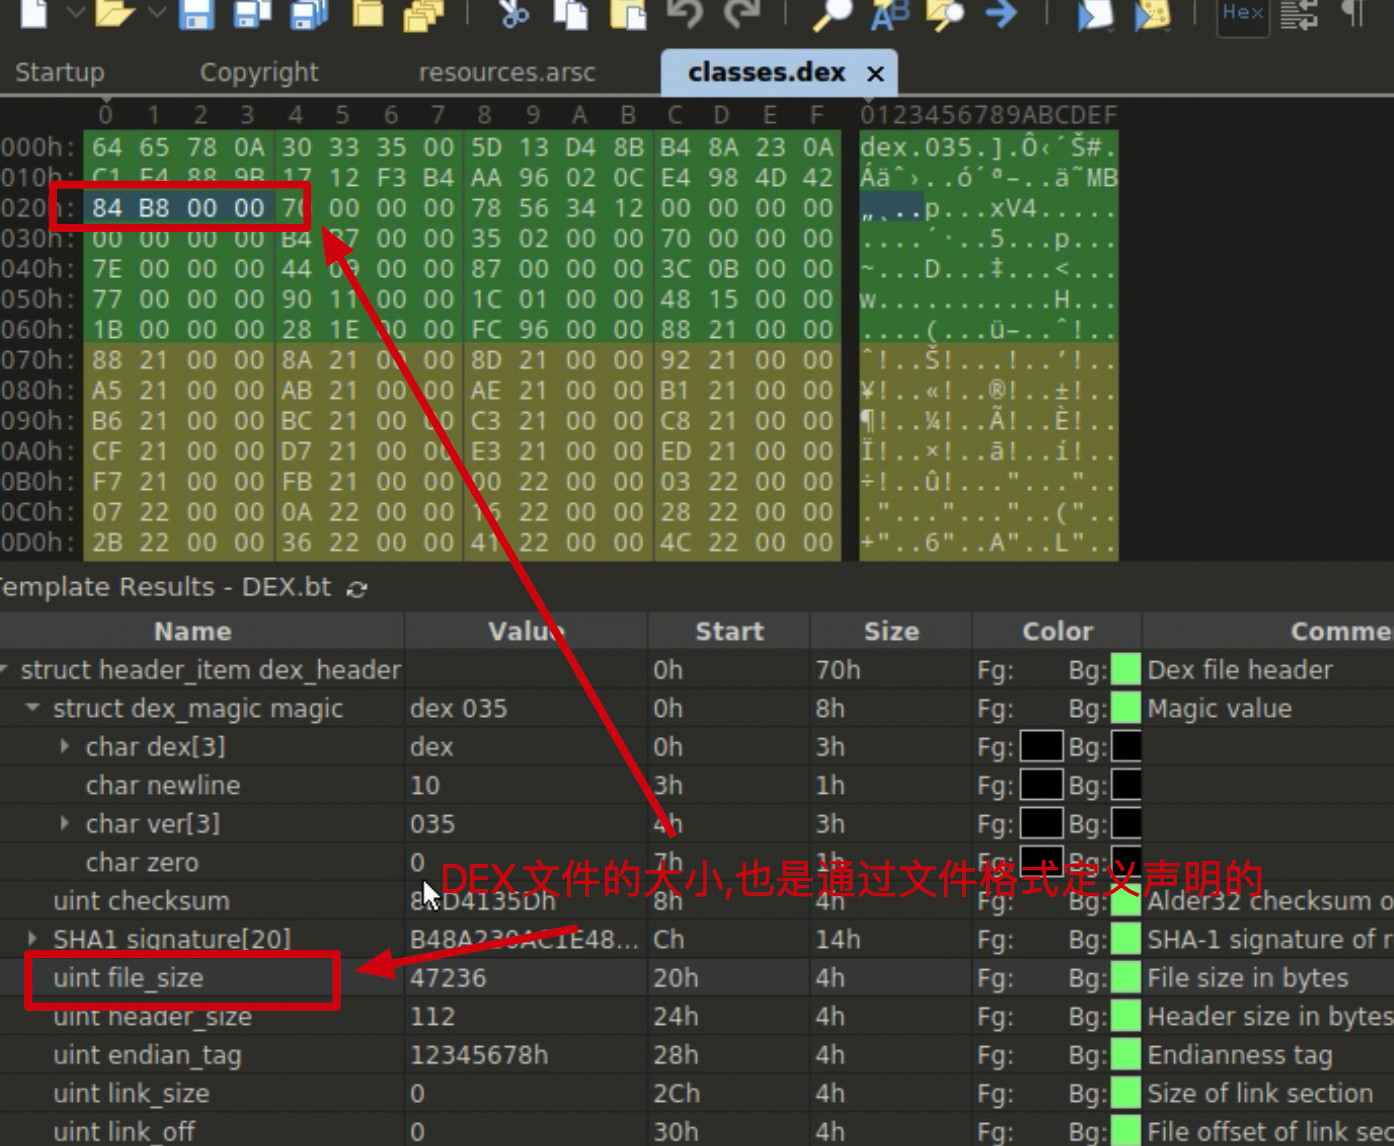
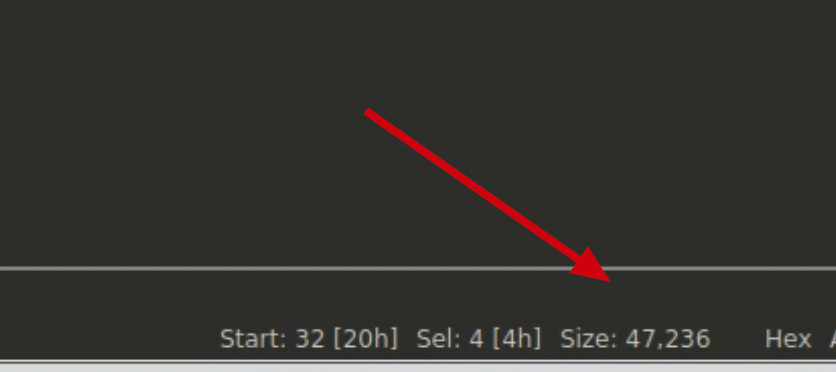
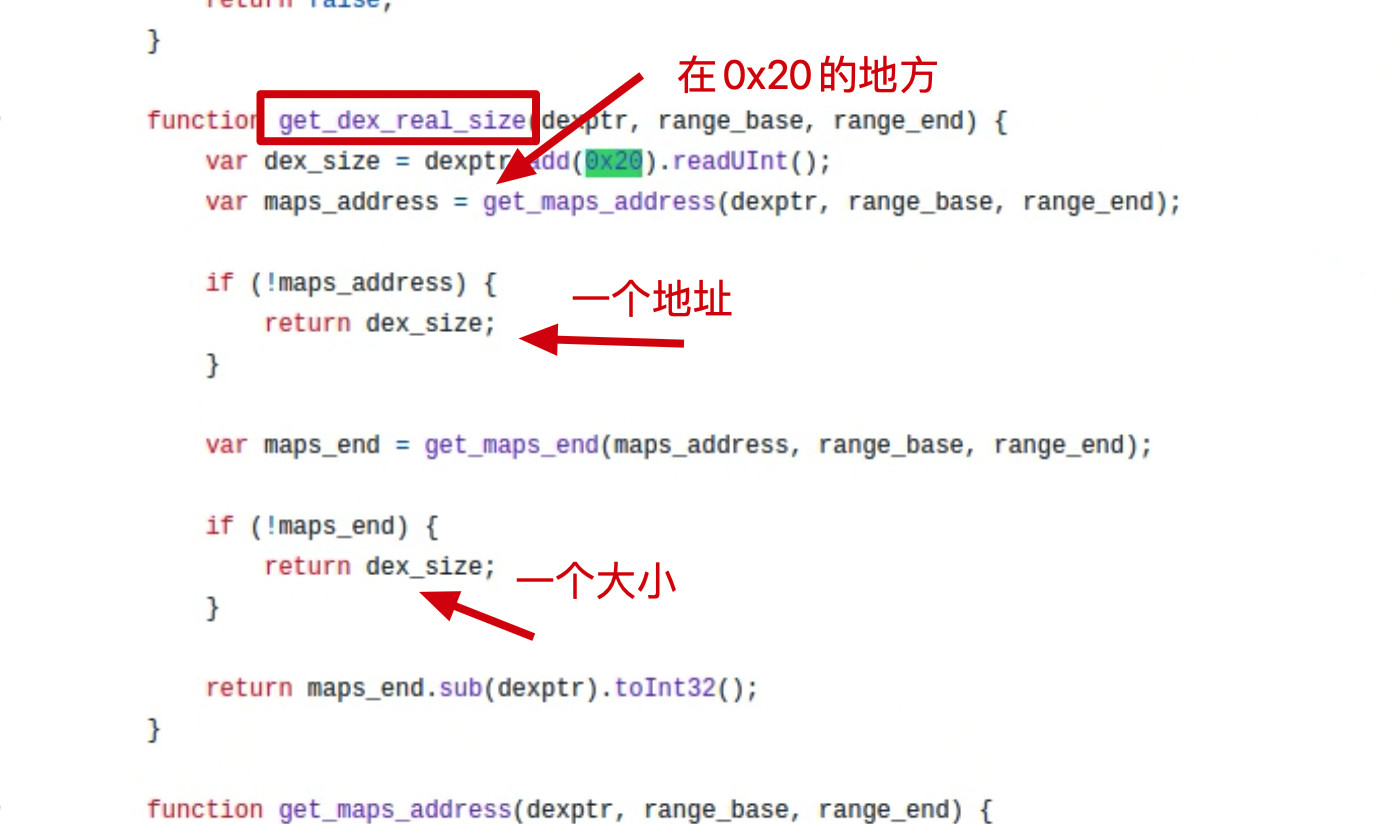
在偏移, 0x20的地方读取大小,工具是相当好用.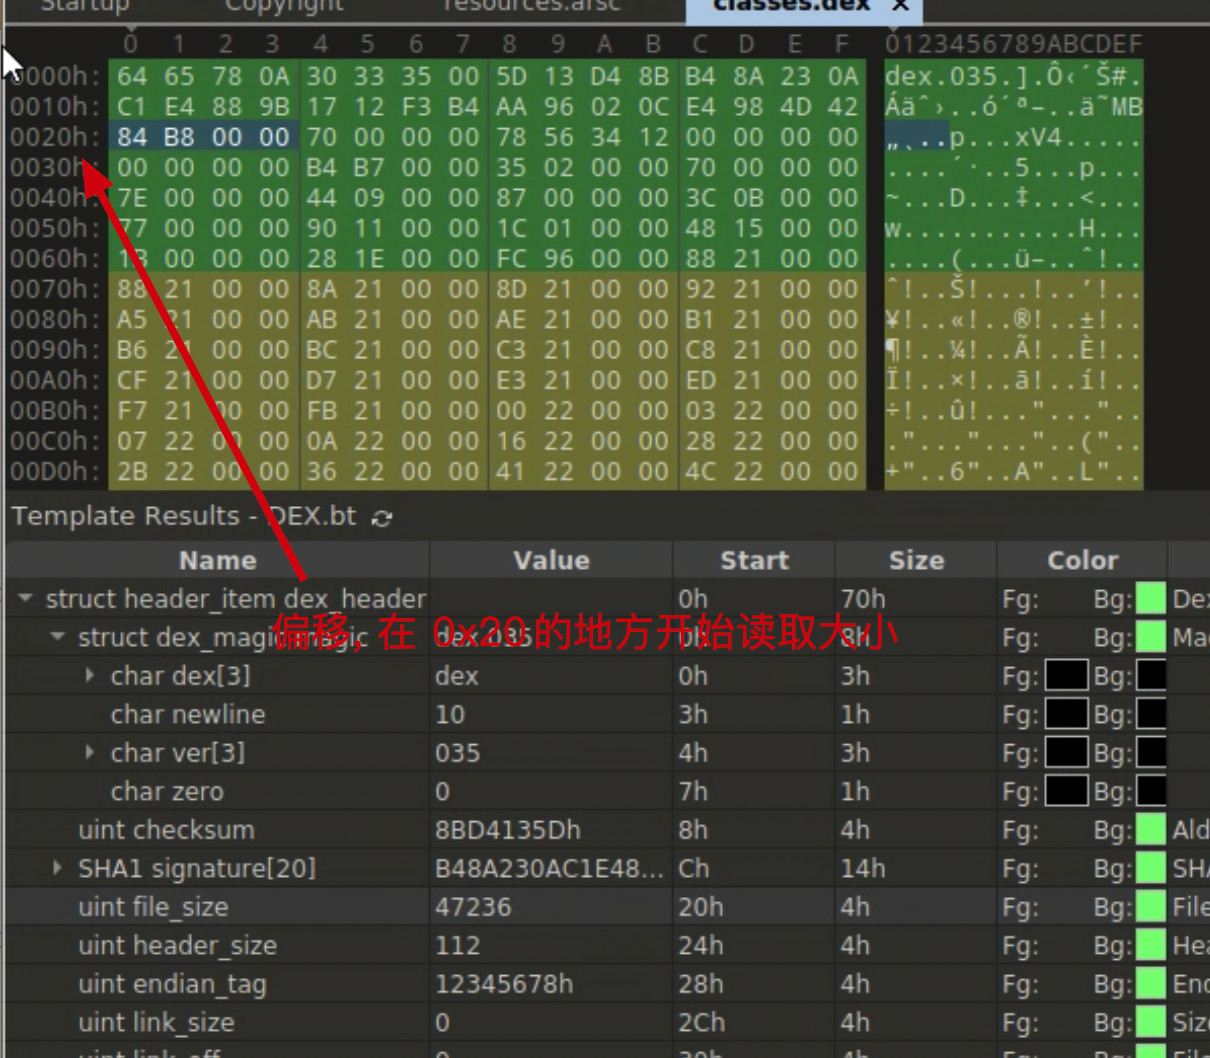
快调 smali, 在算法中调整 ,使用它
如果快速定位系统 api , 那么使用 objection 是最快的.
查看 pyenv预装的环境

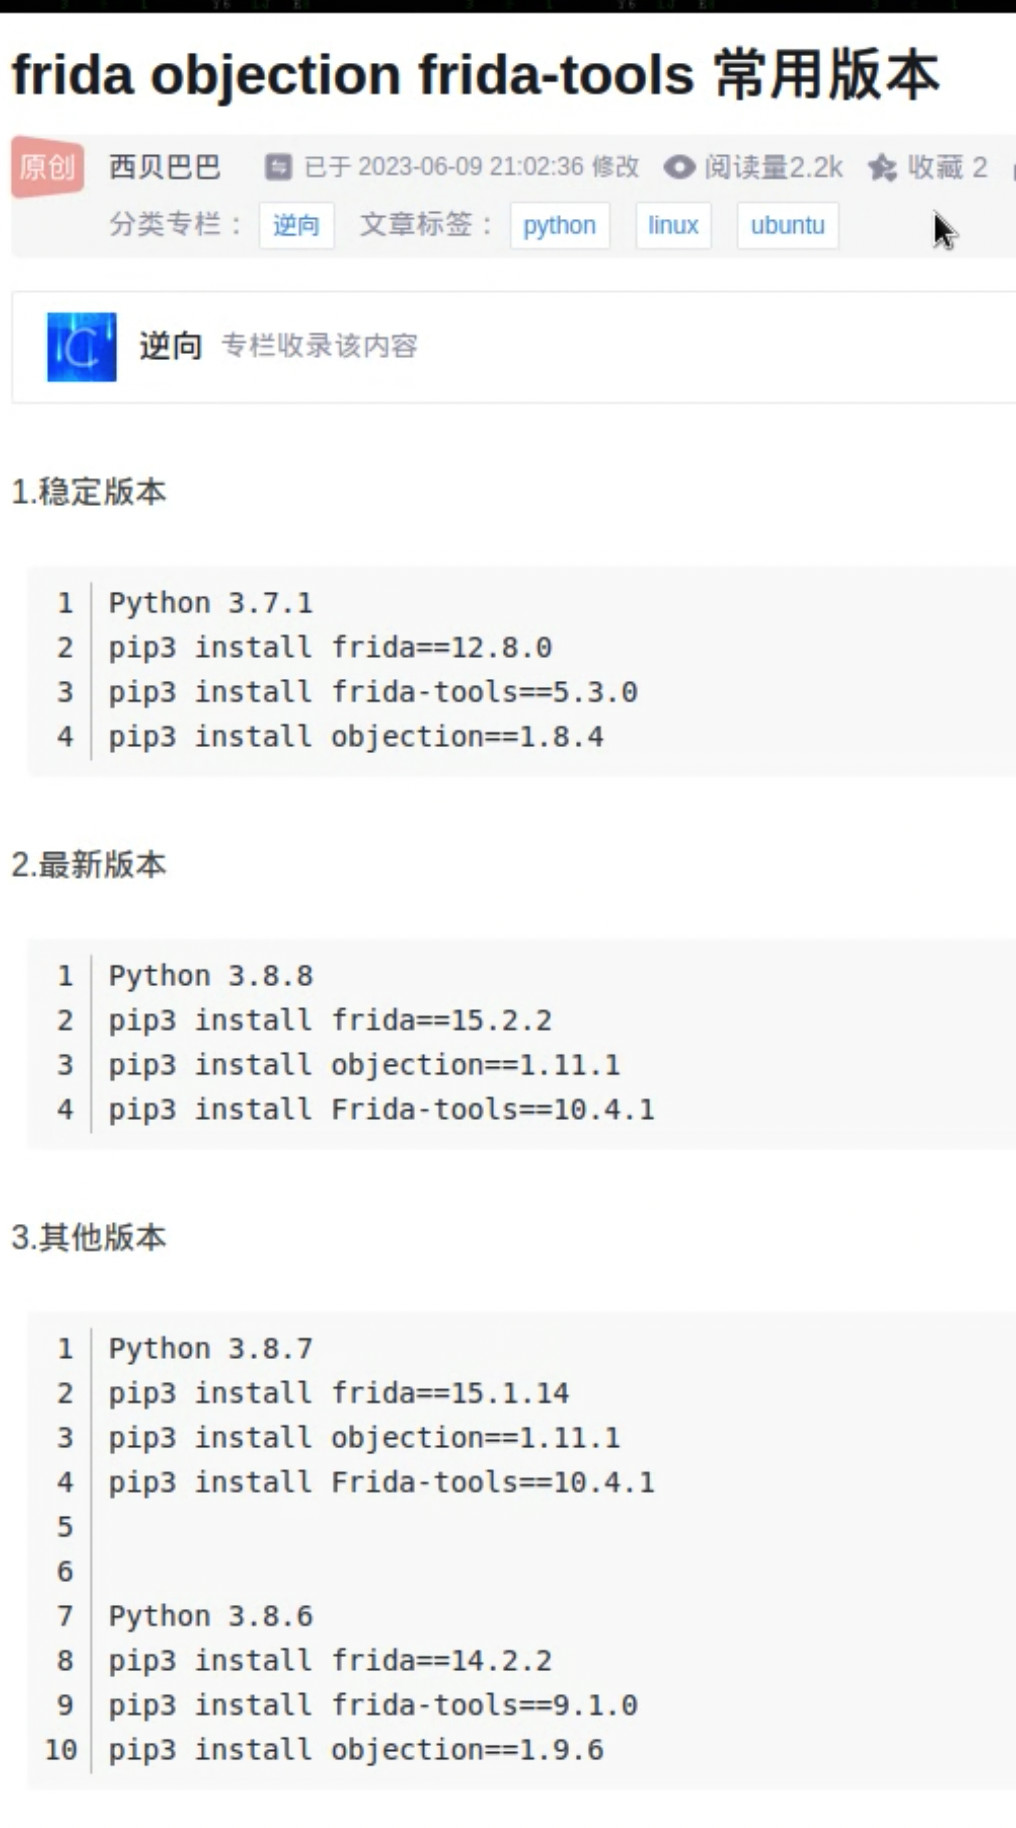
1 2 3 4 5 6 7 8 9 10 11 12 13 14 15 16 17 18 19 20 21 22 23 24 25 26 27 28 29 30 31 32 33 34 35 36 37 38 39 40 41 42 43 44 45 46 47 48 49 50 51 52 53 54 55 56 57 58 59 60 | # pyenv versions r0env,自带pyenv支持多版本Frida/objection切换pyenv install 3.9.5pyenv global 3.9.5pip install frida==16.0.5https://bbs.kanxue.com/thread-276753.htmpyenv install 3.8.0pyenv install 3.10.5pyenv local 3.8.0//python3.8.0对应得frida版本是12.8.0,// 对应得frida-tools是5.3.0// 对应得objection是1.8.4//这里安装顺序步能乱,必须先frida在frida-toolspip install frida==12.8.0pip install frida-tools==5.3.0pip install objection==1.8.4https://bbs.kanxue.com/thread-273728.htm#msg_header_h1_5代码写完之后,按vscode的快捷键ctrl + ~,即可调出vscode的内置终端,[原创]linux指令的一些笔记.https://bbs.kanxue.com/thread-269867.htm[原创]Frida脚本开发环境https://bbs.kanxue.com/thread-268999.htm多版本管理用,星球里介绍过的pyenvhttps://bbs.kanxue.com/thread-248977.htm一文读懂Python版本管理工具Pyenv使用http://wpue.com/28713.html#pyenv versions //查看所有预装r0env2022版本#pyenv local x.x.x //python版本└─# pyenv versions system* 3.8.0 (set by /etc/apt/sources.list.d/.python-version) 3.8.5 3.9.0└─# pyenv local 3.8.0 └─# frida --version12.8.0└─# objection version objection: 1.8.4└─# pyenv local 3.8.5 └─# frida --version 14.2.18└─# objection version objection: 1.11.0 └─# pyenv local 3.9.0└─# frida --version 15.2.2└─# objection version objection: 1.11.0 |
分析自己写的 apk
检查手机系统架构
getprop ro.product.cpu.abi
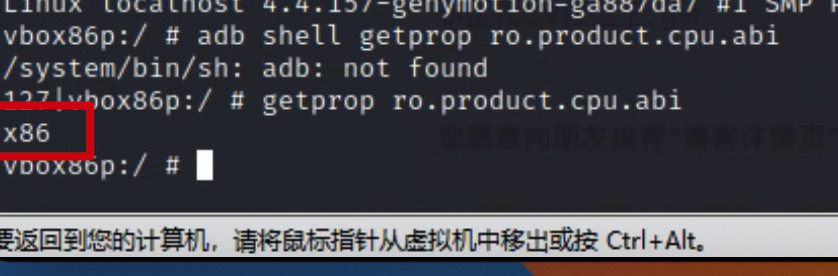
结果是 32bit 的 x86架构
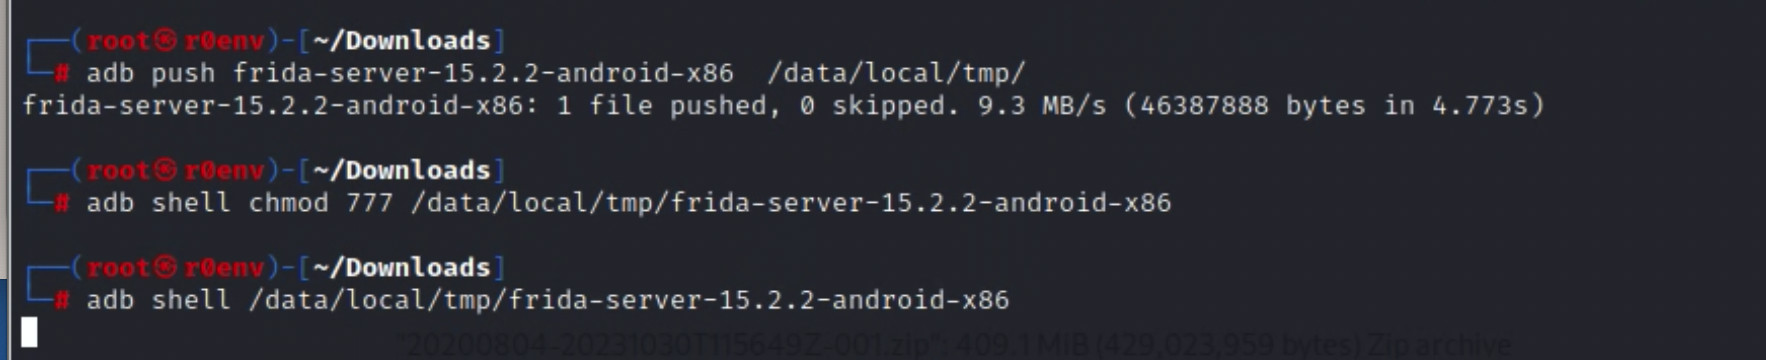
1 2 3 4 5 6 7 8 9 | ┌──(root㉿r0env)-[~/Downloads/20200804/Lesson01note]└─# adb push frida-server-14.2.8-android-x86 /data/local/tmp/frida-server-14.2.8-android-x86: 1 file pushed, 0 skipped. 9.8 MB/s (42901140 bytes in 4.166s)┌──(root㉿r0env)-[~/Downloads/20200804/Lesson01note]└─# adb shell chmod 777 /data/local/tmp/frida-server-14.2.8-android-x86┌──(root㉿r0env)-[~/Downloads/20200804/Lesson01note]└─# adb shell /data/local/tmp/frida-server-14.2.8-android-x86 |
切换版本还是问题
继续切换版本
终于跑起来,正常了.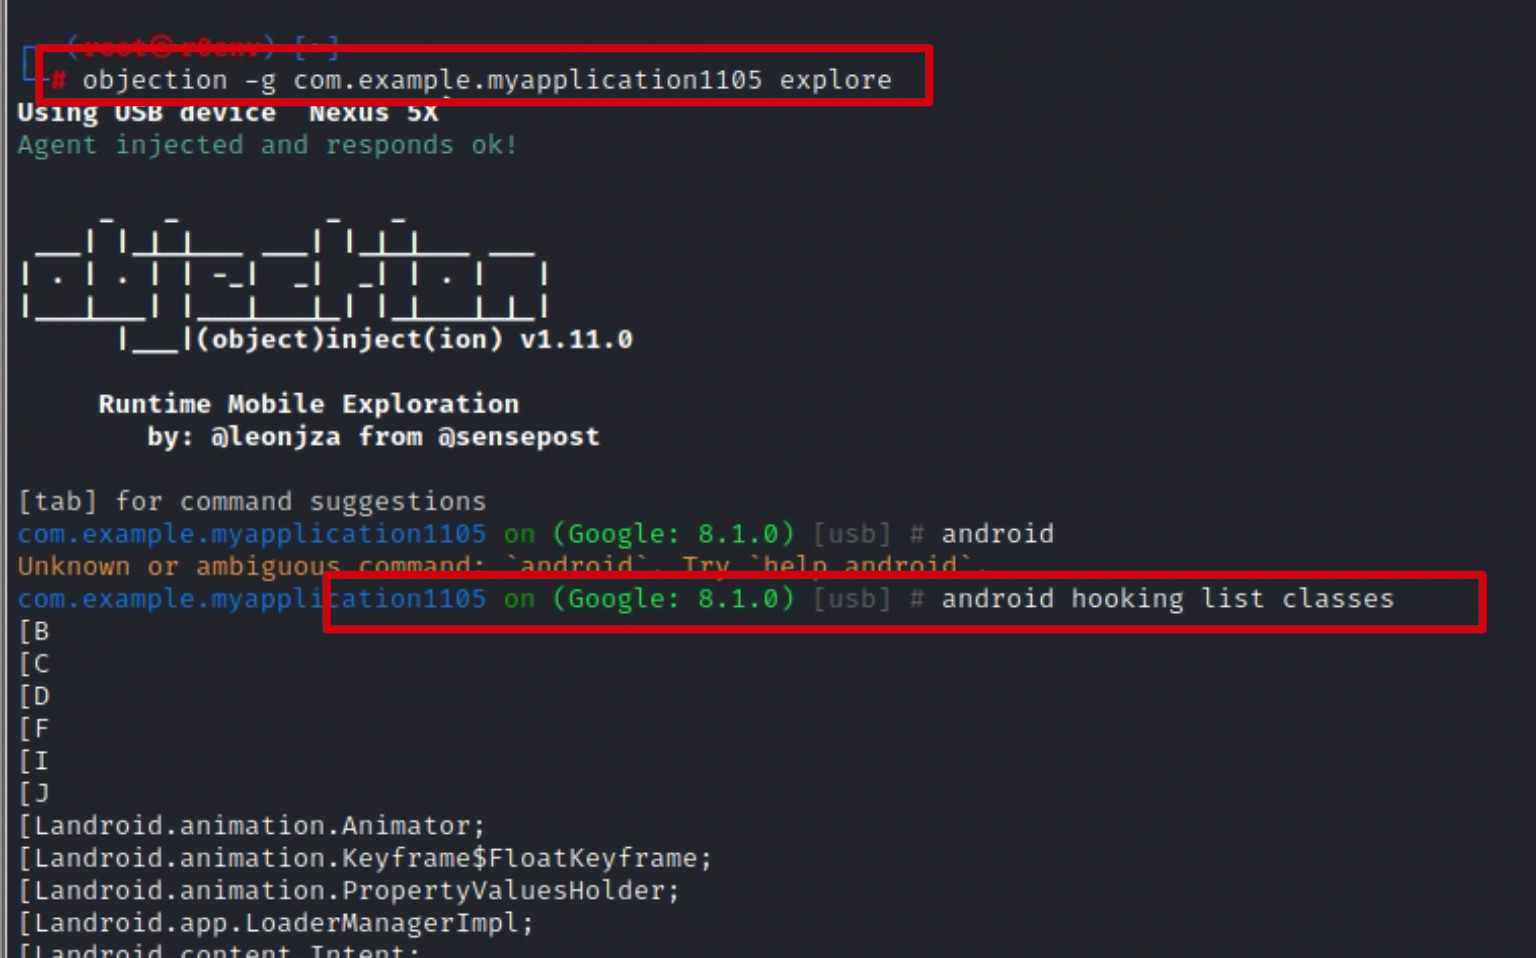
新开窗口, 过滤 class
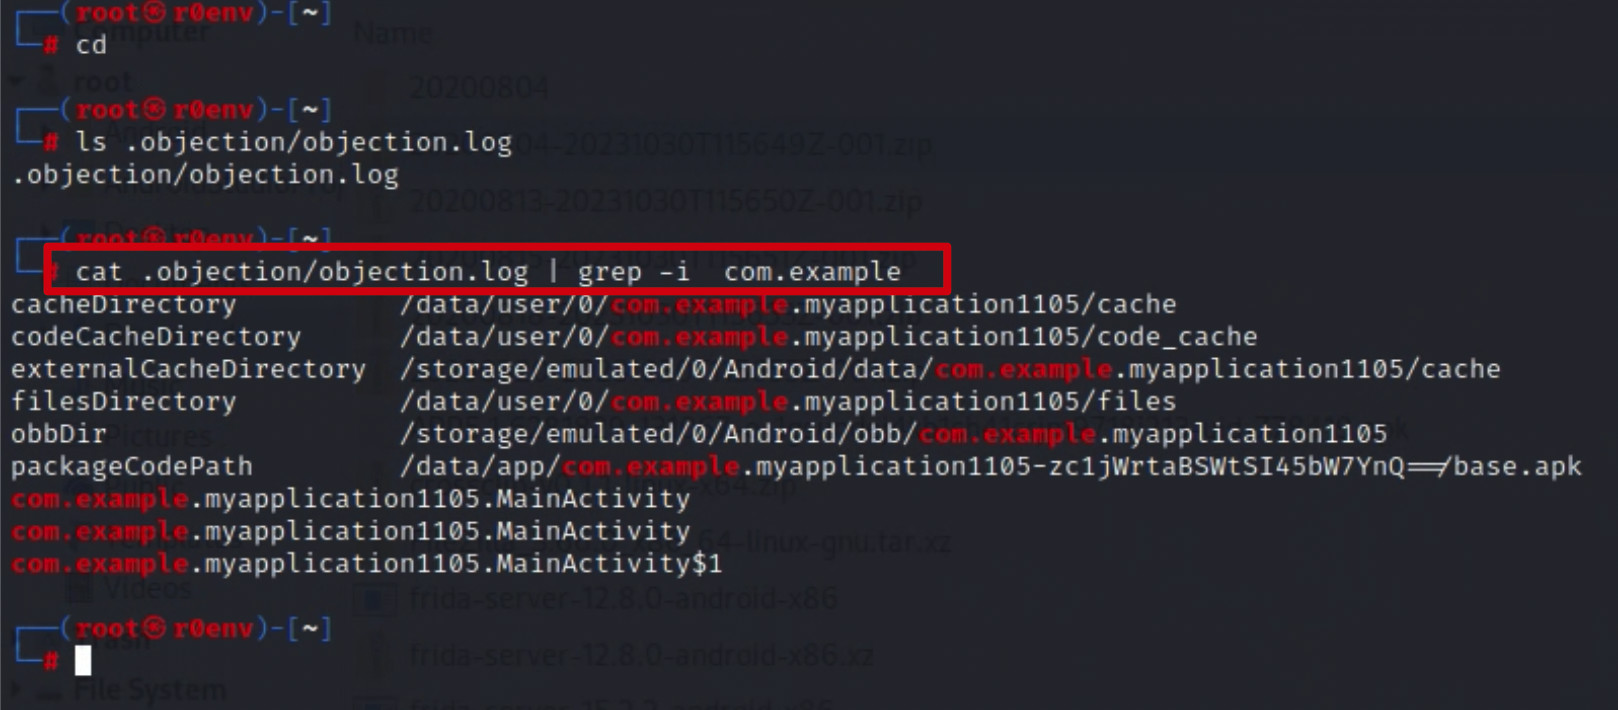
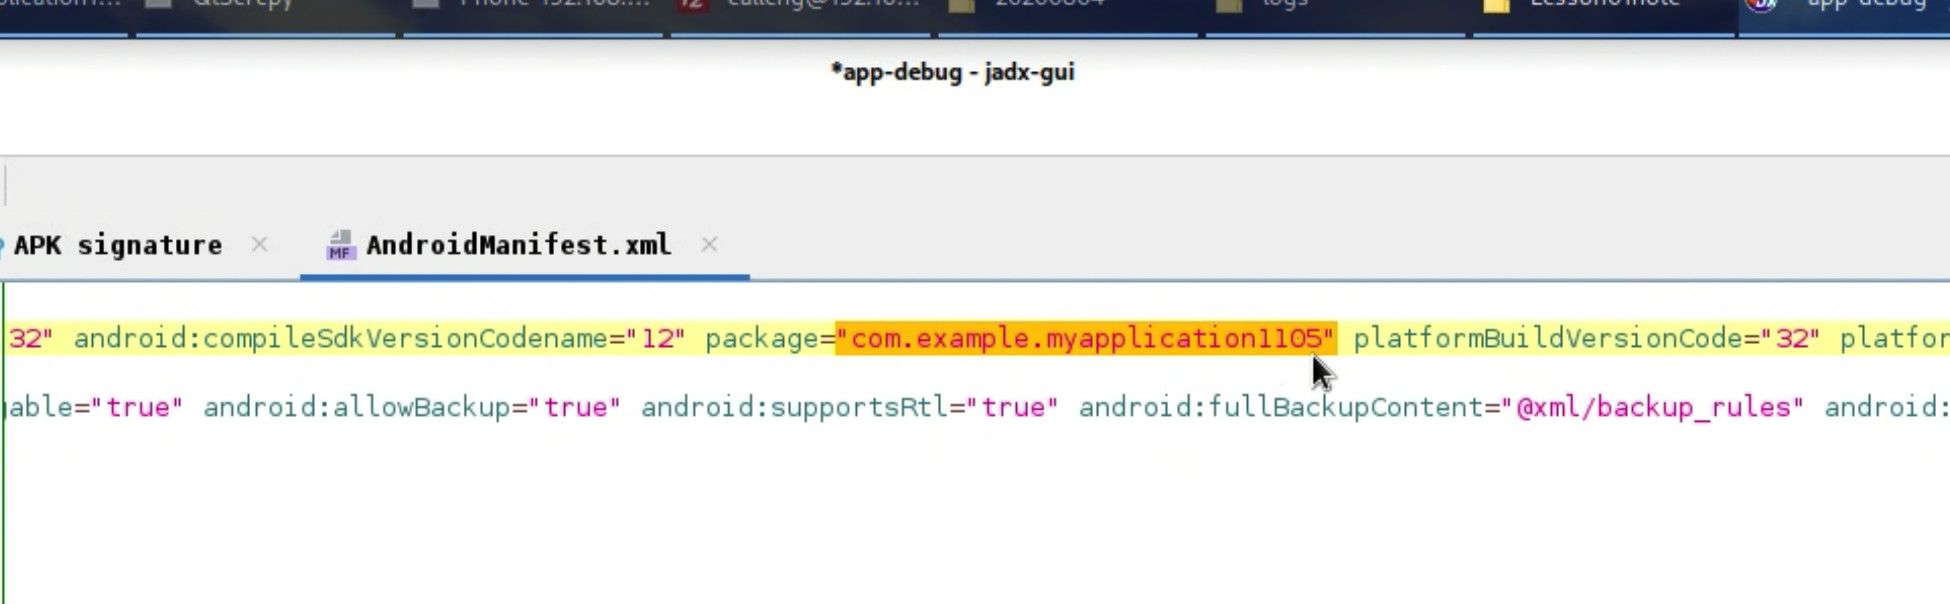
使用 jadx-gui 静态分析 MainActivity
1 2 3 4 5 6 7 8 9 10 11 12 13 14 | proxychains git clone https://github.com/hluwa/Wallbreaker /root/.objection/plugins/Wallbreaker#### 加载插件的方式//加载插件objection -g com.example.myapplication1105 explore -P /root/.objection/plugins根据上面找到的 名称动态的窗口com.example.myapplication1105.MainActivitycom.example.myapplication1105.MainActivitycom.example.myapplication1105.MainActivity$1objection加载成功后,输入plugin wallbreaker classdump com.example.myapplication1105.MainActivity |

葫芦娃真niu bi. plus
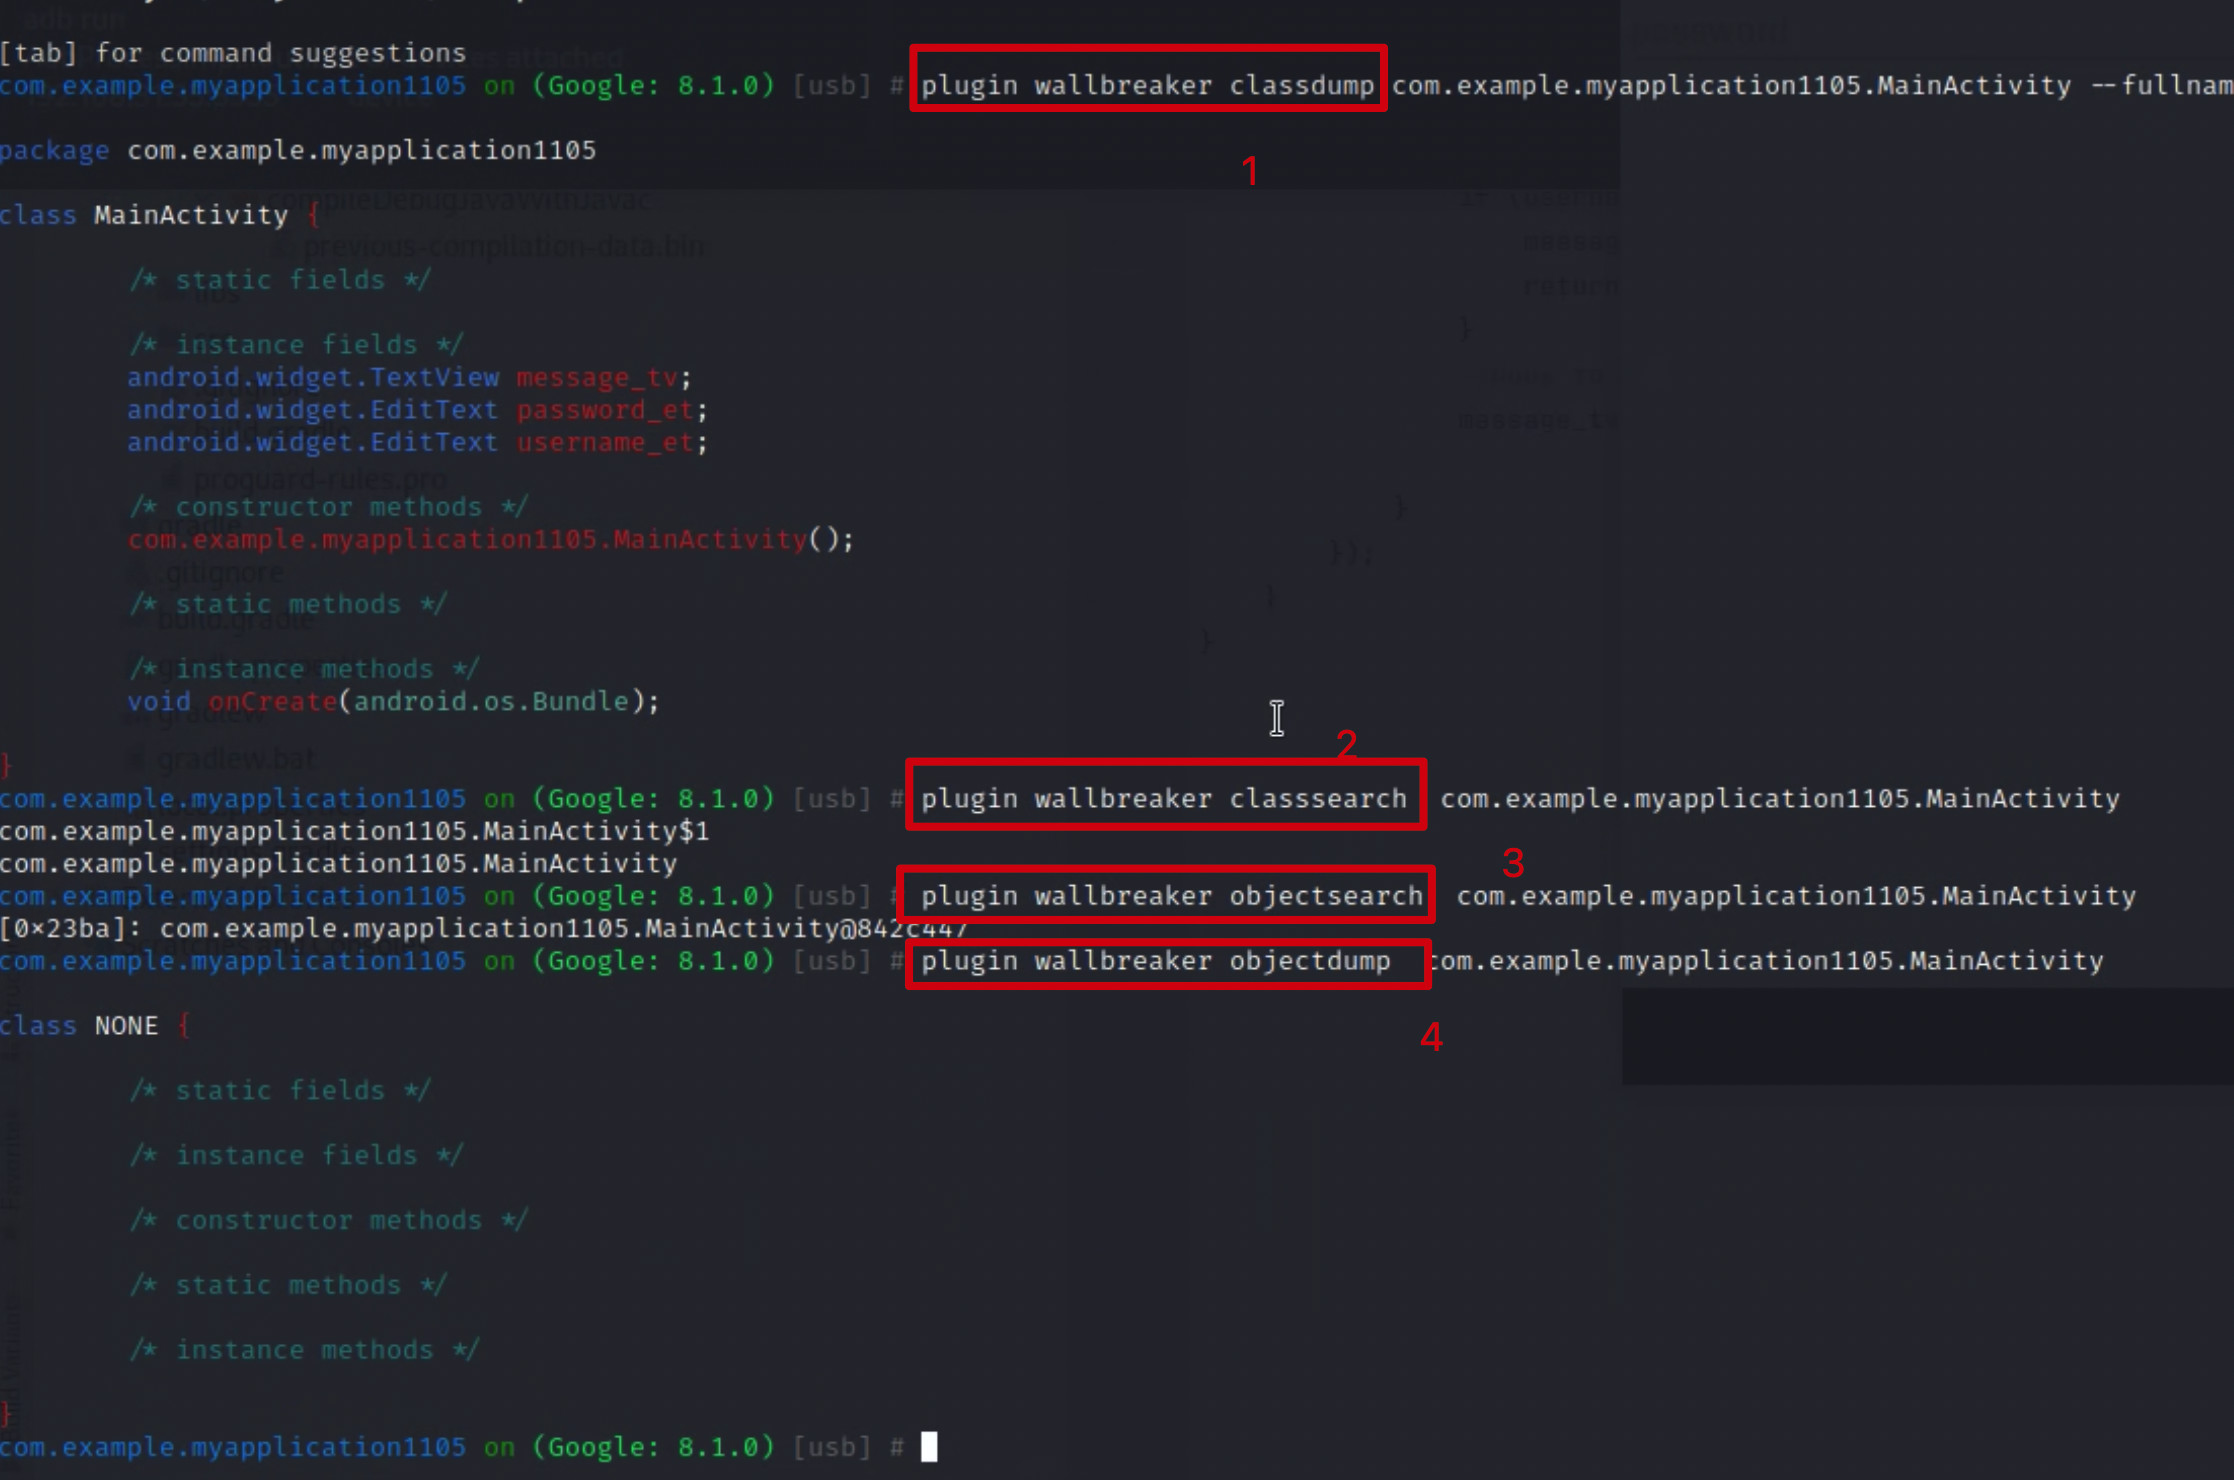
静态反编译, 寻找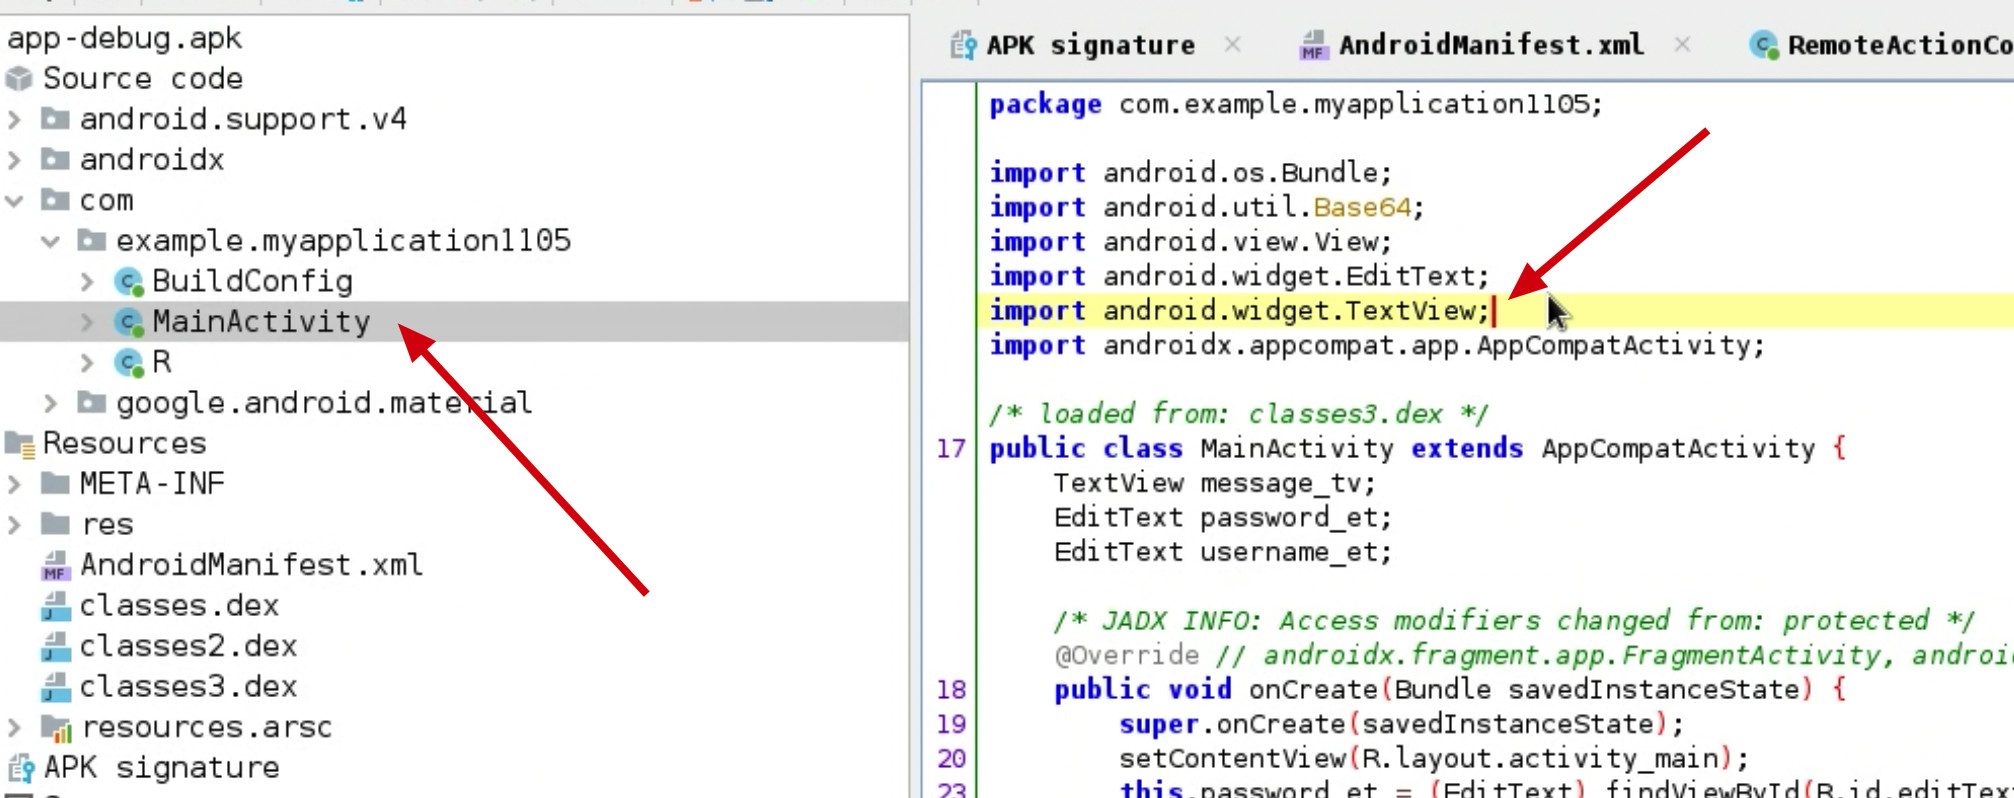
动态反编译,确认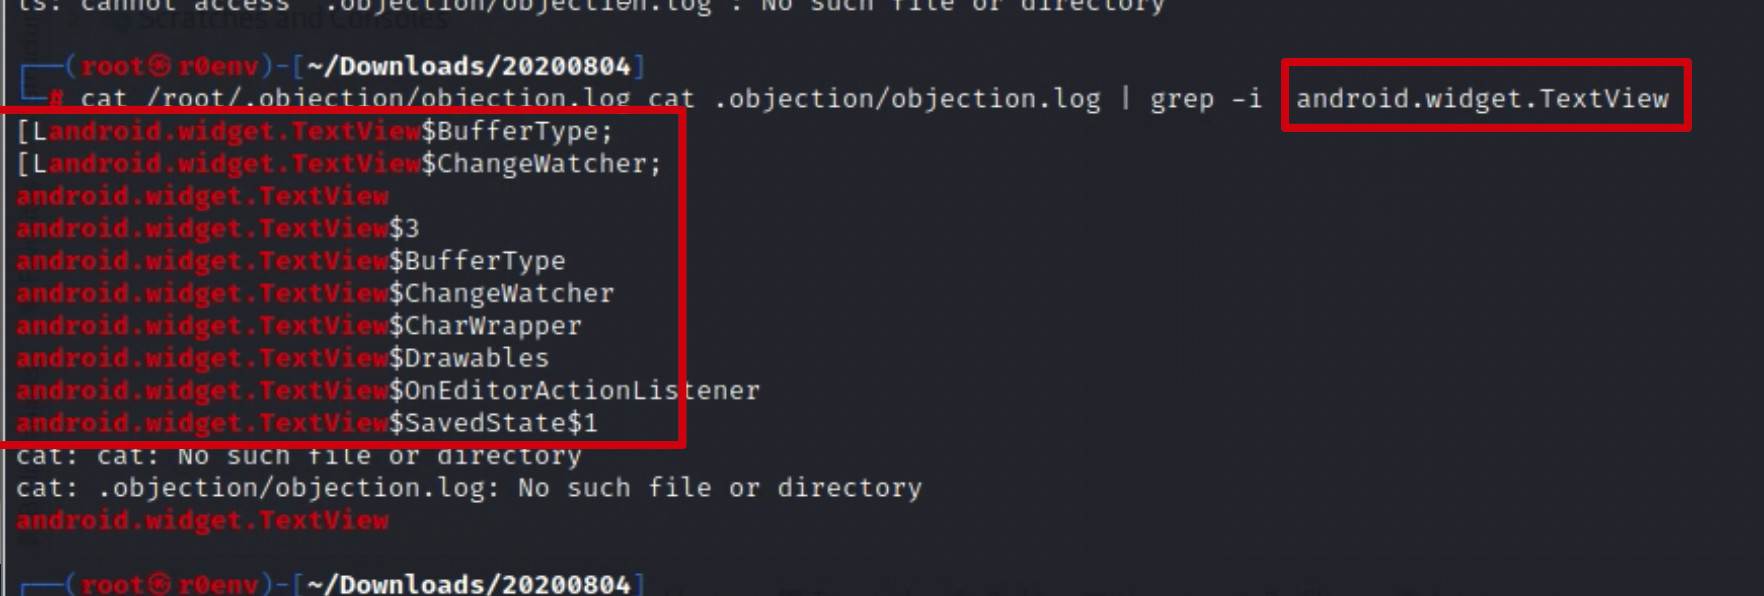

方法名找到了, hook 他的class
1 | android hooking watch class_method android.widget.TextView.setText --dump-args --dump-backtrace --dump-return |

被系统命中

动态从内存中打印出来的class 才是真的, 静态的只做分析的参考.
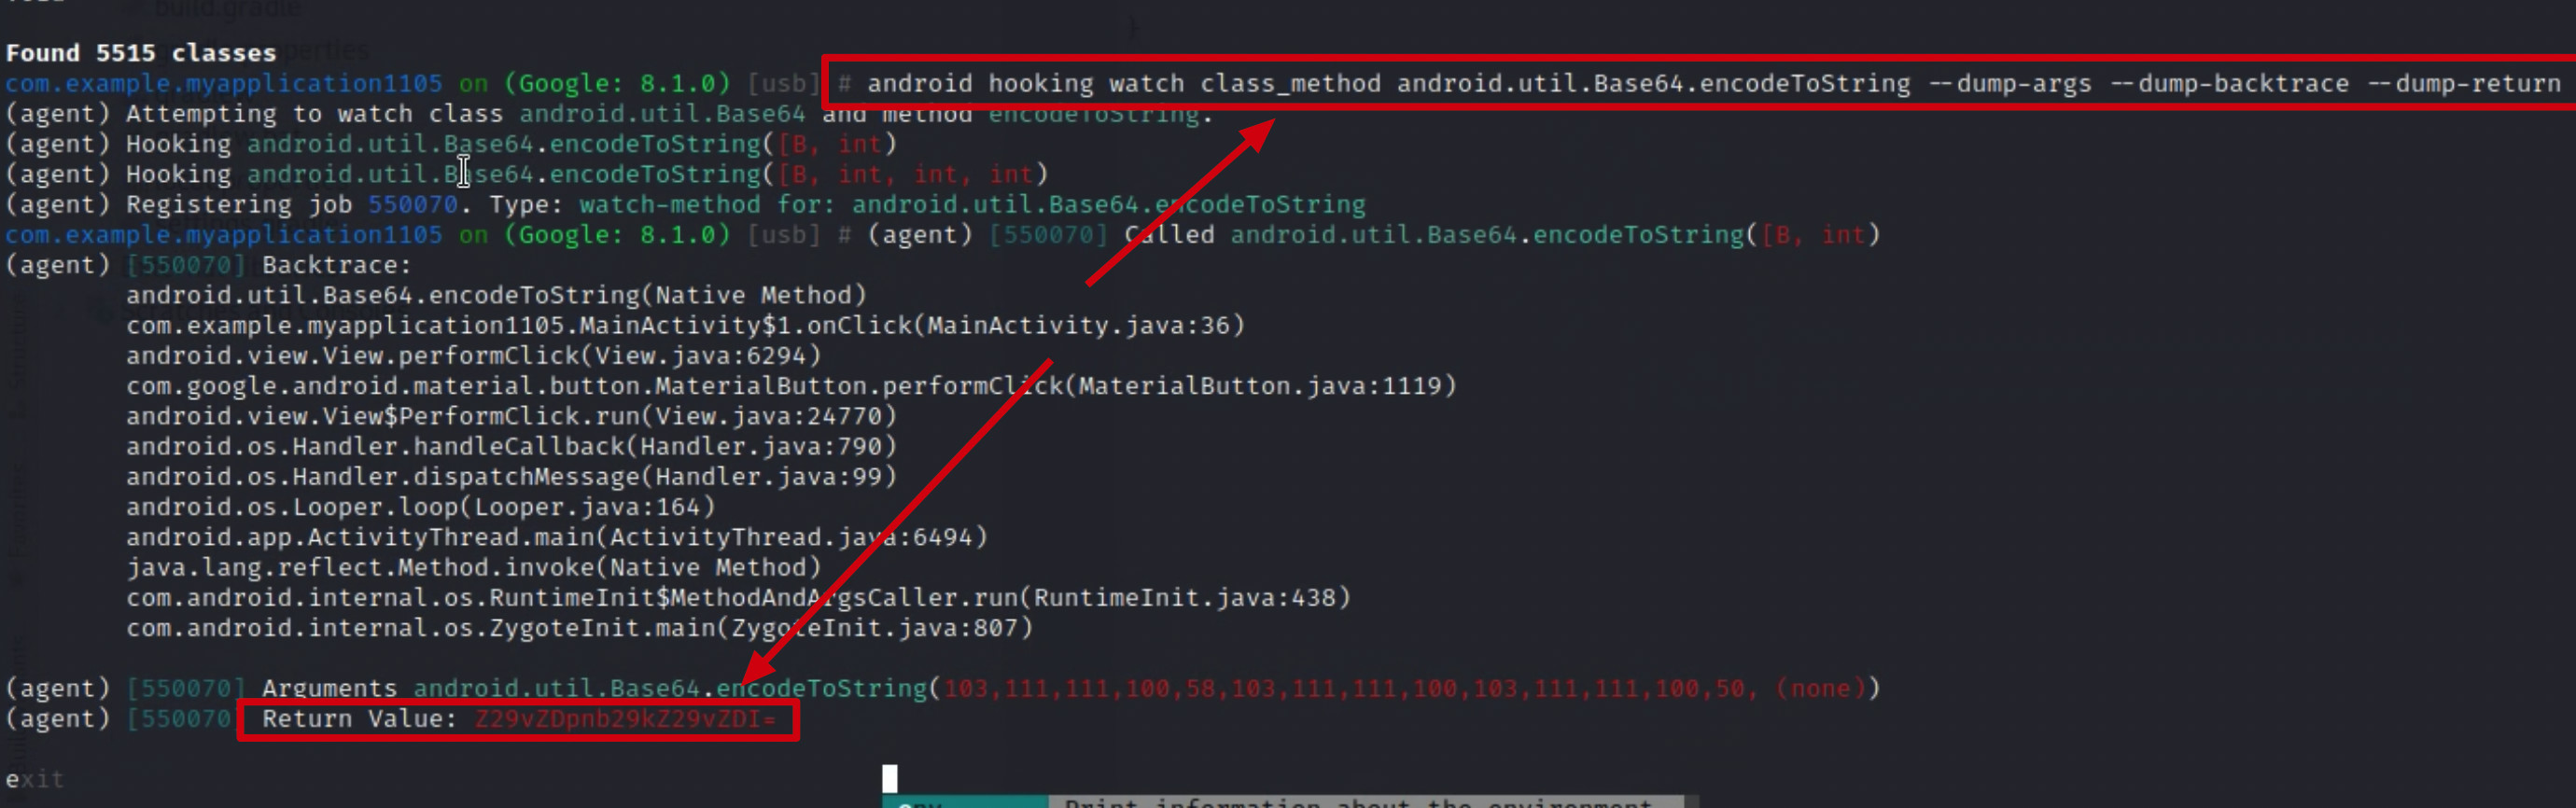
1 | android hooking watch class_method android.util.Base64.encodeToString --dump-args --dump-backtrace --dump-return |
1 2 3 4 5 6 7 8 9 10 11 12 13 14 15 16 17 18 19 20 21 22 23 24 25 26 27 28 29 30 31 32 33 34 35 36 37 38 39 40 41 42 43 44 45 46 47 48 49 50 51 52 53 54 55 56 57 58 59 60 61 62 63 64 65 66 67 | com.example.myapplication1105 on (Google: 8.1.0) [usb] # android hooking watch class_method android.widget.TextView.setText --dump-args --dump-backtrace --dump-return(agent) Attempting to watch class android.widget.TextView and method setText.(agent) Hooking android.widget.TextView.setText(java.lang.CharSequence, android.widget.TextView$BufferType, boolean, int)(agent) Hooking android.widget.TextView.setText(int)(agent) Hooking android.widget.TextView.setText(int, android.widget.TextView$BufferType)(agent) Hooking android.widget.TextView.setText(java.lang.CharSequence)(agent) Hooking android.widget.TextView.setText(java.lang.CharSequence, android.widget.TextView$BufferType)(agent) Hooking android.widget.TextView.setText([C, int, int)(agent) Registering job 286935. Type: watch-method for: android.widget.TextView.setTextcom.example.myapplication1105 on (Google: 8.1.0) [usb] # (agent) [286935] Called android.widget.TextView.setText(java.lang.CharSequence)(agent) [286935] Backtrace: android.widget.TextView.setText(Native Method) com.example.myapplication1105.MainActivity$1.onClick(MainActivity.java:36) android.view.View.performClick(View.java:6294) com.google.android.material.button.MaterialButton.performClick(MaterialButton.java:1119) android.view.View$PerformClick.run(View.java:24770) android.os.Handler.handleCallback(Handler.java:790) android.os.Handler.dispatchMessage(Handler.java:99) android.os.Looper.loop(Looper.java:164) android.app.ActivityThread.main(ActivityThread.java:6494) java.lang.reflect.Method.invoke(Native Method) com.android.internal.os.RuntimeInit$MethodAndArgsCaller.run(RuntimeInit.java:438) com.android.internal.os.ZygoteInit.main(ZygoteInit.java:807)(agent) [286935] Arguments android.widget.TextView.setText(Sending to the server :Y2FsbGVuZzpjYWxsZW5nMjAyMw==) (agent) [286935] Called android.widget.TextView.setText(java.lang.CharSequence, android.widget.TextView$BufferType)(agent) [286935] Backtrace: android.widget.TextView.setText(Native Method) android.widget.TextView.setText(TextView.java:5207) android.widget.TextView.setText(Native Method) com.example.myapplication1105.MainActivity$1.onClick(MainActivity.java:36) android.view.View.performClick(View.java:6294) com.google.android.material.button.MaterialButton.performClick(MaterialButton.java:1119) android.view.View$PerformClick.run(View.java:24770) android.os.Handler.handleCallback(Handler.java:790) android.os.Handler.dispatchMessage(Handler.java:99) android.os.Looper.loop(Looper.java:164) android.app.ActivityThread.main(ActivityThread.java:6494) java.lang.reflect.Method.invoke(Native Method) com.android.internal.os.RuntimeInit$MethodAndArgsCaller.run(RuntimeInit.java:438) com.android.internal.os.ZygoteInit.main(ZygoteInit.java:807)(agent) [286935] Arguments android.widget.TextView.setText(Sending to the server :Y2FsbGVuZzpjYWxsZW5nMjAyMw==, NORMAL) (agent) [286935] Called android.widget.TextView.setText(java.lang.CharSequence, android.widget.TextView$BufferType, boolean, int)(agent) [286935] Backtrace: android.widget.TextView.setText(Native Method) android.widget.TextView.setText(TextView.java:5250) android.widget.TextView.setText(Native Method) android.widget.TextView.setText(TextView.java:5207) android.widget.TextView.setText(Native Method) com.example.myapplication1105.MainActivity$1.onClick(MainActivity.java:36) android.view.View.performClick(View.java:6294) com.google.android.material.button.MaterialButton.performClick(MaterialButton.java:1119) android.view.View$PerformClick.run(View.java:24770) android.os.Handler.handleCallback(Handler.java:790) android.os.Handler.dispatchMessage(Handler.java:99) android.os.Looper.loop(Looper.java:164) android.app.ActivityThread.main(ActivityThread.java:6494) java.lang.reflect.Method.invoke(Native Method) com.android.internal.os.RuntimeInit$MethodAndArgsCaller.run(RuntimeInit.java:438) com.android.internal.os.ZygoteInit.main(ZygoteInit.java:807)(agent) [286935] Arguments android.widget.TextView.setText(Sending to the server :Y2FsbGVuZzpjYWxsZW5nMjAyMw==, NORMAL, true, (none)) (agent) [286935] Return Value: (none) |
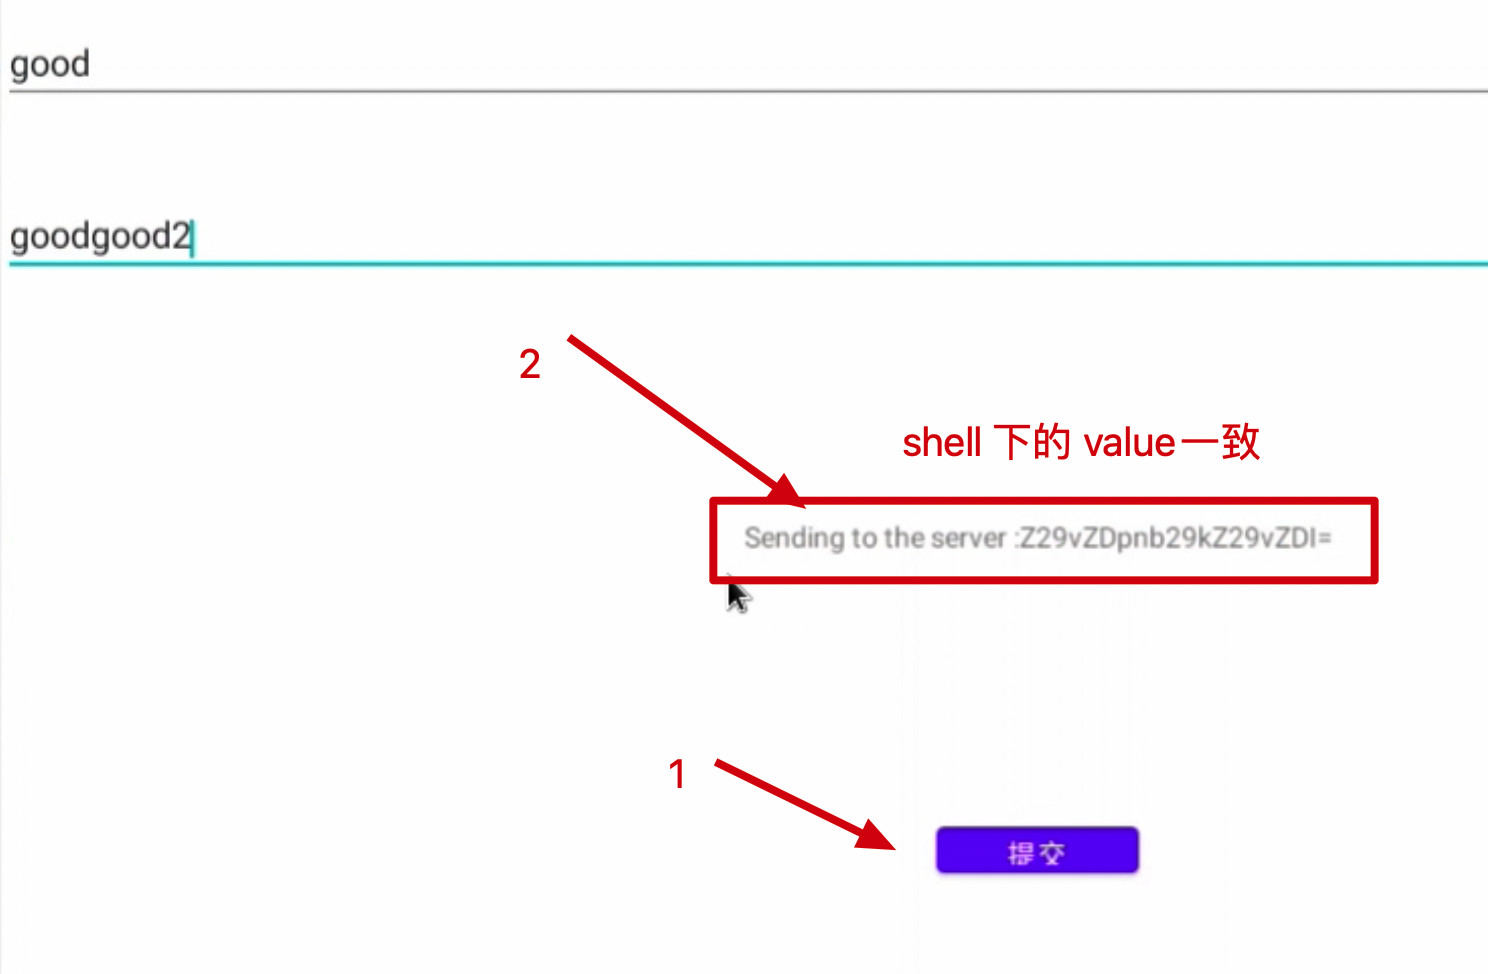
shell 中,命中的和 图中app界面一致.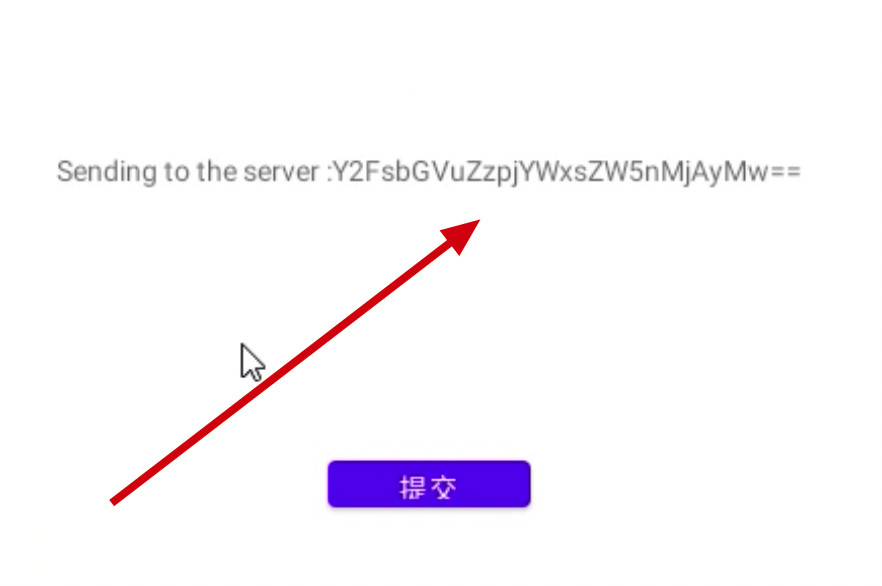
shell 中,命中的和 图中app界面一致.
string builder upponed ,
离我们数据更近的地方.
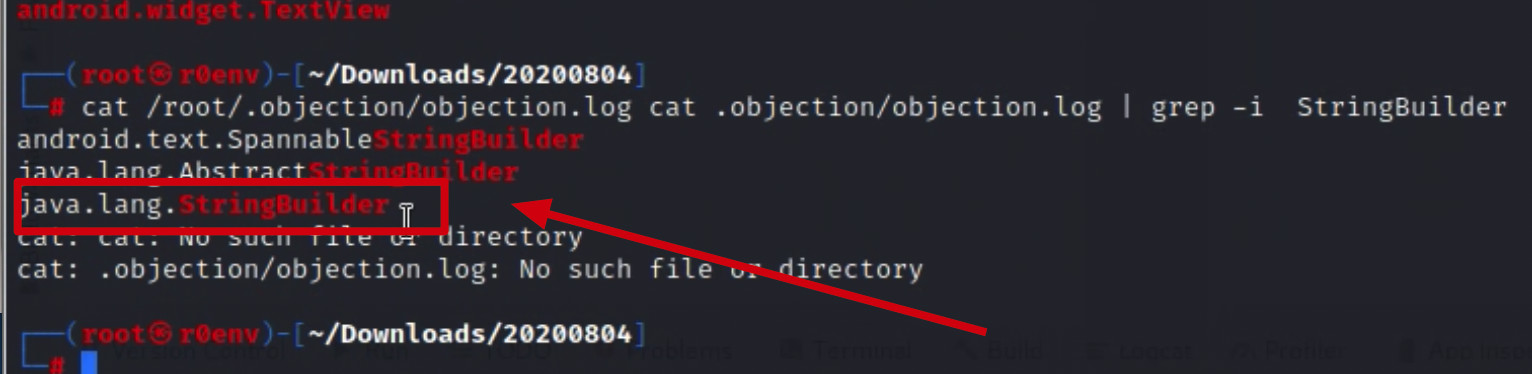
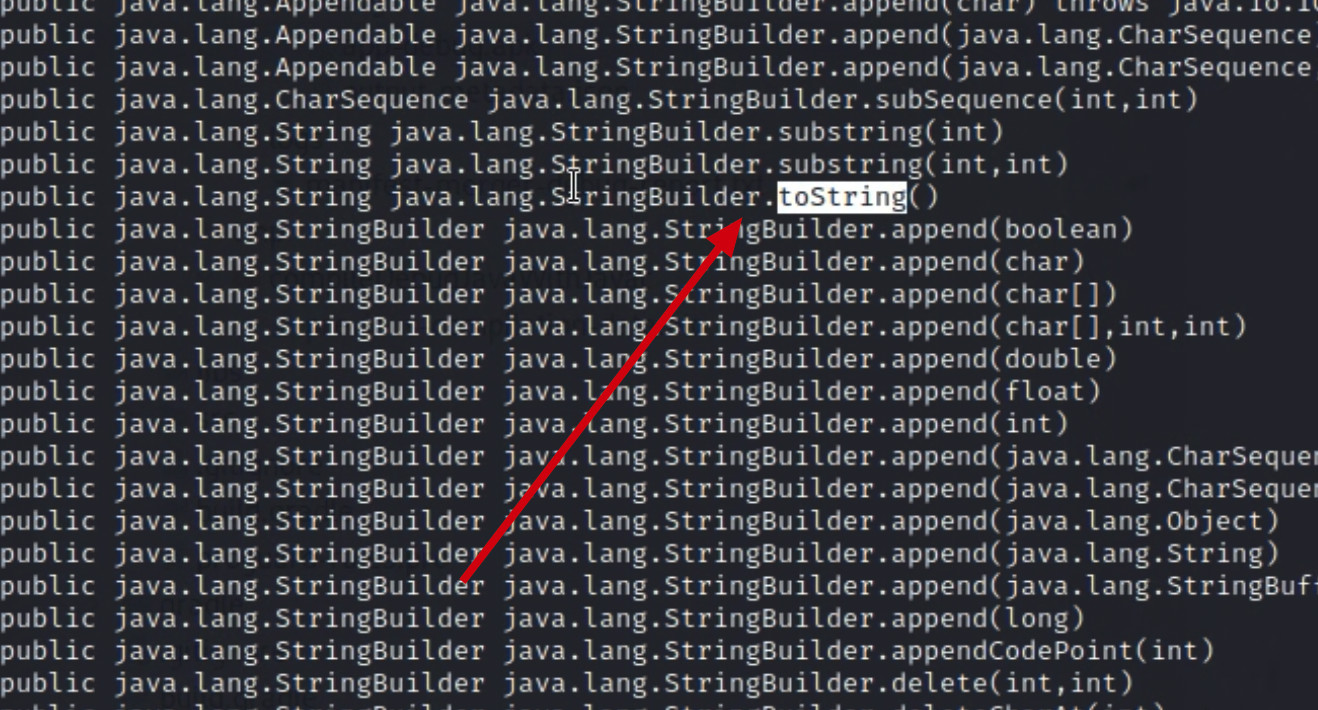
1 | android hooking list class_methods java.lang.StringBuilder |
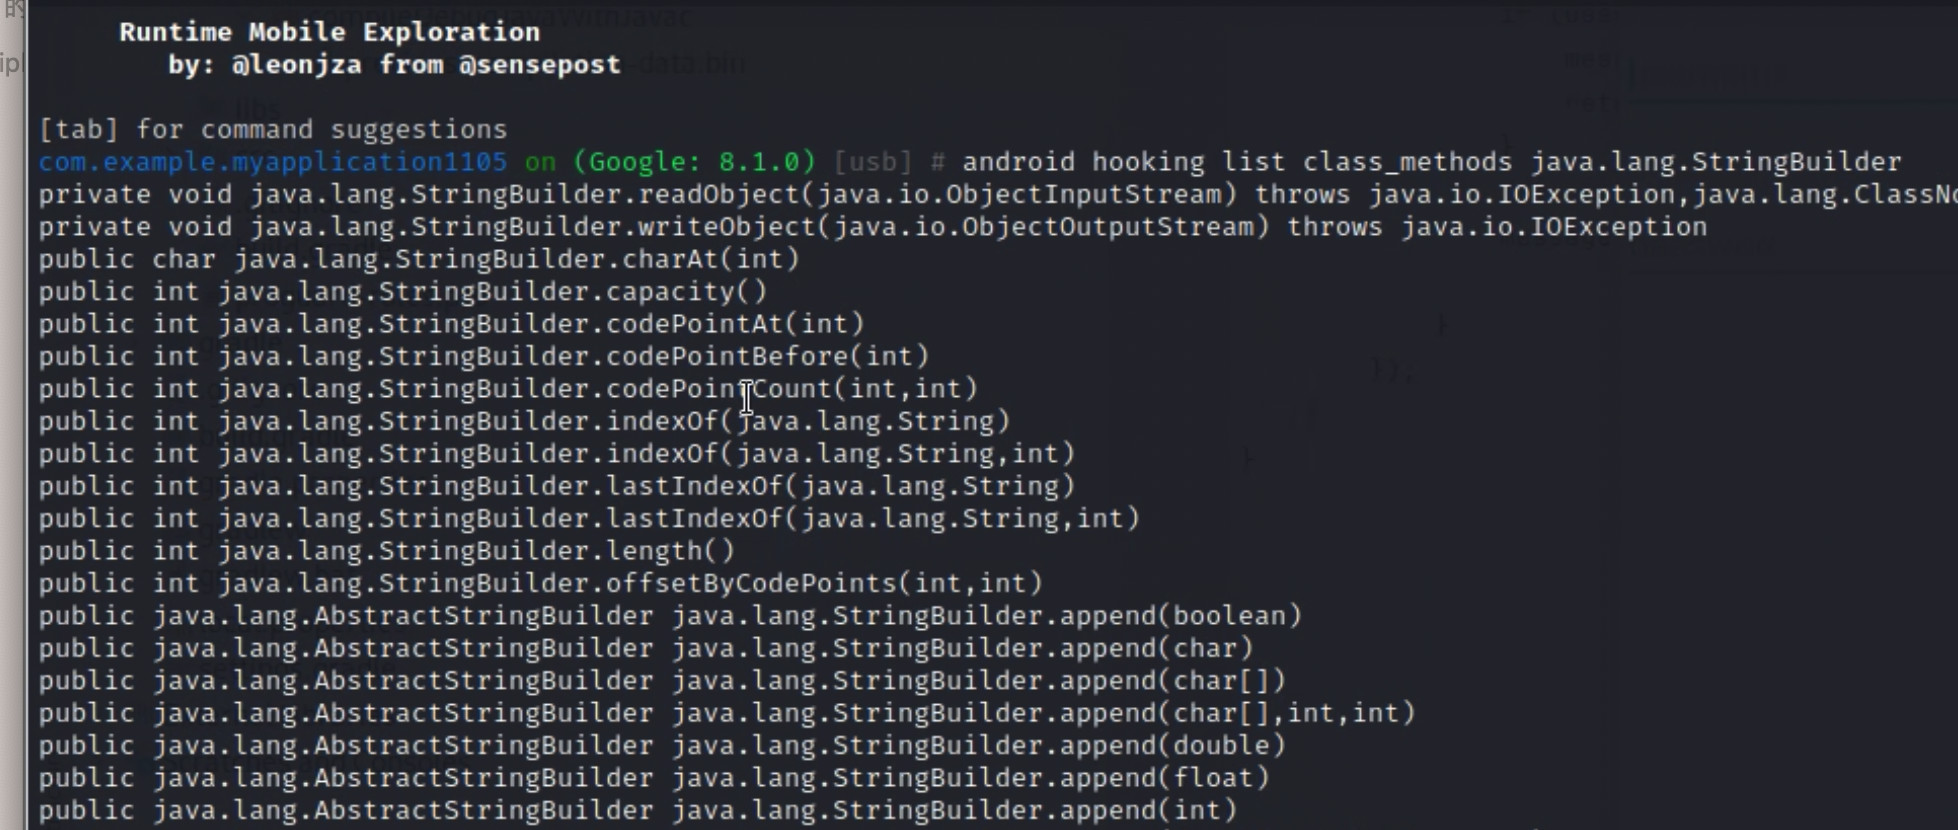
hooking watch class_method java.lang.StringBuilder.toString
终端中搜索 toString得到
1 | android hooking watch class_method java.lang.StringBuilder.toString --dump-args --dump-backtrace --dump-return |

界面输入 内容, app 奔溃.
watch class_method android.util.Base64.encodeToString
既然崩溃, 就hook base64. 离数据更近.
1 | android hooking watch class_method android.util.Base64.encodeToString --dump-args --dump-backtrace --dump-return |